
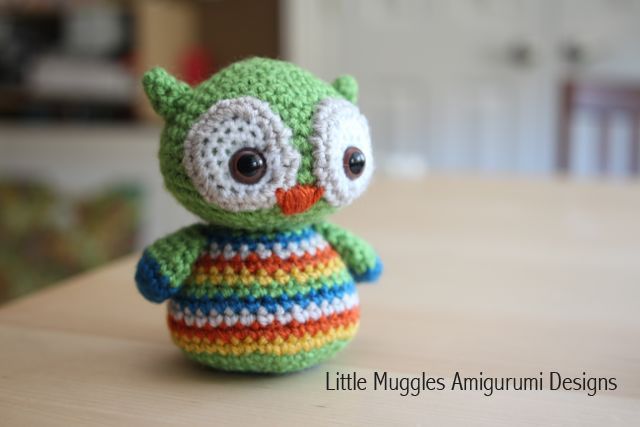
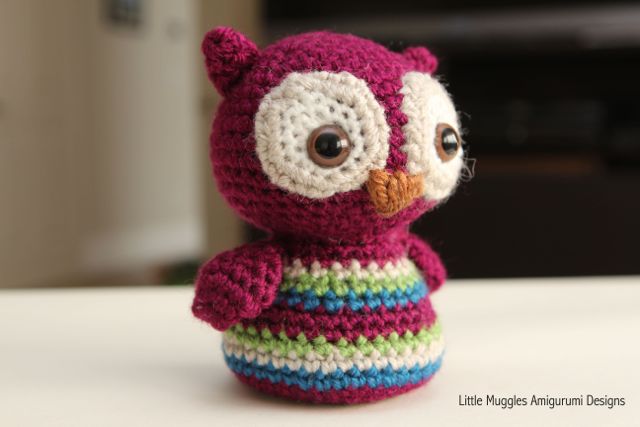
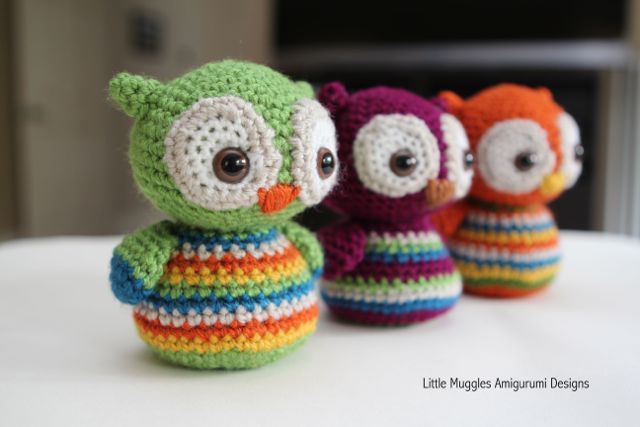
My baby owls are all made with Lion Brand Vanna’s Choice worsted weight yarns. They are approximately 4.5 inches high. Regarding the instructions for the body, I have indicated where the color change should start (should you wish to follow my example), but I will leave it up to you as to how you want to do your stripes. If you prefer my example, you can view my pictures and follow the color scheme accordingly. I like to change colors in every row but it sure can be tricky getting the color transition seam to look neat. I found a “Jogless stripe” tutorial that I found extremely helpful. Not only are there written instructions here, there is also a step by step video! Check it out if you’re interested! Please note that this character is made using single crochet spirals. I also highly recommend using tight stitches. The polyester pellets I use are fairly small and can “leak” out of the openings if the stitches are too loose. (For this reason, I do not recommend giving this doll to little children to play with) OK, here we go!
MATERIALS
Size USD3/3.25mm crochet hook
Medium/worsted weight yarn
Sport weight yarn in White (for eye circles)
12mm safety eyes
Blunt end tapestry needle
Polyester pellets
Polyester fiber fill
Stitch marker
HEAD
Rnd 1 – Start 6sc into magic ring
Rnd 2 – 2sc in each st [12]
Rnd 3 – (sc, inc) repeat around [18]
Rnd 4 – sc around [18]
Rnd 5 – (2sc, inc) repeat around [24]
Rnd 6 – (3sc, inc) repeat around [30]
Rnd 7 – (4sc, inc) repeat around [36]
Rnd 8 – sc around [36]
Rnd 9 – (5sc, inc) repeat around [42]
Rnd 10-14 – sc around [42]
Rnd 15 – (5sc, dec) repeat around [36]
Rnd 16 – (4sc, dec) repeat around [30]
Rnd 17 – (3sc, dec) repeat around [24]
Rnd 18 – (2sc, dec) repeat around [18]
Fasten off
EAR
Rnd 1 – Start 4sc into magic ring
Rnd 2 – sc around [4]
Rnd 3 – (sc, inc) repeat twice
Fasten off and leave a tail
BODY
Rnd 1 – Start 6sc into magic ring
Rnd 2 – 2sc in each st [12]
Rnd 3 – (sc, inc) repeat around [18]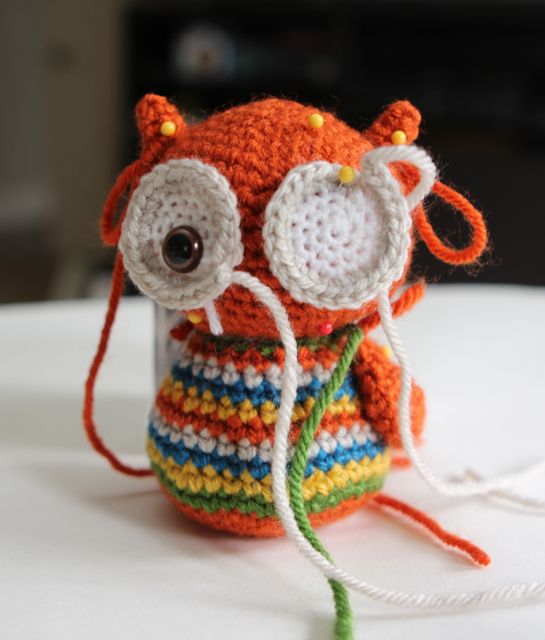
Rnd 4 – (2sc, inc) repeat around [24]
Rnd 5 – (3sc, inc) repeat around [30]
Rnd 6 – (4sc, inc) repeat around [36]
Rnd 7 – (5sc, inc) repeat around [42]
Change color and alternate a color for each row
Rnd 8-9 – sc around [42]
Rnd 10 – (5sc, dec) repeat around [36]
Rnd 11-12 – (sc around [36]
Rnd 13 – (4sc, dec) repeat around [30]
Rnd 14 – sc around [30]
Rnd 15 – (3sc, dec) repeat around [24]
Rnd 16 – sc around [24]
Rnd 17 – (2sc, dec) repeat around [18]
Fasten off and leave a tail
EYE PATCH
start with white sport weight yarn
Rnd 1 – Start 6sc into magic ring
Rnd 2 – 2sc in each st [12]
Rnd 3 – (sc, inc) repeat around [18]
Switch to light gray worsted weight yarn
Rnd 4 – (2sc, inc) repeat around [24]
Fasten off and leave a tail
WING
Rnd 1 – Start 6sc into magic ring
 Rnd 2 – 2sc in each st [12]
(Change color, if you are following my green owl design)
Rnd 3 – (sc, inc) repeat around [18]
Rnd 4 – sc around [18]
Rnd 5 – (sc, dec) repeat around [12]
Rnd 6 – (2sc, dec) repeat around [9]
Rnd 7 – (sc, dec) repeat around [6]
Fasten off and leave a tail
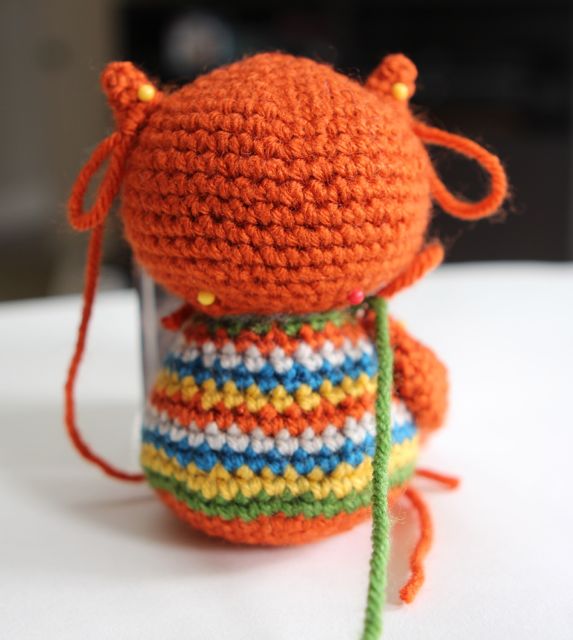
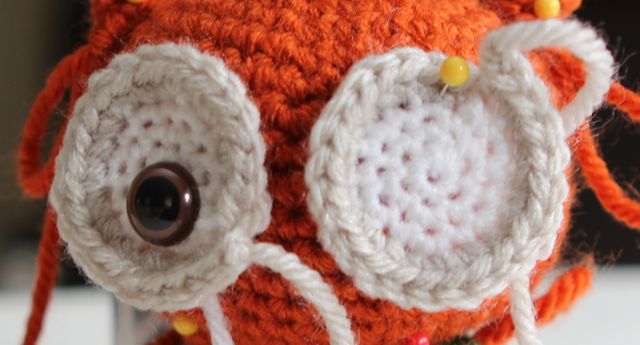
Assembly is fairly simple. Start by stuffing the head with fiber fill. Pin the ears and eye circles in place. See my picture to see where the eyes should be placed. The post needs to be pushed through the eye circle as well as the head before attaching the backing. In my example, I placed the eye post through an opening that is one row away from the center. When you are satisfied with the placement of all the parts, go ahead and sew the eye circles in place. Then reach inside the head and attach the eye backings. Next, sew the ears in place.
Fill the body with polyester pellets until it is about 3/4 full. Top it off by stuffing the rest of the space with fiber fill. This helps to keep the poly-pellets in place. Attach the head. There should be a seamless transition at the neck because both the head and body openings have the same number of stitches. The wings go on next. I usually sew the beak on last. You can also use a piece of felt in place of a yarn beak.
And that’s it! Please feel free to email me with any questions! littlemuggles@yahoo.com

Have admired the postings of your little muggles on facebook, I think they are adorable. Thank you so much for sharing this owl pattern, its gorgeous!
I love these owls!
I’m already searching for a way to sneak them into my already filled WIP-basket 😉
Just a little tip:
You can add a little piece of an old pantyhose (preferably the toe part)to the body in which you put the pellets. It reduces the chances of leaking 😉
I love the idea of the pantyhose. Could it be used in other crochet items stuffed with fiberfill? ty for sharing
I make a lot of dolls and frequently stuff poly fiberfill into panty hose when stuffing my dolls because it keeps the fiberfill from peeking out the holes in my crochet work…especially when using a large hook and chunky yarns.
That’s a great tip, Jeannie!! Thanks for sharing!!
Love these wish I had enough hours in the day and days in my lifetime to do all the patterns I have seen!!! LOL
You can always put your pellets in a little plastic bag first before putting them in an owl. Then you can be fairly sure no pellets will come out if the crocheting isn’t tight enough.
Thank you so much for the wonderful tip!!
Beautiful Owls, thank you for sharing.
OMYGOD these are just TOO ADORABLE and next on my list!! Thank you for sharing!! 🙂
These are ADORABLE.
Love it! Pinning it and checking out the rest of your patterns. Thanks for sharing your talent!
These are really cute for my grandkids! Thank you!
These are adorable and I will have to make a bunch of these for stocking stuffers for all five of my granddaughters! Thanks for being so generous with your pattern and step by step pictures.
What a fantastic idea! 🙂
Thanks, Amy!
OMG! So adorable! I thought I had enough owls in my life ~ but these are too cute to live without! I’m looking through my yarn stash right away and getting started on one tonight.
🙂 Be sure to send me a pic!! Everybody is very welcome for the pattern! It makes me so happy to see all these positive comments!!
These are gorgeous, thank you for the pattern. Great idea to use panty hose to contain the pellets.
very cute liked it a lot
Really cute! I shared this on my Facebook and already 5 people have asked me to make them… Thank you for the pattern!
You mentioned a video, where is that located?
Hi there! The video I mentioned is to help make stripes with smoother transitions during color changes. Usually there’s a very obvious “staircase” look to it. If you click on the “Jogless Stripe” tutorial, which is written in blue, it will link you to the appropriate site. There is a video on that site showing the technique. I hope that clarifies things!
These are the CUTEST!!! Thank you so much for sharing your pattern. My Grandkids will love him. Thumbs up to wonderful generous artists.
These are so cute. I’m anxious to do some. Thanks for sharing.
Do you use the yarn to sewing the eye circles to the head or do you use sewing thread?
I use the same light gray yarn that I used on the outer edge of the eye circle! I just leave an extra long tail when I’m done doing the edge and then use that to sew onto the head. 🙂
These are oh so cute! Thank you so much for your lovely pattern.
this is so adorable!! thank you! I love how it can be any color combo. perfect to make for my son and daughter.
Very cute! Thanks for sharing your pattern!
Whooo da thunk it? Prefect little birds to make and give for my
Secret Santa!
Beautiful owls!!!
A suggestion, it would be wonderful if you put your pattern on ravelry if you haven’t done so already.
Hi Rose! Thank you for the compliment! My pattern is indeed on Ravelry! I appreciate your thoughtfulness in making the suggestion! Have a lovely day!
How did you make the beak? I’ve done everything else, just need some saftey eyes and I can sew mine together.
In my example, I just used a tapestry needle and yarn – I picked three points, sewed a triangle, and went over the sides several times. Then from the bottom point I looped the yarn over the top “bar” of the triangle over and over until the triangle was filled in. You can try different things out until you find a technique that works for you!
i love them they are beutiful
Does the hook size make a ton of difference in the overall size of the owl? I currently have a 3.75mm hook and was wondering if it would make the owl a lot bigger?
Hi there! If you use a 3.75mm hook and the recommended worsted weight yarn, I don’t think it will make that much of a difference. Remember to keep your stitches relatively tight! 🙂 Happy crocheting!
Where do you do your increases and decreases, at the beginning and end of each row or just randomly in the row?
Greetings, Diane! My instructions will tell you when to make your increases or decreases. For example, if it reads 2sc,inc… that means you make a single crochet in 2 consecutive stitches and then you increase (make 2sc) into the third stitch. If it reads 4sc, dec…you would make a single crochet in 4 consecutive stitches and then sc2tog (decrease) as your next stitch. I hope that clarifies things! The numbers in the brackets at the end of each Round indicate the number of stitches you should have at the end of that round.
What is a magic ring?
Hello May, a magic ring is a very common technique when starting amigurumi pieces. Here is a link that may help you! http://www.planetjune.com/blog/tutorials/crochet-tutorials/
This website has a treasure trove of super useful crochet tutorials/techniques including step by step instructions and videos to help you with your crochet/amigurumi projects!
Such a sweetie! Thank you. :0)
se puede traducir la pagina…..me interesa en español….gracias.
These little owls are so cute and I love all your designs! Do we have permission to sell items made with your patterns?
Thanks Laura, and yes, you may sell your finished owls as long as you credit Little Muggles for the design and provide a link to where you got the pattern! Happy crocheting!
gracias por poner el patron son tan lindas!!y me quedaron hermosas !!!
me gusta su pagina me enviarian el patron del buho gracias
I wish I knew how to do anything like this! Owls are my favorite, I wish you had an etsy page cause I would buy them all, for real!!!
Thank you, Elbee! Yes, all the things on my Etsy page are patterns right now. Maybe you’d like to learn how to crochet? It’s actually not that hard! I learned from a book, before there were online blogs and tutorials! Give it a try! 🙂
I have just finished your wonderful owl ¡thanks a lot! for one of my grandchildren. He is 2-years old, and safety eyes are really difficult to find where I live, so I need ideas as to embroider? them on the white part for him not to swallow them (he will try, you can bet). But I think it is not going to be neat, and I don’t know what to do.
Greetings!What a wonderful grandma, to take the time to crochet for your grandchild! I found a website that might give you some ideas about how to embroider eyes. This is just one of many out there, so I hope you find one that helps you out! http://mochimochiland.com/2008/07/eye-eye-a-tutorial/ Good luck!
I’ve purchased all of the materials, and am ready to start, but the first instruction has me stumped; what’s a magic ring? Many thanks for your reply 🙂
Greetings! A magic ring is a very common way to start amigurumi pieces! It’s a great technique to learn. I will send along a link that will hopefully help you out with this! Let me know if you run into any troubles!! http://www.planetjune.com/blog/tutorials/crochet-tutorials/
Thank you, Amy!
!!!son todos ,hermosos(de ser posible)quisiera aprender atejer una brujita ….gracias
If you wanted to make them baby safe, you could sew on eyes made of felt or make one more small circle of black or brown and place them where you put the plastic ones. Just a thought since I have a little one putting everything in her mouth
Great idea, Ingrid! I’ve seen some people do exactly as you’ve suggested. Definitely safer if little ones are going to be handling them! Thanks for the tip!
Thank you for posting this cute pattern….. All my family want me to make them a cute owl now! Love it!
Cool! Maybe you can turn them into Christmas stuffers? 🙂
These are so cute. Thank you for sharing. 🙂
Thank you so much for this pattern! I just finished one (it’s maroon with cream, baby pink and blue/green stripes) and I absolutely adore it! I attached it to a lovey blanket that I crocheted and it is the perfect size. I used black yarn for the eye instead of using a plastic eye and stuffed the whole thing with stuffing instead of using pellets since it will be going to my baby niece due in November. I am definitely going to make more of these!
Thank you so much for the cute owl pattern. I made these for my daughter-in-laws owl theme baby shower. I put them in a flower pot with material looking like a birds nest with a small flower next to them. I also made one a little bigger to put in a diaper carriage. Everyone thought they were so cute. Thank you also for the tip for magic ring and “Joggles Stripe”.
You’re very welcome!! I hope you got some pictures of the creations that you described! What a wonderful mom you are to take the time to make your daughter in law’s shower extra special!! I’m sure your effort was greatly appreciated!!
Erg leuk ! Cute.
Thank you
Hello, so I love these owls and have already made one, and credited you at my local nursery, I have been asked to make a family of owls but was wondering how I would make them bigger for the mummy and daddy owls, these are for Christmas so are in lovely Christmas colours! If you could give me advice on making them bigger I would be much appreciated!
Greetings! The only advice I have about making them bigger is to use a thicker gauge yarn and a larger crochet hook? Good luck with your project! I bet they will turn out beautifully! Don’t forget to send along pictures if you can!
Loooove these!! Thank you for the pattern & for pattern in English. Have found too many offers in English, just to find the pattern itself, in a totally different language. <3 <3<3 owls!!!!
Am I so lucky that you can tell or show me how to make the magic ring?
So sorry for the late reply!
Here is a link to a page that has a magic ring tutorial! Good luck!http://www.planetjune.com/blog/tutorials/crochet-tutorials/
I am so enjoying myself! These patterns are fun and so easy. I have made them for my grandson and other children in the family and each and every one is loved and squeezed by all! Thank you for sharing,
You are very welcome!! I’m glad you like the pattern!
GENIA!!!!…me re encantó !!!!!!…voy a hacer un montón!!!! GRACIAAAAAAS!!!!
Thank you for the pattern. I love how my little owl turned out. I used cotton yarn.
I need help on making the head. I dont understand how to do the magic ring. could you please help me with that.
Thanks abby
Greetings! Here is a link to a website that can help you! The magic ring is quite common in amigurumi making and comes in quite handy! Good luck and please let me know if you have other questions. There are also plenty of other tutorials out there if you google it!
I have to try to make such a cute little owl 🙂 Thank you very much for the free pattern!!
wonderful!may thanks for the pattern!i love the color combo!
greetings!
So lovely , j’aime beaucoup
Hello Ami! Thanks for sharing this beautiful pattern! I just finished my first amigurumi little owl…loved the process and will be making more of your patterns for sure! I purchased the book Zoomigurumi so little lil quack is next.
I love your wonderful creations!
Thank you once again for a lovely pattern and good instructions. This was my first amigurumi crochet project and it has turned out a treat and I enjoyed doing it very much. Now I have to make more as I know all of my grandchildren will love it and want one of their own. Once again thank you for your generosity.
love it thankyou.
gracias por compartir.
Thanks for the pattern. Made one for my sister and blogged about your blog. http://www.veganlovlie.com/2014/02/my-new-crochet-project-owl-amigurumi.html
🙂
I am now fascinated by the world of amigurumis!
I am have an impossible time with the ears! I can’t see which stitch is which after the first round! Any suggestions? I must be doing something wrong.
Greetings, Brandy! Sorry for the delayed response! Are you still having trouble? Do you use stitch markers? That might help you out. If you cannot distinguish the stitches, maybe you could make slightly looser stitches? I’m not sure what else you can do..If you are still having trouble, let me know and I can email you in more detail. Please contact me at littlemuggles@yahoo.com!
Thank you for the pattern they are so cute!!
These are so cute, I am going to have to make some for the grandchildren. I collect owls so will be making some for myself as well. Thankyou so much for sharing the pattern
Adorable ces hiboux et puis quel joli travail bien soigné ! merci pour ce partage !
These are beautiful! I was thinking of making one and placing a bell in it so it was more of a rattle. Would I stuff just with poly fill if it is to be a baby toy? I am worried that they pellets would make it too heavy for a baby to pick up otherwise
Yes, stuffing it with polyfil will be perfect for a little one! I don’t think the pellets would be too heavy, but I’d be worried about the pellets getting out and being eaten. I love your rattle idea! Be sure to send me a pic! 🙂
Je vous remercie pour ce jolie modèle j’adore les hiboux je vais m’empresser de le faire dés que j’ai finis mes encours pour la communion de ma petite fille
I just love this pattern. I named my owl Miss Whoo Whoo who goes there. She is wearing a little crystal necklace and instead of making ears for her, I made a lovely hat.
I thought I’d looked everywhere but can’t find any reference to the sale of made items. Do you allow us to sell our finished owls?
Ik heb dit patroon via mijn tablet overgeschreven en ga deze tijdens mijn vakantie haken
en maak er een sleutelhanger van voor aan mijn tas.
Bedankt voor dit prachtige baby-uil patroon.
Gr. J
I need a huge favor. A friend of mine really wants one of these. I have no clue how to make one. “This green owl was made using Vanna’s Choice yarn in Fern, Sapphire Blue, Terracotta, Linen, and Mustard” this is the one I am looking at. I know this sounds weird but if someone can make this for me. I would pay them. Scott Bleau pox box 420 Healy Alaska. 99743. Please let me know if you can help me.
I’ve been saying that I’ll get busy and make some toys for the cancer hospital here in Cuenca, EC. These look to be the ticket. So darn cute.
Thanks. (Now where did I pack those hooks???)
I have a question about the ears. I am confused at the third row. It says sc, inc, repeat twice…but there are only 4 stitches. Am I to continue beyond the actual 3rd row to finish the third row in the instructions? 9sc in 4sc…9sc in 6sc…6sc in 4sc. Can you please shed some light? Also, do you have a book or something that I could purchase with the instructions for your lovely creations?
HI there! At the end of Row 2, you have 4 stitches. Row 3 indicates that you should make a single crochet in the first stitch, increase in the 2nd stitch (make 2 single crochets in this st), make a single crochet in the 3rd st, and increase again in the 4th stitch. HOpe that helps!
Thank you for your interest in my designs! I currently do not have a book solely with my designs. However, you can find a few of my patterns in the popular Zoomigurumi series, which is a compilation of patterns from different designers around the world.
Happy crocheting!
Heel mooi gedaan dat uiltje,
Zeer leuk voor te haken.
Gr.Maria
I love the Little Muggles Baby Owl. im going to make some for my friends in my sew bee we have every Thrusday. what a great job you have done. thanks for sharing.
Thank you for the pattern now I can make something for the wildlife rehab center I volunteer for. Our mascot is the Owl. Thank you again.
So cute! I have been knitting and sewing for a long time but just started crocheting recently (a granny square blanket). I love owls and will have to make dozens of these for my littles and I to play with!
Love these! will do the own first and then may have to buy the “Lil Quack” My granddaughter LOVES ducks!
Saw a tip on Dedri’s blog “Look at What I Made” http://us6.campaign-archive2.com/?u=43cd232a6a074efe62e3b7797&id=7c16363f7c&e=860cee6675 (don’t have link to exact page, but it’s on her blog – for her stuffed amigurami. So stuffing doesn’t “leak” out (esp. for little ones), use clean old hose/pantyhose….and put your stuffing in those and knot ends…can still stuff items very well, but it won’t leak out…very clever. She calls them ‘stuffing bombs’ and she uses for all her Amigurami Amish Puzzle Balls
Love the pattern, I put dried beans in bottom instead of pellets and added a witches hat in preparation for Halloween! So cute!!
Oh I love these little owls!! They are so cute!!! Cant wait to try em.
I have a lot of left over yarn so now I can use it for these adorable owls … thank you so much for sharing the pattern
I made 2 of these adorable owls for my grandaughters. The 2 yr old says ” this is my favorite ” thank you for such fun patterns
You are very very welcome! What a wonderful Grandma you are!! Those are some lucky little girls there! 🙂
Beautiful, I do this little muggles and I will want to do little frog:)
I can’t understand why it curls when you put all the st’s in and around is suppose to curl and how do you keep it so tight when you put the head in the body to sew together it
It shouldn’t be curling…please email me if you continue to have troubles. You may be reading the instructions wrong…
SUPER CUTE!!♡♡♡♡♡♡♡♡♡
merciiiiiii
c’est gentil
<3
he’s so cute. am making him today. I like the idea of using the pellets so they are really squishy but I would also be wary of little kids with them. have you ever thought of making a bag the size of the head and body out of an old nylon and then pouring in the pellets? I use tulle as a liner because it comes in different colors and I don’t like seeing the stuffing through the stitches. just a thought. I have never tried the pellets but will be doing so in another project. thanks so much for sharing this little guy with all of us.
Someone else also mentioned the great idea of using the foot of a pair of nylons to make the bag. Ingenious! Using tulle is a great idea too! Thank you for sharing it – I bet a lot of people will benefit from your creativity!
Super adorable! I’m going to make some for my friend’s baby shower, which is owl-themed. I’d like her baby to be able to play with them at some point, so do you have any instructions/tips on fully crocheting the eyes instead of using buttons or hard pieces?
Thank you for sharing this cute pattern!
Kristine
Hi Kristine! How did your owls go? I commend you for thinking ahead in keeping the little ones safe! I don’t have any tips on how to crochet the eyes..I would probably use a tapestry needle and sew them on like I did the nose.
Thank you so much for the cute pattern Amy,God bless you
(\ /)
( * *)
c(‘)(‘)
*´¨)
¸.•´¸.•*´¨) ¸.•*¨)Tammy Go.
I loved making these little owls. they are adorable and I will give them to my twins who’s birthday is coming up. Thanks for this great pattern! I loved it and the way it turned out! You are really good at what you do. Thanks
Thank you for being so generous and sharing this pattern. I am having troubles making a jogless stripe, I have tried a lot of different tutorials and still can’t figure it out. What would happen if I joined the rows instead of using the spiral method? I Would appreciate your opionion before I remake it for the 5th time!
Shauna
Hi Shauna, So sorry for the delayed response. I can share the link to the tutorial that I like to use. The stripes are never completely even for me either..http://needlenoodles.com/home/node/139 I’ve never tried joining the rows vs. spiral..I’m sorry I couldn’t tell you what would happen and how to adjust the pattern for it! Good luck!
Hi here! I am fairly new to amigurumi…I am doing your cute little owl as my beginner’s project. I am currently doing the head. I am not sure how you get 18 stitches in the third row..if you have 12 stitches from the previous rows, single crochet and increase that gives you 15 stitches. I am confused! Hope I can get some help!
In the second row, you end with 12 stitches. For the 3rd row, you will be making an increase in every other stitch. You increase 6 times and that’s how you end up with 18 stitches at the end of the round. I hope that helps you! Please email me if you have further questions! littlemuggles@yahoo.com
Hello Amy!
Thank you! I know where I went wrong…I was actually reading the pattern wrong *sigh* thank you for your response nevertheless! 🙂 half of the head is done! 🙂
Hi Amy, love your owls and looking forward to trying them. Wondered what worsted wool weight yarn is. I have not heard of it before. many thanks Marian
Hello Amy,
Thank you very much . I made them for my little girl, they are so cute.
I found these when searching Pinterest for owls. My daughter is expecting in March and she has started collecting owls for her precious little one. Thank you for sharing!
thanks sooo much ….i love these cuties…mmmmmmmm
I found this pattern and made on for my Children’s Lit class, it is based Harry Potter. I gave it to my professor as the proverbial apple. I got extra points for my house (Go Hufflepuff.) Thank you for being so kind and sharing this pattern with us.
I came across your pattern while looking for a hedwig (Harry Potter) pattern. Im making her in white and will do the black flecking with embroidery floss. Its for my friend who is expecting soon. I’m just doing the head and attaching a blankie to the bottom instead of the body. Thanks for such a cute easy pattern.
A little tip regarding plastic pellets, I use stockings as a “bag” for the pellets inside my shapes and stitch it up really well. I also secure the stitching with fray stopper, that way the pellets can’t wiggle out between the stitches!
Thank you so much for this pattern. I do not crochet much but this pattern seems friendly so I want to try it for my Niece, who has a baby coming in a couple of months. I do want to try and put a rattle in the bottom.
Thankyou so much for this great pattern
Love your patterns so much and this Owl is so adorable and wznted to make. Well today someone happen to spot something g I had made for a gift and asked if I could make an OWL. so glad I knew exactly whst I would show … I usually give a choice of three designs BUT somehow I knew she would choose yours..so excited. Also thanks for info about changing colors. You are so talented I could never do without a pattern so I appreciate you.
I’m from Poland. My English is poor but I understand everything what is in your instructions. It’s really simple. Thank you 😄
Not only do I love the characters you created, but the easy read of your instructions. Thank you for sharing.
Thank you for sharing. I have been doing amigurumi for a while oand only now have discovered your cute owls. I prefer to use 4ply (? Sock/baby) cotton and 2.5 hook. No worries about pellets leaking. If possible even cuter. Also I make the body and head in one piece by continuing on and reading the head pattern backwards and stopping at 12 stitches and pulling up to make a nice flat finish. I hate sewing up! Thanks again.
Ay!!! Que lindos. Gracias por compartir. Ah! Y gracias por el consejo sobre la media. Buen día a todas las adictas al amigurumi.