
Greetings, fellow amigurumi enthusiasts!
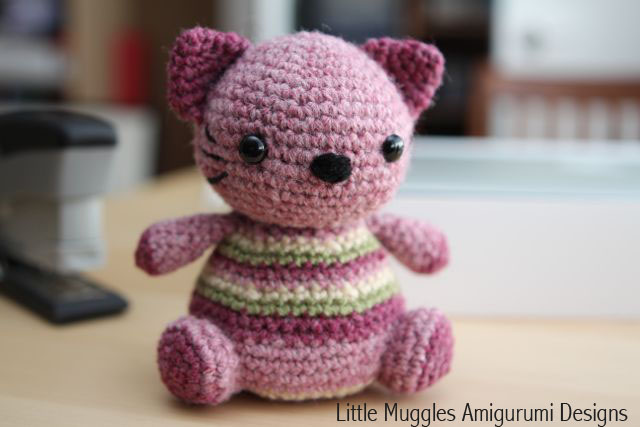
I present to you my Violet Kitty beanbag pattern! This character was made mainly with Lion Brand’s Wool-Ease yarn, a somewhat finer worsted weight yarn. It was easy to get nice tight stitches using this, which is important since I didn’t want any leakage of poly-pellets from the body! As always, there can be a great variation in size and appearance of your little kitties depending on your yarn, hook, and color preferences! I’ve indicated how I’ve made my character, including where I made all of my color changes. I look forward to seeing your own creative twists!!
Enjoy the pattern and Happy Crocheting!!!
-Amy
MATERIALS
Size USG6/4.00mm crochet hook
Worsted weight yarn
- Light pink (Lion Brand Wool-Ease in Dark Rose Heather)
- Dark pink (Lion Brand Wool-Ease in Rose Heather)
- Beige (Vanna’s Choice in Beige)
- Green (Vanna’s Choice in Dusty Green)
- Black
9mm safety eyes
black embroidery thread
fiber fill
stitch marker
yarn needle
HEAD
Rnd 1: Make 6sc into magic ring
Rnd 2: inc in each st [12]
Rnd 3 : (sc, inc) repeat around [18]
Rnd 4 : sc around [18]
Rnd 5: (2sc, inc) repeat around [24]
Rnd 6: (3sc, inc) repeat around [30]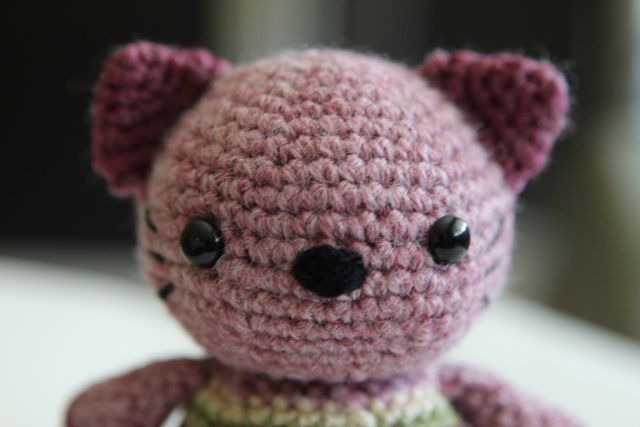
Rnd 7: (4sc, inc) repeat around [36]
Rnd 8: sc around [36]
Rnd 9: (5sc, inc) repeat around [42]
Rnd 10-12: sc around [42]
Rnd 13: (6sc, inc) repeat around [48]
Rnd 14: (6sc, dec) repeat around [42]
Rnd 15: (5sc, dec) repeat around [36]
Rnd 16: sc around [36]
Rnd 17: (4sc, dec) repeat around [30]
Rnd 18: (3sc, dec) repeat around [24]
Fasten off and leave a tail
EAR
Rnd 1: Make 4sc into magic ring
Rnd 2: inc in each st [8]
Rnd 3: sc around [8]
Rnd 4: (sc, inc) repeat around [12]
Rnd 5: (2sc, inc) repeat around [16]
Fasten off and leave a tail
BODY
Start with dark pink yarn
Rnd 2: inc in each st [12]
Rnd 3 (beige): (sc, inc) repeat around [18]
Rnd 4 (light pink): (2sc, inc) repeat around [24]
Rnd 5 (dark pink): (3sc, inc) repeat around [30]
Rnd 6 (light pink): (4sc, inc) repeat around [36]
Rnd 7 (beige): (5sc, inc) repeat around [42]
Rnd 8 (light pink): (6sc, inc) repeat around [48]
Rnd 9-11 (light pink): sc around [48]
Rnd 12 (dark pink): sc around [48]
Rnd 13 (dark pink): (6sc, dec) repeat around [42]
Rnd 14 (green): sc around [42]
Rnd 15 (beige): (5sc, dec) repeat around [36]
Rnd 16 (light pink): sc around [36]
Rnd 17 (dark pink): sc around [36]
Rnd 18 (green): sc around [36]
Rnd 19 (beige): (4sc, dec) repeat around [30]
Rnd 20 (light pink): (3sc, dec) repeat around [24]
Rnd 21 (dark pink): sc around [24]
Fasten off and leave a tail
ARM
Start with dark pink yarn
Rnd 1: Make 4sc into magic ring
Rnd 2: inc in each st [8]
Rnd 3: (sc, inc) repeat around [12]
Change to light pink yarn
Rnd 4-6: sc around [12]
Rnd 7: (2sc, dec) repeat around [9]
Rnd 8: sc around [9]
Rnd 9: (2sc, dec) twice, sc [7]
Rnd 10: sc around [7]
Fasten off and leave a tail
FOOT
Start with dark pink yarn
Rnd 1: Make 6sc into magic ring
Rnd 2: inc in each st [12]
Rnd 3: (sc, inc) repeat around [18]
Change to light pink yarn
Rnd 4: sc around [18]
Rnd 5: (sc, dec) repeat around [12]
Rnd 6: (2sc, dec) repeat around [9]
Fasten off and leave a tail
TAIL
Start with dark pink yarn
Rnd 1: Make 4sc into magic ring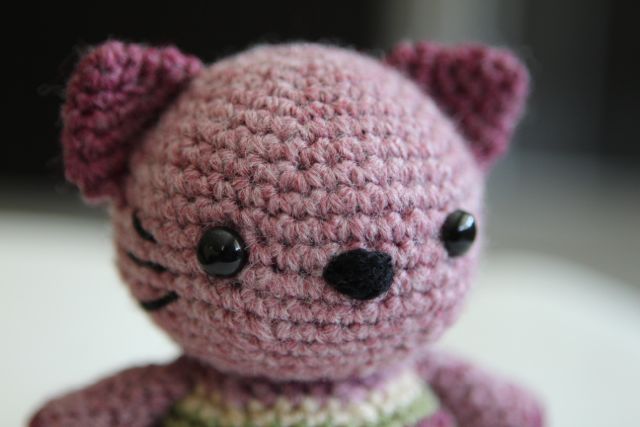
Rnd 2: inc in each st [8]
Rnd 3-4: sc around [8]
Change to light pink yarn
Rnd 5-7: sc around [8]
Change to dark pink yarn
Rnd 8-10: sc around [8]
Change to light pink yarn
Rnd 11-13: sc around [8]
Fasten off and leave a tail
ASSEMBLY
Stuff the head with fiber filland place the safety eyes between Rnds 10 and 11, with 8 stitches between them. Attach the ears, making sure they are symmetrical with the eyes. Sew the nose with black yarn and then the whiskers with black embroidery thread. The yarn ends and thread ends should be tied securely inside the head. Affix the backings to the safety eyes.
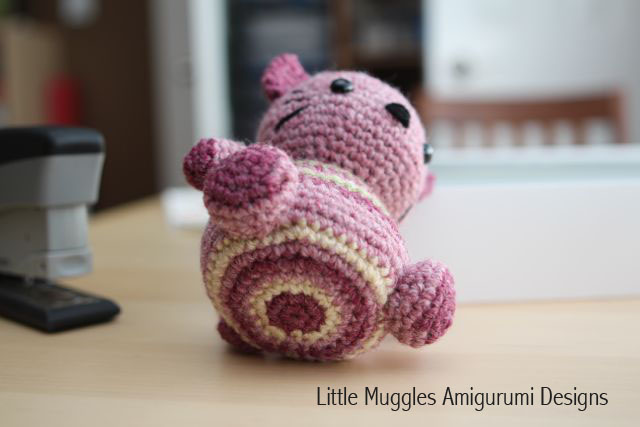
Fill the body with poly pellets(or beans) until about 3/4 inch from the top. Stuff the remaining space with fiber fill. (NOTE: Someone suggested using pantyhose to make a small bag for the poly pellets before putting into the body. This prevents the pellets from “leaking” out of the body should your stitches be too loose.) Attach the body to the head. The body and neck should have a seamless transition when you are done since there are an equal number of stitches at each opening.
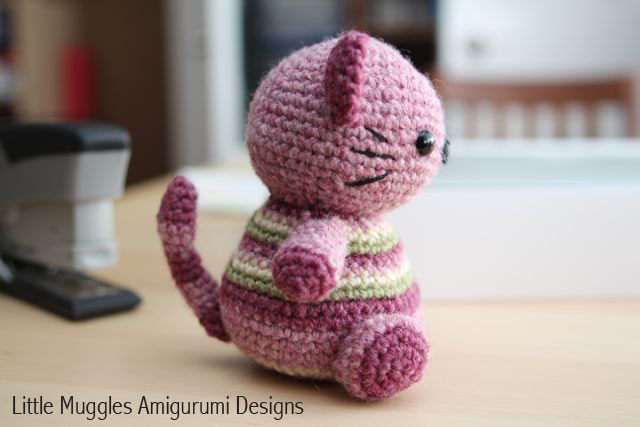
In my example, I did not stuff the arms or tail before attaching. The feet were stuffed with a little bit of fiber fill. Note the symmetry of the limbs before attaching and make sure the feet do not interfere with the balance of your doll when it is placed on a flat surface. Same with the tail.
Thank you so much for your free patterns. I love them all
Thank you for the new pattern, I have made all your free patterns and I have purchased several more, I love your work. Waiting to see how your Dragon pattern unfolds.
Thanks to everyone for all the nice comments and thank you Rondel for your interest in my designs!! I am working on the Dragon right now, as a matter of fact!! My apologies for making everyone wait and I thank you for your patience!
Thank you very much for sharing this pattern. I love your designs!!!
This is so adorable 🙂 Thank you! Rhondda
thank you for the lovely paterns’ and ideas
This is cute! Thank you for sharing. 🙂
I usually knit, but going to attempt to crochet these kitties, for my friends with grand kids. These are adorable!
Good luck! Let me know if you run into any troubles and I’m happy to help!
Love this…my lol girl has the back to school blues and I want to make one stuffed with lavender …thank you for the pattern so sweet
I hope the owl helps to make your little girl much happier about having to go back to school!! You could even add a keychain and hang it on her backpack! Good luck!
OMYGOD I LOVE it and your other little animals, SO ADORABLE! I can’t wait to make one, thank you for sharing! 🙂
Thank you Ann, you’ve got me back into crocheting again and I’m loving it! I just finished the owl and your instructions are very easy to follow,even though I used the wrong size crochet hook I think he turned out do cute.( I’ll send you a pic). And now of course I have to make that adorable kitty. Thanks for the pattern!
I can’t wait to see your pictures!
I’m sorry but I don’t know what you mean by “magic ring”. I think this is a darling pattern, but I need to know what is a “magic ring”. thanks.
A magic ring is a common way to start out amigurumi body parts. Here is a link to sites that may help you:
http://ambassadorcrochet.com/2012/02/14/how-to-make-a-crochet-magic-ring/
http://www.planetjune.com/blog/tutorials/crochet-tutorials/
Good luck!
That’s fantastic. I’ve never really liked crocheting in the round because it is a pain to start and I would always have a hole. This is great. Thanks so much.
This is so cute! Thank you so much for sharing your pattern 🙂
It´s funny, I designed Violette the Kitty few months ago.
You can see here
http://romanemone.canalblog.com/archives/2013/05/14/27152860.html
Greetings!! What a funny coincidence, right?? I love your Violette kitty! She’s so pretty and adorable! I designed my kitty in the beginning of June and it started out as just a head and a body. I was going to stop at that but then decided to add the limbs. My husband named her because of her coloring.. he thought the ears looked purple and came up with the name, which I thought was cute. Great minds think alike!
Thank you for the very very cute cat! I love making soft toys. And I look forward to making this one.
What a cutie!
I love the feel of the “bean bag” but hate when they come dribbling out. I started using the nylon socks you get at the shoe store, the free ones they want you to use. They move wonderfully and hold all those pesky pellets inside where they belong.
Fantastic idea!
Yes, it´s funny, I supposed for the name.
Me, it´s because my real cat is called Violette.
Your Violet is a little bit as mine, with some more weight 😉
thank you for your free pattern.. it is so adorable…
thank you so much for your generousity 🙂
Lovely Projects !!!! Can i use another yarn ? Any suggestions?
Any worsted weight yarn will do! If you choose a bulkier yarn, your doll will just come out a bit bigger and vice versa with a thinner yarn! Just make sure that whatever yarn you choose, you should make tight stitches to keep the polyester pellets from falling out. Good luck!
I loved so much this pattern that i started crocheting the kitty as soon as i printed it.
I have a question with the foot.
You wrote this:
FOOT
Start with dark pink yarn
Rnd 1: Make 6sc into magic ring
Rnd 2: inc in each st [12]
Rnd 3: (sc, inc) repeat around [16]
My question is with those increases in rnd 3 i get 18 stitches. Is that right?
Gaby
Hi Gaby! Yes, you are right, the number should be 18 and not 16! Sorry for the confusion! I will fix that right away!
After I fixed the 18, I took a more careful look at the instructions for the foot. I was surprised to see that there were some other errors as well! I took out my crochet hook and just made a foot and I updated the the pattern. The funny thing is, there have been others who have already made the kitty and no one mentioned having any problem with the foot! They have even sent me pictures of their kitties, which all came out very nice! ?? I’m a bit confused, but if there are any other questions regarding the foot, please contact me!!
Thank you for the corrections. it looks very nice but without the corrections it was going to have very big feet :))
I´ll try to take a picture when it´s finished and post it.
Gaby
I do it.
I lave it very mutch.
thank you/
Excellent pattern – thank you sooo much!
Here is my first ‘Violet’ – Tiny Tina ♥
Martha Vitez
@Martha’s World of Crocheted Critters
https://www.facebook.com/photo.php?fbid=460332334079853&set=a.370779766368444.1073741852.361492330630521&type=1&theater
Hi Martha! Your little kitty is just beautiful!! Thank you for sharing your picture with me! You brightened my day!
She’s so cute! Thankyou for sharing!
Here is my violet kitty. https://www.facebook.com/photo.php?fbid=10201946717295783&set=a.1054657252912.2009154.1420250554&type=1
Thank you so much for the pattern.
Your kitty is adorable!! Wonderful job!!
Amy, I have a question. After my daughter plays with it, (she adores it absolutely), the bottom of the kitty turns into the shape of a ball, rather than stays flat like in your picture. Is there anything I can do to make it stay flat? Thank you so much.
Hi YuanPei,
My apologies for such a late response!
Hmmm what to do to make the doll stay flat… If you stuff it very firmly, it might help it hold its shape a bit better. Or maybe you can insert a stiffcardboard circle into the doll as you’re making it and that would help to hold it’s shape too. Other than that, I’m not sure what else you can do. GOod luck!
What a lovely kitty! And the directions are so clear than even I, a Spanish speaking crocheter, have understood everything at the first reading. So, as far as I’m concerned, you’re a great designer and a great teacher. Thank you so much, Amy <3 !!!
I have one question though: Is it possible to subscribe to your posts? ?ve been looking for the 'subscribe' button but have not found it 🙁
A hug and two kisses, (the Spanish way to say 'bye')
Thank you for sharing your creativity! You are so kind, and so appreciated!
Amy, it’s very, very, very cute!!! Thank you to share the pattern!!!
Muchas gracias por los patrones gratuitos, están preciosos 😍😍