
MATERIALS
- Size USG6/4.00mm crochet hook
- Worsted weight yarn [I used Vanna’s Choice in Beige, Kelly Green(shell), Dusty Green(“belly”), and Fern(polka dots)]
- 9mm safety eyes
- fiber fill
- stitch marker
- yarn needle
ABBREVIATIONS
- st – stitch
- sc – single crochet
- inc – increase (2sc into stitch)
- dec – decrease (sc 2 stitches together)
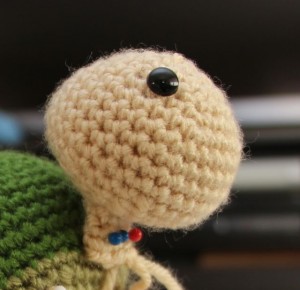
HEAD
use beige yarn
Rnd 1: 6sc into magic ring
Rnd 2: 2sc into each st [12]
Rnd 3: (sc, inc) repeat around [18]
Rnd 4: sc around [18]
Rnd 5: (2sc, inc) repeat around [24]
Rnd 6: (3sc, inc) repeat around [30]
Rnd 7-10: sc around [30]
Rnd 11: (3sc, dec) repeat around [24]
Rnd 12: (2sc, dec) repeat around [18]
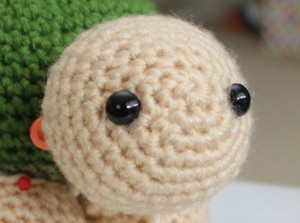
**Using my picture as a guide, position your safety eyes and attach the backings at this point. Also start stuffing the head. If you wait until the end, the neck opening will be too small to comfortably stuff the head and it will definitely be too small to attach the backings to the eyes! The head should be stuffed until it is nice and firm but you do not need to stuff the neck at all.**
Rnd 13: (sc, dec) repeat around [12]
Rnd 14: (sc, dec) repeat around [8]
Rnd 15-18: sc around [8]
Leave a long tail for attaching to head
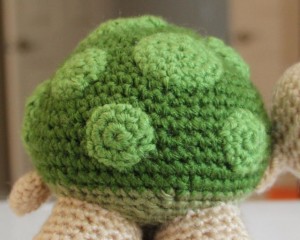
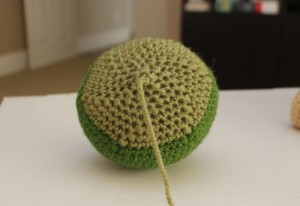
SHELL
The shell is constructed from the top down.
use Kelly Green yarn
Rnd 1: 6sc into magic ring
Rnd 2: 2sc into each stitch [12]
Rnd 3: (sc, inc) repeat around [18]
Rnd 4: (2sc, inc) repeat around [24]
Rnd 5: sc around [24]
Rnd 6: (3sc, inc) repeat around [30]
Rnd 7: (4sc, inc) repeat around [36]
Rnd 8: (5sc, inc) repeat around [42]
Rnd 9: sc around [42]
Rnd 10: (6sc, inc) repeat around [48]
Rnd 11: sc around [48]
Rnd 12: (7sc, inc) repeat around [54]
Rnd 13: sc around [54]
Rnd 14: (8sc, inc) repeat around [60]
Rnd 15-16: sc around [60]
Rnd 17: (8sc, dec) repeat around [54]
Change to Fern yarn color
Rnd 18: (7sc, dec) repeat around [48]
Rnd 19: (6sc, dec) repeat around [42]
Rnd 20: (5sc, dec) repeat around [36]
Rnd 21: (4sc, dec) repeat around [30]
Rnd 22: (3sc, dec) repeat around [24]
Rnd 23: (2sc, dec) repeat around [18]
**Stuff the shell at this point and make sure it is nice and firm before you fasten off your stitches at the end.**
Rnd 24: (sc, dec) repeat around [12]
Rnd 25: (dec) repeat around [6]
Fasten off
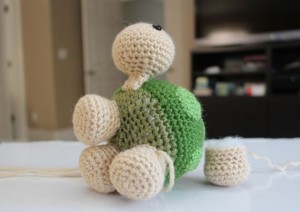
FOOT (make 4)
Rnd 1: 6sc into magic ring
Rnd 2: 2sc into each st [12]
Rnd 3: (sc, inc) repeat around [18]
Rnd 4: (2sc, inc) repeat around [24]
Rnd 5-6: sc around [24]
Rnd 7: (2sc, dec) repeat around [18]
Rnd 8-10: sc around [18]
Leave a tail for sewing onto body
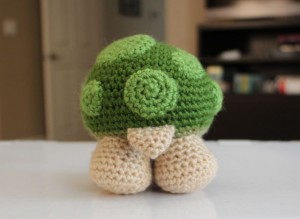
TAIL
Rnd 1: 4sc into magic ring
Rnd 2: 2sc into each st [8]
Rnd 3: (sc, inc) repeat around [12]
Rnd 4-5: sc around [12]
Leave a tail for attaching to body
POLKA DOTS (optional)
For my turtle, I made 3 different size polka dots and placed them randomly on the shell.
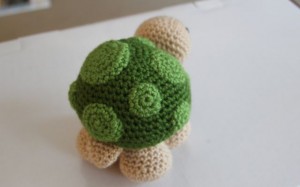
Large Polka Dot (I made one)
- Rnd 1: 6sc into magic ring
- Rnd 2: 2sc into each stitch [12]
- Rnd 3: (sc, inc) repeat around [18]
- Rnd 4: (2sc, inc) repeat around [24]
- Fasten off and leave a long tail for attaching
Medium Polka Dot (I made 3)
- Rnd 1: 6sc into magic ring
- Rnd 2: 2sc into each st [12]
- Rnd 3: (sc, inc) repeat around [18]
- Fasten off and leave a long tail for attaching
Small Polka Dot (I made 5)
- Rnd 1: 6sc into magic ring
- Rnd 2: 2sc into each st [12]
- Fasten off and leave a long tail
ASSEMBLY
You have already stuffed your turtle’s head and body at this point. Now it is time to attach the two together! First, sew the neck opening closed. Using the above pictures as guides, position the head and neck against the body and pin it into place. You will need to sew the entire back of the neck onto the shell to maintain the upright posture of the head. If you only sew the bottom of the neck in place, the head will be top-heavy and will just fall forward.
After the head is attached to the body, you are ready to attach the feet. Pin each foot in place and make sure they are all symmetrical. One by one, sew each foot to the underside of the shell. Be patient and neat in making your stitches! You want everything to come out smooth and nice!
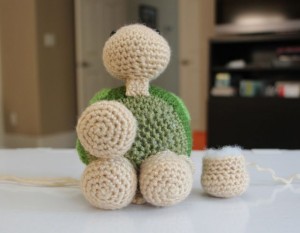
Next, attach the tail to the back. You are done with your basic turtle!!
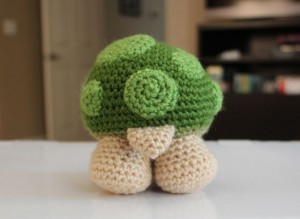
You can now add your own creative designs and touches! Sew on polka dots, felt embellishments, tie ribbons, bows, etc….!
Congratulations!! Now go take some pictures of your adorable creation! Send them along to me at LittleMuggles@yahoo.com or you can post your pictures on my Facebook page here!
Remember to include your
- Name
- your turtle’s name
- your website/blog (optional)
- where you are from!
- any other information you’d like to share!
I can’t wait to see your finished dolls!!
This pattern is an original pattern by Little Muggles (January 2013). Please do not claim this pattern or any part of this pattern as your own. If you wish to share this pattern, kindly link to this page, but please do not reprint it on your site. Crediting my pattern by linking to either my Facebook page, Craftsy shop, or Etsy shop, would be greatly appreciated!! This pattern may not be sold or distributed for commercial purposes. Thank You for understanding!

THANK YOU SO MUCH FOR SHARING THIS WONDERFUL DESING!
OH MY GOSH! I just saw this uploaded to ravelry and definitely will have to make one. I have yet to venture into softies of any kind but I have recently just loved all things turtle. Thank you for sharing the pattern!!
My pleasure, Amanda! Hope you enjoy making your turtle!! Feel free to send along pictures when you are finished!
I just completed Sheldon for a friend’s baby and he turned out absolutely adorable. He is the first amigurumi pattern I have attempted and the directions were perfect. Thank you so much again for such a great pattern. I have people saying they want me to make them their own Sheldon. 🙂
Fabulous, Lauren! I’m so happy that everything turned out perfectly! 🙂 Would you be able to send me a picture? Keep on crocheting!
This pattern took no time at all to complete, and I LOVE IT!! My youngest son is turning 9 in a couple of days and is in love with turtles. I plan on making an egg to place this turtle inside so that he may “hatch” his new baby. 🙂 Thank you sooo much for sharing. I will send photos when the big day comes.
I’m so happy that you enjoyed the pattern! Happy Birthday to your little man! Love your idea with the egg and I can’t wait to see pictures!! Thank you for leaving a comment and have a great day!!!
hola me encanto la tortuga!!!la hice y quedo re linda.
Muy buena la explicacion.Saludos desde Argentina
Greetings, Beatriz!
I am happy you enjoyed the pattern! Thank you for visiting my site!
Have a wonderful day!
MUCHAS GRACIAS DESDE ARGENTINA HERMOSA TORTUGUITA
Wow, this is such a fabulous pattern! I’ve had so much fun making my turtles, Timmy and Tamara. http://cuteasabutton82.wordpress.com/2013/03/14/timmy-the-turtle/
http://cuteasabutton82.wordpress.com/2013/03/15/when-timmy-met-tamara/
Thank you so much for sharing your pattern 🙂
You are very welcome!!! Your work is beautiful and I really enjoyed seeing how Timmy met Tamara!:) SOO cute!
I’ve had so much fun with their story – and there’s more on the way!! I think I may be a little addicted…
I loved making this turtle is was so awesome I loved it, it didn’t take that much time at all I gave my turtle to my friend I told her to name it michalangilo from the ninja turtles she did she loved I gave it to her for her birthday she loved it thank u so much for sharing your link:-)
I’m so glad you enjoyed the pattern!! It’s always extra special when you take time to make a gift for someone! I like the turtle’s name, too! (I’m a ninja turtle fan):)
I have lots of Red Heart yarn. I know it is not the soft yarn, but would it be ok to use for these cute animals? I am trying to find patterns to use these up. Thank you.
Hi Trish!
Yes, you can use Red Heart yarn to make amigurumi! Try it out and see how you like it! I’ve used it in the past and you’re right, it’s not super soft or anything, but the dolls will still come out fine. Personally I use my dolls more for decor and it really doesn’t matter if they are soft or not. 🙂
Thank you Amy, I will give this a try!!
I just finished my Sheldon. You can find him here:
http://eresininstitches.wordpress.com/2013/04/03/sheldon-crochet-along/
He is such a joy to work on, I hope to make more
Thank you so much for sharing your beautiful picture, Fiona!! I’m happy you enjoyed making your turtle!
TY so much for sharing this wonderful pattern !!!
https://sphotos-a.xx.fbcdn.net/hphotos-ash3/544284_10200899235593580_880344167_n.jpg
https://sphotos-a.xx.fbcdn.net/hphotos-ash3/562392_10200899236073592_714599264_n.jpg
Thanks for sharing the cute turtle design. I made it, hope I’ve done justification to your design.
Thank you so much for this adorable pattern! I’m new to amigurumi, and this little guy was perfect for me to work on my skills. I named mine Rita.
Thank you so much for sharing the pattern. Just got done mine and I love it:D Thank you:)
Hola encuentro genial tus patrones, pero sabes soy nueva en esto y la verdad estoy muy perdida con todas las instrucciones, por ejemplo no entiendo a que se refiere con: SC (single crochet) diciembre – disminución (que tiene que ver el mes de diciembre??) Ronda 1:6SC (no entiendo que significa esto de ronda y lo demás), 2sc, inc esto lo entiendo menos…..y sc alrededor….tampoco lo entiendo…..ah! voy a morir….creo que soy la única que no lo entiende y me da pena! 🙁
gracias por publicar igual ya que esto es un lindo trabajo y una bella forma de hacer algo con nuestras manos.
si alguien me pudiese ayudar con todo este enredo que tengo lo agradecería.
bendiciones.
🙂
Greetings! I am sorry you are having trouble! If you are a beginner, it can be confusing. I tried to write my instructions clearly for everyone to understand. “sc” means single crochet. “dec” is not december. dec means “decrease”, which means that you single crochet two stitches together. “sc around” means that you make single crochet stitches in every stitch of that row. “inc” means increase, which means you make 2 single crochets into the same stitch. These are all fairly basic instructions. If you are still having trouble, I recommend you look online for some crochet tutorials. They may be helpful since you are just starting out! Good luck to you!
hola hice amigurumis para mi y cuando la gente los vió les encantó y me encargaron,lo que quería preguntar era si ésto se puede ,vender el producto relizado,no quiero faltarle el respeto a nadie.Le envié un correo a Amigurumis.org y ellos me respondieron que creen no hay problema pero que es mejor preguntar.Los patrones que uso,son siempre libres.Desde ya te agradezco y espero tu respuesta ansiosa,gracias,vero.
Hello! I am sorry but I am not sure I understand what you are trying to say. Can you send me another message, maybe using different words? I’m so sorry for the trouble. The google translate did not do a good job! Thank you!
Is there a PDF for this?
I’m sorry there is no PDF for this file.
A very nice well written pattern. Thanks so much for sharing! I finished a version of the turtle with sport weight yarn for my daughter. You can see it here http://petrastrickt.de/2013/12/15/i-love-turtles/ Others will have to follow I guess as my daughter is accepting orders from school friends 😉
Best wishes
Petra
I fell in love with this turtle as soon as I saw it & I stayed up all night to finish it. My first attempt at amigurumi and I’m really proud of the result. Thank you for the pattern. My 3 year old will love it … She loves anything that has to do with turtles 🙂
Thanks for sharing this wonderful and very detailed pattern.
So cute! Thankyou for making him free!
Thank you so much for this beautiful pattern. i just made a crib mobile for my new born nephew combining several amigurumi patterns and Sheldon is one of them:)
Hi, this might sound silly, but when you say to sew it together is that with yarn or thread? Thanks, Mary
Greetings, Mary! When sewing, you should use yarn! 🙂 Most of the time, you can use the yarn tail that is left over when you finish the body part.
Thank you so much!
My mom is a huge turtle fan and “Sheldon” will be perfect for her..her name is Michele, her nickname is “Shel” I have been crocheting for 20+ years and just recently started the amigurumis and I absolutely love them. I’ve made a frog, duck, and starting Sheldon in a few minutes. My friends love them and have asked me to make them for their children and grandchildren. Thank you so much for this pattern it looks very easy to understand and I will share when I’m done. Have a great weekend. Paula
I’m just getting into making amigurumis and am so excited to see some really cute patterns. I will be making these and I want to buy your 2nd book also. Thank you for offering free patterns for those of us who love getting free stuff!
bummer using new computer trying to save patter I cant please help!!!!!!
Hi. I was just wondering if I can sell the finished product from the pattern. I can’t see anything in the small section at the bottom of the pattern and I’m on my mobile device, so it is hard to peruse your website. Thank you.
Hi Jessi
THank you for contacting me! Yes, I’m happy to have you sell your finished products. If you can credit LIttle Muggles for the design and possibly also provide a link to my shop or website, that would be wonderful! Thank you ! Also, please send along any pictures-I’d love to see your work!!
You can send them to littlemuggles@yahoo.com
WArm regards,
Amy
Can anyone tell me the approximate size of the finished turtle?
Hi there!
Thank you so much for sharing this pattern, it’s so cute! I was wondering if you have any tips for sewing on the different parts. I’m a great crocheter but I struggle when it comes to sewing parts together or hiding tails and things like that.
Hi Kelci! Here’s a link that you might find useful! http://www.planetjune.com/blog/joining-amigurumi/ You can also google “sewing amigurumi parts together” – there are also videos that you might want to check out! Good luck!
Thanks so much for your help. I had a look and I should be able to follow your pattern. Plus the progress pictures really help. Now I am just faced with the difficult choice of which pattern to try first! I can’t wait.
Sorry I added my previous comment in the wrong section.
Hey! Thanks so much for this great pattern! I made it myself and I really like the way it turned out, I am going to sell this on my etsy account. Here is the link: https://www.etsy.com/listing/227081521/
Hi again.I forgot to say that I didn’t do the spots because i didn’t have the right colors.
Hope you like it!!!!!!!!!!!!!!!!!!!!!!!!!!!!!!!!!!!!!!!!!!!!!!!!!!!!!!!!!!!!!!!!!!!!!!!!!!!!!!!!!!!!!!!!!!!!!!!!!!!!!!!!!!!!!!!!!!!!!!!!!!!! I know I do!!!!!!!!!!!!!!!!!!!!!!!!!!!!!!!!!!!!!!!!!!!!!!!!!!!!!!!!!!!!!!!!!!!!!!!!!!!!!!!!!!!!!!!!!!!!!!!!!!!!!!!!!!!!!!!!!!!!!!!!!!!!
СПАСИБО !!!
Oh Ami ! I have admired your patterns for a couple of years. They are so adorable. And now I have a real reason to make them…..a brand new grand baby!
I wish you were my next door neighbour ~ I’d bring tea and cookies and would enjoy learning from you!
All the best! A fan from Ontario, Canada
Diana P
Hello Diana!! Congratulations on your new grand baby!! How adorable and exciting!! I would love to live near you! Who wouldn’t want tea and cookies brought over by a kind neighbor?? 🙂 And I know Ontario is beautiful! Happy crocheting and thank you for reaching out! XX, Amy
I just wanted to say thank-you for posting this pattern. It is the only pattern that I have found that I have liked. This was the perfect pattern for my gift to my parents for their anniversary. Thanks so much, you are a life saver!
Thanks for sharing this design. You help me to learn amigurumi.
While laid up from surgery after having kidney removed due to cancer I made a giraffe for a friend who was going through chemo for breast cancer and that was my first time making a crochet animal. Since then I have been making small animals for kids going through chemo which I like to call “comfort pets” and sheldon is perfect to add to the collection . Thank you
thank you so much for sharing your pattern.i really enjoyed making it
Thankyou for sharing..all credits to you ..loved the pattern and the instructions were so accurate ..kudos to you
Could you tell me the measurements of this adorable turtle? My friend wants me to make a small-sized turtle that is less than 6 inches. This turtle is adorable.
Hi there! I gave away my turtle and no longer have it to measure, but from my recollection, it is pretty close to 6 inches from head to tail. I don’t believe it’s much longer than that if at all. Hope that helps!