
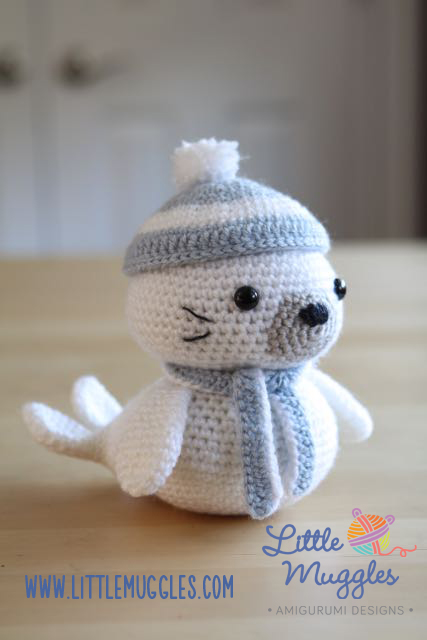
I created this baby seal back in late 2014 when I was trying to come up with something suitable for the upcoming winter months. When I finished this little guy, I immediately jumped into other projects without writing its pattern up. Now that spring is almost here, I was thinking about hanging onto it until next winter but I’ve been surprised by the number of ongoing inquiries regarding Sammy so I decided I had to find some time to sit down and work on this pattern for you all!
And to thank you for all of your patience and for your ongoing support of my work and designs, I would like to present this pattern to you for FREE! I can’t wait to see all the baby seals that will be made! Please send pictures of your finished seals to littlemuggles@yahoo.com and don’t forget to include your city and country!! 🙂
Happy crocheting, everyone!!
XOXO, Amy
MATERIALS
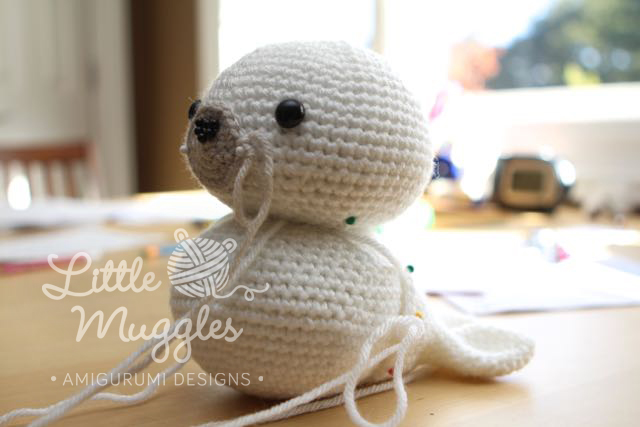
- Vanna’s Choice yarn in White, Linen (a soft gray), Silver Blue (a pale blue), and Charcoal Gray (dark gray for nose)
- 12mm black safety eyes
- USD3/3.25mm crochet hook
- yarn needle
- fiber fill
- black embroidery thread for whiskers
HEAD
use white yarn
- Rnd 1: make 6sc in a magic ring
- Rnd 2: inc in each st [12]
- Rnd 3: (sc, inc in next st) repeat around [18]
- Rnd 4: (2sc, inc into next st) repeat around [24]
- Rnd 5: sc around [24]
- Rnd 6: (3sc, inc into next st) repeat around [30]
- Rnd 7: (4sc, inc into next st) repeat around [36]
- Rnd 8: (5sc, inc into next st) repeat around [42]
- Rnd 9: (6sc, inc into next st) repeat around [48]
- Rnd 10: sc around [48]
- Rnd 11: (7sc, inc into next st) repeat around [54]
- Rnd 12-17: sc around [54]
- Rnd 18: (7sc, dec) repeat around [48]
- Rnd 19: sc around [48]
- Rnd 20: (6sc, dec) repeat around [42]
- Rnd 21: (5sc, dec) repeat around [36]
- Rnd 22: (4sc, dec) repeat around [30]
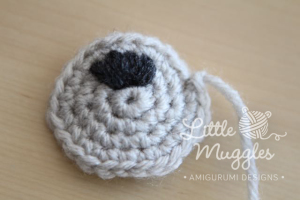
Sew the nose on with charcoal yarn. Tie a tight knot on the back side. - Rnd 23: (3sc, dec) repeat around [24]
- Fasten off
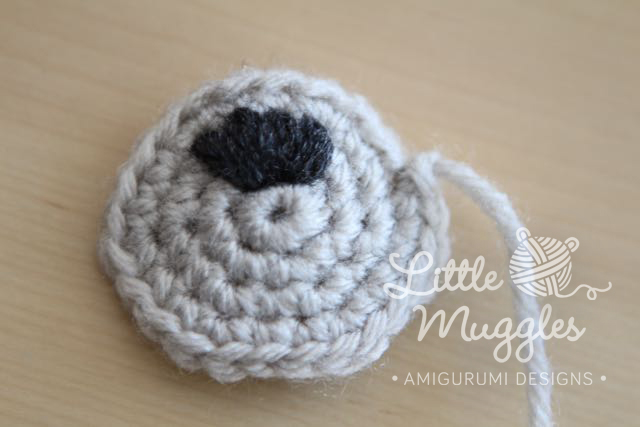
MUZZLE
- Rnd 1: make 6sc in a magic ring
- Rnd 2: inc in each st [12]
- Rnd 3: (sc, inc in next st) repeat around [18]
- Rnd 4: (2sc, inc in next st) repeat around [24]
- Fasten off and leave a tail for attaching to head
BODY
use white yarn
- Rnd 1: make 6sc into magic ring
- Rnd 2: inc in each st [12]
- Rnd 3: (sc, inc in next st) repeat around [18]
- Rnd 4: (2sc, inc into next st) repeat around [24]
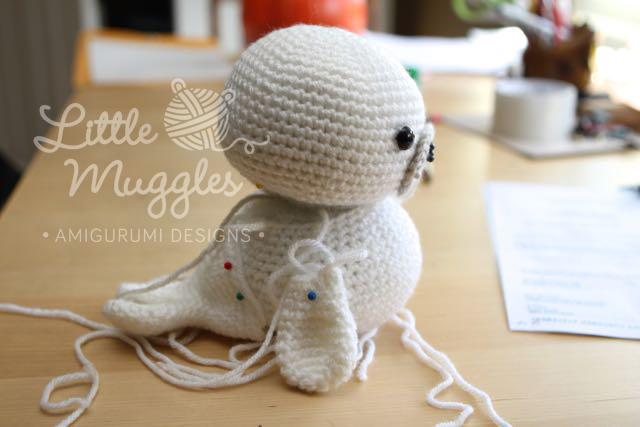
Pinning your pieces together allows you to get a better picture of the overall look! - Rnd 5: (3sc, inc into next st) repeat around [30]
- Rnd 6: (4sc, inc into next st) repeat around [36]
- Rnd 7: sc around [36]
- Rnd 8: (5sc, inc into next st) repeat around [42]
- Rnd 9: (6sc, inc into next st) repeat around [48]
- Rnd 10: (7sc, inc into next st) repeat around [54]
- Rnd 11: (8sc, inc into next st) repeat around [60]
- Rnd 12-13: sc around [60]
- Rnd 14: (8sc, dec) repeat around [54]
- Rnd 15: (7sc, dec) repeat around [48]
- Rnd 16: sc around [48]
- Rnd 17: (6sc, dec) repeat around [42]
- Rnd 18: sc around [42]
- Rnd 19: (5sc, dec) repeat around [36]
- Rnd 20: sc around [36]
- Rnd 21: (4sc, dec) repeat around [30]
- Rnd 22: (3sc, dec) repeat around [24]
- Fasten off and leave a tail
TAIL
use white yarn and make two
- Rnd 1: make 6sc into magic ring
- Rnd 2: (sc, inc in next st) repeat around [9]
- Rnd 3: (2sc, inc in next st) repeat around [12]
- Rnd 4: (3sc, inc in next st) repeat around [15]
- Rnd 5: sc around [15]
- Rnd 6: (4sc, inc in next st) repeat around [18]
- Rnd 7: (4sc, dec) repeat around [15]
- Rnd 8: (3sc, dec) repeat around [12]
- Rnd 9: (2sc, dec) repeat around [9]
For the first piece you make, fasten off and cut the yarn.
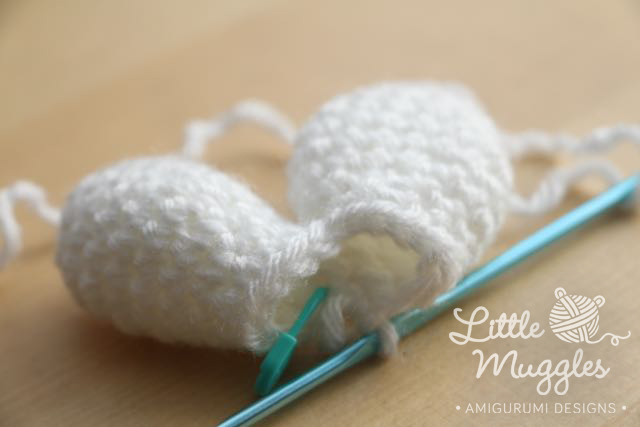
For the second piece, stop after round 9. You will now continue by joining the two pieces together.
- Rnd 10: After completing round 9 on your second piece, insert your hook into a stitch from your first piece. Draw up a loop and yarn through as you would for any single crochet stitch. This will join the two pieces together. Continue crocheting around the newly attached piece and if you keep going all the way around, you should end up with two joined pieces and 18 stitches total by the end of the round.
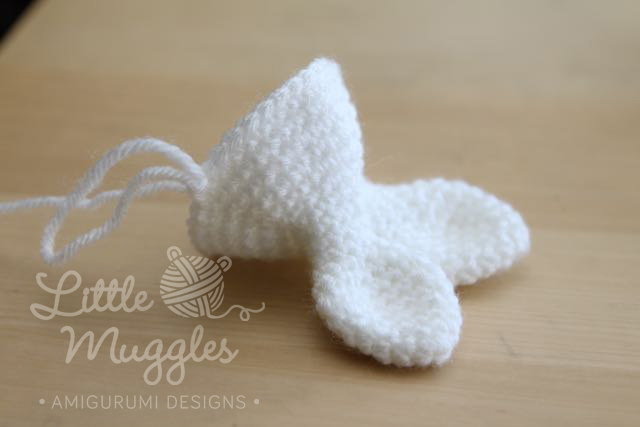
ready for attaching! - Rnd 11: 5sc, inc, 7sc, inc, 4sc [20]
- Rnd 12: 2sc, dec, 8sc, dec, 5sc [18]
- Rnd 13: sc around [18]
- Rnd 14: (2sc, inc in next st) repeat around [24]
- Rnd 15: (3sc, inc in next st) repeat around [30]
- Rnd 16: sc around [30]
- Rnd 17: (4sc, inc in next st) repeat around [36]
- Rnd 18-19: sc around [36]
- Fasten off and leave a long tail
FLIPPER
use white yarn
- Rnd 1: make 6sc in a magic ring
- Rnd 2: inc in each st [12]
- Rnd 3-7: sc around [12]
- Rnd 8: (2sc, dec) repeat around [9]
- Rnd 9-10: sc around [9]
- Rnd 11: (2sc, dec) repeat twice, sc [7]
- Rnd 12: sc around [7]
- Fasten off and leave a long tail
HAT
start with blue yarn
- Rnd 1: make 6sc in a magic ring
- Rnd 2: inc in each st [12]
- Rnd 3: (sc, inc in next st) repeat around [18]
- Rnd 4: (2sc, inc in next st) repeat around [24]
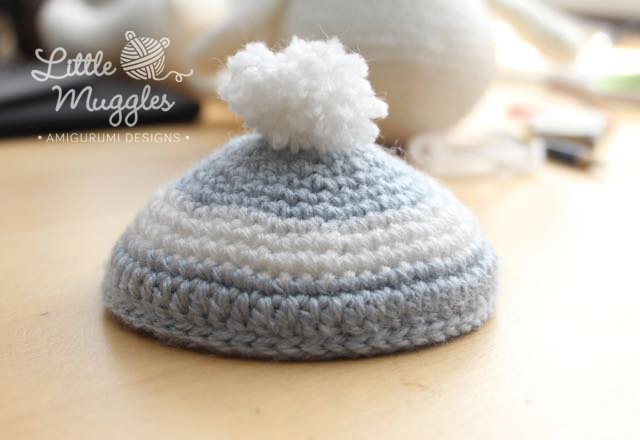
Sammy’s cute pom pom hat! - Rnd 5: sc around [24]
- Rnd 6: (3sc, inc in next st) repeat around [30]
- Rnd 7: (4sc, inc in next st) repeat around [36]
- Rnd 8: (5sc, inc in next st) repeat around [42]
- change to white
- Rnd 9: (6sc, inc in next st) repeat around [48]
- Rnd 10: (7sc, inc in next st) repeat around [54]
- Rnd 11: (8sc, inc in next st) repeat around [60]
- change to blue
- Rnd 12: sc around [60]
- Rnd 13: chain 2, dc around [60]
- Rnd 14: sl st around [60]
- Bind off
POM POM
There are many different ways to make pom poms but this is the technique that I used. Feel free to experiment and find out what works best for you!
Wind your white yarn around a medium sized dinner fork around 40 times. Use a length of white yarn (about 7 inches) to tie the middle of the bundle together tightly. Slide the fork out and snip the open ends of all the loops. Fluff out the pom pom and trim evenly. You can use the tail ends of the yarn which you used to tie the bundle to now attach the pom pom to the top of the hat! Weave in all yarn ends neatly.
SCARF
Chain 66 in white and 2 in blue yarn [68]
Starting into the 3rd chain from the hook, dc across
Bind off and weave in your yarn tails
ASSEMBLY
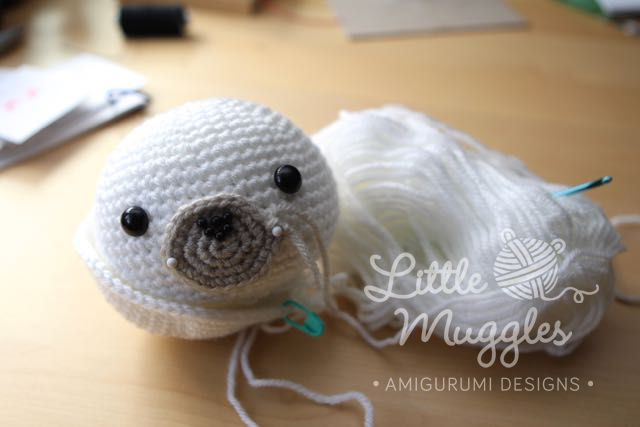
Stuff the head and body generously. Place the eyes between rounds 13 and 14 with 10 stitches between them. Sew the nose onto the muzzle and center it between the eyes. Sew the muzzle on neatly and carefully. There is no need to stuff it. Using your black embroidery thread and needle, sew a couple of whiskers onto each side of the face. You can add eyebrows too!
The head and the body both have the same number of stitches in the openings so sewing them together should be seamless. You can position the head however you wish. (ie. instead of looking forward, you might face the head towards the side instead…) Next, position the tail against the back of the body and sew it on. You will need to fill the tail with fiber fill before completely attaching it to the body. Try to center the tail so that your seal can sit by itself without toppling.
Attach the flippers next. Take note that they are symmetrical.
Put the scarf and hat on – you are finished!! I hope you’ve enjoyed making your own baby seal!
COPYRIGHT 2015 – LittleMuggles
This pattern is for personal use only. Please do not sell or rewrite this pattern in any way. Mass production/ factory production of dolls made from this pattern is not allowed. Please do not claim my patterns or amigurumi designs as your own. You may sell your own handmade finished dolls if you credit the design to “Little Muggles” and include a link to my website (www.littlemuggles.com).
Love this pattern. Thanks for sharing it. I will make it for my daughter as an Easter gift. I will be looking for more of your patterns.
This is the most beautiful seal I,ve ever seen in all my life!
Thank you for sharing
Greetings from Italy
wondcerfull works
Super cute!
Thank you for sharing this wonderful pattern 🙂
This is the cutest thing ever!! Thanks for sharing 🙂
It may just be me….but I’m having trouble with the flipper looking like the one in the photo. It is coming out much skinnier than it appears it should be…..any help would be greatly appreciated!
oh my gosh! Thank you for alerting me on this one! I have updated the instructions and hopefully it should work out ok now. Please let me know if you have any more troubles. My apologies!!
Thank you for correcting this!! Can’t wait to finish up Sammy and send him to my sister!!
This little fellow is sooo cute! Beets any rubber ducky – on the shrelf that is… Thank you for the pattern!
omgosh! i love him! thank you for sharing. i’ve made several of your patterns and can’t wait to make this one. 🙂
Vraiment très joli ce petit phoque
J’adore
Merci pour le partage du tuto
You are very welcome!!
Hello,
Love the seal! It is so cute, great job!!
I don’t see anywhere to sign up for email updates… =)
Thank you Olena! I’m sorry there isn’t an email update feature yet. In the meantime, please follow me on FB, pinterest, instagram, and/or twitter!
Thank you for the pattern cannot wait to try this!
Hi, thankyou for sharing this little cutie~
Greetings from Bali. 🙂
It was really great of you to do all that work and then pass it on to all of us for free!!!! Thank you girl, very much!!! So pleased with your selfless act that I am heading over to check out the items for sale and hope others do too!! Kindnesses like that should be rewarded and I pray God blesses you abundantly for how tickled I am about this adorable little guy!!!
I really enjoy doing your patterns and I made sammy’s girlfriend for my daughter:)thank you for sharing patterns.
i love your little critters, they are so cute! So glad I found you website!
Thank you, for sharing your patterns.
You’re very welcome! Thank you for taking the time to send me a message!
I fell in love with Sammy, thank you for the pattern.
Cannot wait to crochet this little fellow. I bought one of your books and they are great. Thank you for sharing
cute little seal: love it!!! Thanks for sharing the pattern!
Que bonito!!!!!muchas gracias por compartir el patron
Thanks for this wonderful pattern! Just a quick question though: you said that the stitch count for the openings of the head and body should match, but here you have that the head ends with 24 and the body ends with 30. Should I decrease one more row for the body to make it 24 as well?
Hi Swathi! Thanks for pointing that out! The error has been fixed! My apologies for the confusion! (the body should end with 24st)
I will make a couple of these to donate to a local children’s hospital with other items. Thanks for sharing.
I just finished my baby seal. It turned out so cute. The only thing I did different was I made the hat smaller and attached it off to the side so it looks like a tiny beret.
I am a senior volunteer at Martin Hospital South in Stuart, Florida and love to crochet and knit. Any of the items I make are given to hospital patients and that is where Sammy the Seal will go along with many of your other Little Muggles plus baby hats, loveys, baby blankets and prayer shawls. Also make up “Angels in the Pocket” for adults.
Thank you for sharing your wonderful talent.
Just showed this to my hubby (who is 84) and he said he wants one! My next project. Thanks
That’s awesome! 🙂 You must send me a picture of your hubby with the seal!! That would be too cute! littlemuggles@yahoo.com :))
Can’t seem to find in your directions, how or what the little black nose is made from………….did I miss something?
Hello Peggy,
So sorry for the delayed response. The little black nose for the seal is mentioned in the caption of one of the pictures. It is actually charcoal yarn and is sewed on. Hope that helps!
Just finished Sammy and it seems like my cat has a new friend!!! I ended up infusing the stuffing with cat nip seeing how she loved him! Thank you for sharing the pattern and will come back frequently to view your site!!!
What a fun idea, the catnip in the stuffing!! I’m happy to hear that you kitty is having fun with her new toy!
Lovely little seal. Thank you for sharing this pattern.
Have a nice day, Margaret
Danke für die süße Anleitung. Würde euch gerne mein fertiges Modell zeigen.
You’re very welcome! Please send your pictures to “littlemuggles@yahoo.com”.
This pattern is so really cute~ I love it..
but I have a problem making the tail 🙁
the row 11 has 20 stitches
but the row 12 you write has 19 stitches (not 18 stitches)
so could you help me with this problem??
Love this pattern… its so cute. I don’t crochet but I made Sammy the Seal out of loom bands. Check it out on my Instagram
https://instagram.com/loomikrafts
That is totally awesome!
merci beaucoup il est superbe
I just finished this cute baby seal 🙂 I think it will be great birthday gift for someone 🙂 thank you for sharing the pattern.
Greetings from The Netherlands
I just want to say that your work is beautiful and I love your patterns. My daughter has been drooling over Lucky and I can’t wait until I can start it.
Hola!! Te escribo desde Argentina para agradecerte por compartir este hermoso patrón 🙂
Si querés ver mi resultado, aquí lo encontrás:
http://daxarabalea.blogspot.com.ar/2015/06/una-foca-abrigadita.html
Saludos y gracias!!!
Thank you for sharing your beautiful picture!! You’re very welcome for the pattern!
Thank you for sharing the pattern. Such a cute seal!
Lots of love from the Netherlands
This is the cutest thing I have ever seen – period! It’s so cute that I’ve decided to crochet it for my fiance. He won’t resist it!
How much white yarn have you used? Also, what dimensions should this adorable baby seal have?
Wonderful work once again! So glad I found this pattern! Hope it will turn out just as great as yours!
Cheers,
Corina
Thank you so much for sharing your lovely patterns.
I really love this little seal.>_<
Its so cute I want it
Thank you for sharing such a beautiful n easy pattern with us. I will try to make this for my neice
Hi! I’m working on the tail right now and for the two flaps I was wondering if it’s meant to be 9 stitches on each flipper. I noticed there was a space between the two pieces if I did 9 on each side, am I doing something wrong?
I am making some Trauma toys for local Paediatrics emergency dept at local hospital and for local ambos to give to children can’t wait to do some of these 🙂
Fantastic!! Have fun and I hope the children love your dolls! You are wonderful to take the time to do what you do!!
Hello ! I’m a crochet begginer. I made many simple Amigurumi and can read many instructions, with help from internet. I just don’t anderstand and find how to do for the hat, the 13) row : “chain 2 dc around”. Can you explain me how to do?
Cause i found many tutorials about how to do a chain, but not directly in an amigurumi…
Thx for you help. Fanny
Hi Fanny!
Welcome to the wonderful world of crochet! If you look up instructions on how to make a double crochet stitch, (not amigurumi) you will see that when you turn your piece and start a new row, you “chain” first. Depending on the stitches.. for example, sometimes you chain 1 or you might chain 2 before continuing your stitch. This is something that is exclusive to amigurumi. Check the tutorials a little further (for the double crochet stitch) and see if you can find the answer! Please let me know if you need more help!
Eine ganz niedliche Robbe ist das. So süß!
Danke für die tolle Anleitung!
Liebe Grüße Beate
Thank you for sharing your pattern, the baby seal is so cute!
I am from Chile, and I just finished mine for mi daughter. She just loved it
Many Thanks for cute seal 🙂 I got gifts for new year !!!!!
Beautiful, I love it, thank you!
I made him, he is fantastic thank you for the pattern !! Greetings from Netherlands
I love it and have him ready thank you for this lovely seal.
Groet uit Nederland.
Thank you so much for the pattern 🙂 it`s one of the most beautiful I have seen 🙂 oh sooo cute
Best wishes
Greetings from Denmark
Oh how lovely! Thanks for sharing! 🙂
Greetings from Finland!
Thank you I have yet to start, but am very excited about. thank you again
merci beaucoup pur ce joli petit modèle
Dear Amy, This little guy will make my grandson so happy! Thank you very much , Maryann
HI Amy, I am new to the world of crocheting and Amigrumi animals. This seal to adorable and I plan on making him for my friend who is battling cancer. I thought she could take him with her when so goes for treatments. She lives where it’s hot and misses the cold climates that is why this little guys is perfect. How tall will he be when completed? Thanks in advanced for the free, adorable pattern, Debi
Hi Amy, I sent you a comment a few weeks ago about the size of “Sammy the Seal”. Anyway I made his twin sister “Sami the Seal”. Let me know where I send you photos. I’m quite proud as a beginner crocheter, it’s my first big project. Thank you for the easy to follow, free patterns. What a gift you bring to the world
So beautiful work, I love ti!
Thank you for the share!
Very cute! I will make one for my son. Thank you for sharing.
Thank you for this pattern 😀 it’s so beautiful <3
Hi Amy, I just made this little guy from your pattern. Thank you so much for sharing. He is just the cutest thing.
Merci pour le tuto de ce joli petit phoque
There should also be 2 flippers, correct? I saw 2 tail pieces but it didn’t say 2 for flipper. I’ve never done amiguramis before but….I think I have to make this one! I love seals, have 2 hutches full plus some! Just hope I can do it justice! Course I will have to make a Sammy and a Samantha! Lol! Thank you for sharing, I think, cuz now I have to try this, oh no, wish me luck! Lol!
Thank you for sharing this pattern. My little 6 year old granddaughter just saw him and fell in love with him so I know what I will be making a start on this evening.
My 12 year old daughter is making this beautiful project. We love it! Thank you for sharing!
Thankyou very much for sharing this pattern
hi i would love to make this but i can’t find what weight yarn you used, as i’m new to crochet i need to be told this.
many thanks
Most of the yarn I use is worsted weight yarn! Hope that helps! 🙂
I would like to crochet this Baby seal but I am from Germany and need some Information about the abbreviations “sc”, “st” and “dec”. What does it mean in german? Inc = inch (2,54 cm) ?
Thank you for your help,
Best wishes,
Monika
“sc” is single crochet. “st” is stitch. “dec” is decrease. “inc” means increase. Hope that helps!
Super je viens de faire ‘ une merveille’ merci
Thank you for sharing this pattern I’ve only been crocheting 3 weeks and I’ve done this for my granddaughter she go to love him
OMG I’m totally in love! <3
This is my next project!!! Thank you so much for sharing!!!
very nice! But how do you get that nose so nice?
🙂 I just use yarn needle and sew stitches over and over again until there are no obvious gaps between the stitches.
I am crotcheting this little marvel these days but I have some problem with the head. Are you sure that so many rounds are needed? It turns out much bigger than the other parts. Thanks in advance, Christina.
I like designing my dolls with large heads. 🙂 As far as I know, there are no mistakes in this pattern. Regarding the scarf, dc stands for double crochet, not decrease. (dec) I hope it works out for you!
How much yarn does this little guy take?
One skein should be more than enough!
Oh my gosh this is the cutest thing i have ever seen!! is there a chance that i could make this pattern with a 4.25mm crochet hook, with very tight stitches?some of my crochet hooks have been lost and i have yet to find them so i was wondering if that could be an option! Thanks-
You can certainly try it! Good luck!
Just finished the baby seal. Turned out really cute!
Thanks for sharing the pattern. If you’d like to see it, I added it as a project to Ravelry with a link to your lovely pattern.
I’m so happy to hear that you enjoyed making your doll!Thank you for sharing your link!
Thank you so much. I love amigurumi and your pattern very beautiful.
Love this pattern. ve just finishedone to send to a baby who has undergone major heart surgery. She is 4 months od. Mum said she loved it.
Luv the detail!!
Shout out from San Diego, California
Thank you verry much. This pattern verry beautiful. I make it to gift my friend.
Thank you so much!! I’m making this for my friend’s birthday and I’m sure he’ll love it!! Thank you for the pattern!
I am fairly new to amigurumi and have only made a few things but Sammy is so cute I want to try. The only part I don’t really understand is the scarf. Could you explain how to do the steps? I read all the comments hoping to find someone asking the same but I guess I’m the only one that didn’t understand. Thank you for sharing your cute creations.
Dear Amy,
Your baby seal is very beautiful and cute. You must have spent a lot of time designing it. I think is a great idea to make one for my daughter as Christmas present. Thank you for your sharing.
Thank you so much!
My grandmother’s favorite animals are seals and I needed to crochet her something for Christmas. This is perfect, thank you!
I LOVE THIS PATTERN. I needed a seal cause I made a polar bear for my baby brother
o_O
Wow, this is so cute!
Can’t remember how I got here … I was searching for a pattern for a baby hat for my friend’s son who will be born in January. Somehow ended up here and now I’m crocheting a baby seal, and I intend to keep it for myself 😛
Thank you so much for this incredibly cute pattern and for sharing it for free!
Greetings from Germany 🙂
You’re very welcome and I’m so happy that you are enjoying the pattern! 🙂 I also hope you end up finding something to make for your friend’s son before he arrives! 🙂
Hi Amy, thanks for sharing your patterns. I have wanted to try amigurumi for a long while, but didn’t have the confidence to try – it always looked difficult to me. I am in the middle of doing Sammy the Seal now, and it isn’t as difficult as I thought. Your instructions are really clear and the pictures help a lot!! Thanks again – I will enjoy many more patterns now!!
It’s just awesome and I love your dolls… Soooo cute and I wil make all of these very soon
Thanks so much for this adorable pattern! I live in Mexico and the exchange rate against the dollar is so bad. So I see so many patterns that are $6 or $8 that I would love to have and I just can´t justify that for something I will make once or twice. So it was a real treat to find this adorable pattern for free. Thank you for your generousity, I am going to start on him this afternoon.
Gracias hermosos tus diseños
Gorgeous and easy-to-follow pattern, thank you so much for sharing! What size eyes did you use on this seal? Do you think it’s worth investing in a set of safety eyes of different sizes? Again, thanks so much for sharing this, I had so much fun crocheting this, just not sure what size eyes to buy for the finishing touch!
I see a lot of people copying your seal design and selling it… have you told them to stop yet? I even saw one who copied your image.
I love this little guy… my only question is the yarn you used is a medium 4 weight yarn that suggests a lot bigger hook than what you instructed to use… I just want to make sure I am checking out the correct yarn before I purchase it.. thank you in advance
Hello Richelle!
I’m very sorry for the extreme delay in response!
I’m apologize for not keeping up with my inbox on my website – I am finally going through my messages now and am apologizing to everyone! To make amigurumi,I find that using a smaller crochet hook size is ideal. You need to make your stitches even and tight, and a larger hook size won’t help with this. The size recommended on the label of the yarn skeins are usually for things like clothing or blankets and things like that! I hope that helps you out!!
I wish you a happy day! Stay safe!
Warm regards,
Amy
Very cute. I’ve done tail and body in one piece. When you finished the tail, go on in round seven of the body.
I made the muzzle for Sammy but no directions for his nose in this pattern… am I not seeing it or Is it not there?
Hi Joy!
My apologies for the delayed reply! The instructions for the nose are not included in the pattern. I’m afraid I assumed that most would know what to do but I will try to include more details about it in future patterns! You basically take your yarn needle with your nose colored yarn and thread it through a few of the stitches on the muzzle where the nose should be. You keep going through the same several stitches until the yarn has become overlapped and thick enough to resemble a nose. You tie the yarn ends on the inner side of the muzzle and then the snout is ready to be sewed on. If you need further directions, please email me at littlemuggles@yahoo.com and I am happy to send you some pictures to guide you through it! Thank you so much for your patience!
Warmest regards,
Amy
I love all your patterns and I’m new to your amigurumi and I’m so excited to start. I’m curious if you would give me permission to make on TikTok and YouTube live not giving the pattern they would have to come here to get the pattern to follow along with me and to make on their own? Wanted to get permission before making on live and I understand either way. I’m starting up new but been crocheting for over 30 years and amigurumi is my specialty I’d say. I could make and let you see before doing so also if you’d like. TIA. Blessings
Love this pattern. I’m making it with blanket yarn right now and sammy is going to be a very big seal.
Small note on the tail, I think that round 12 has a typo in it:
Rnd 12: 2sc, dec, 8sc, dec, 5sc [18]
I think that a 1 sc is missing somewhere. Right now we are only using up 2+2+8+2+5=19 stitches of the 20 needed to complete the round.
Thank you for the amazing free pattern. I am just starting the scarf. In the picture, the scarf has a white edge around it, but that is not in the directions. Did you just do a slip stitch around it with white like the end of the hat?
Hi Gail! The scarf instructions indicate to start with white yarn and then you switch to blue. If you follow along, there should be a white edge to the scarf and you should not need to make any slip stitches. I hope you like your end result! 🙂
Thanks Amy. It turned out really cute! 🥰
I love this pattern SO much! One year ago, I crochet this. It was my very first amigurumi ever and it came out great. I am trying this pattern again one year later to see how much I have improved. I really love this pattern !