
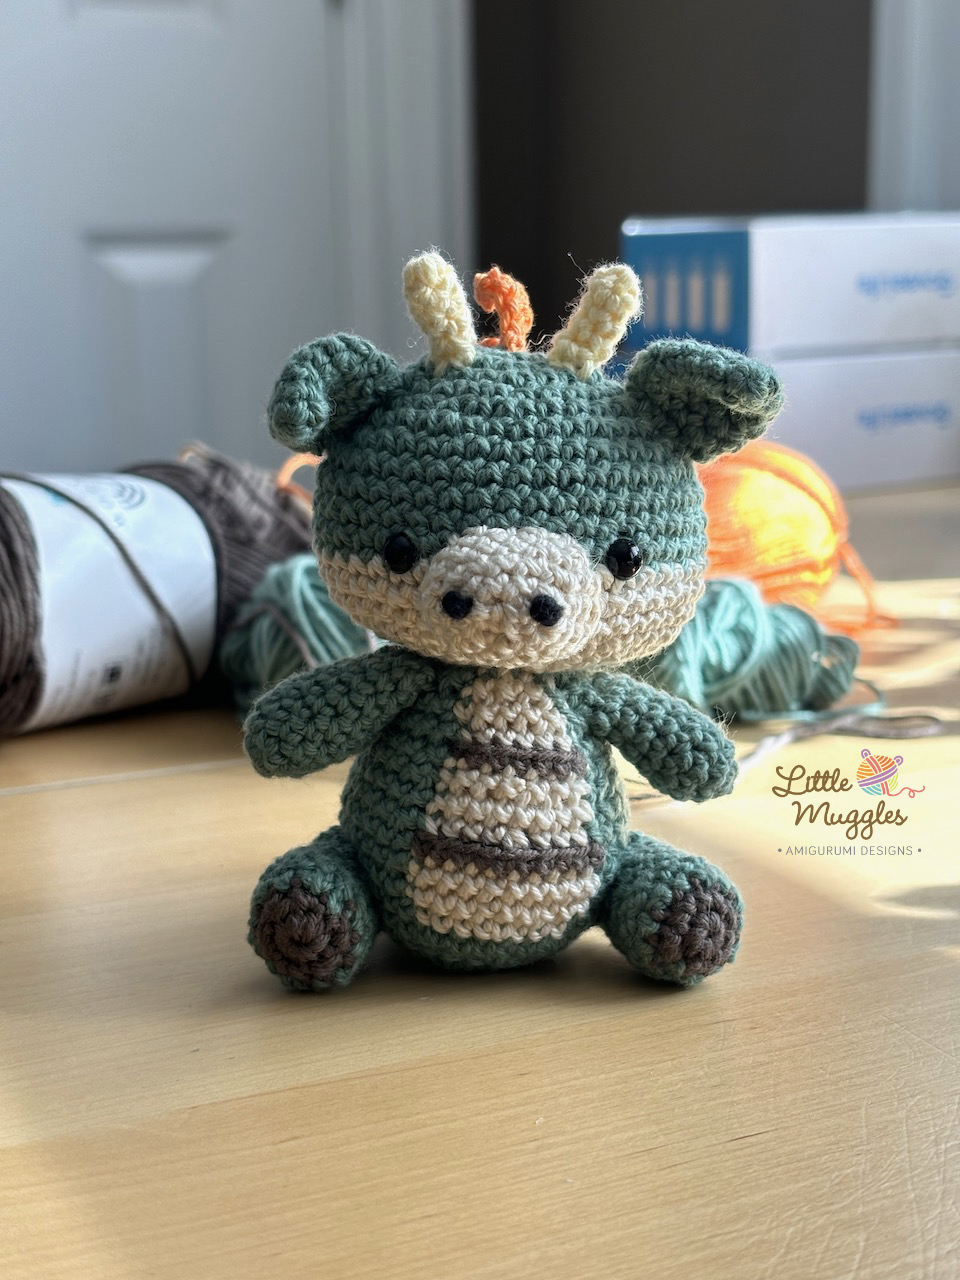
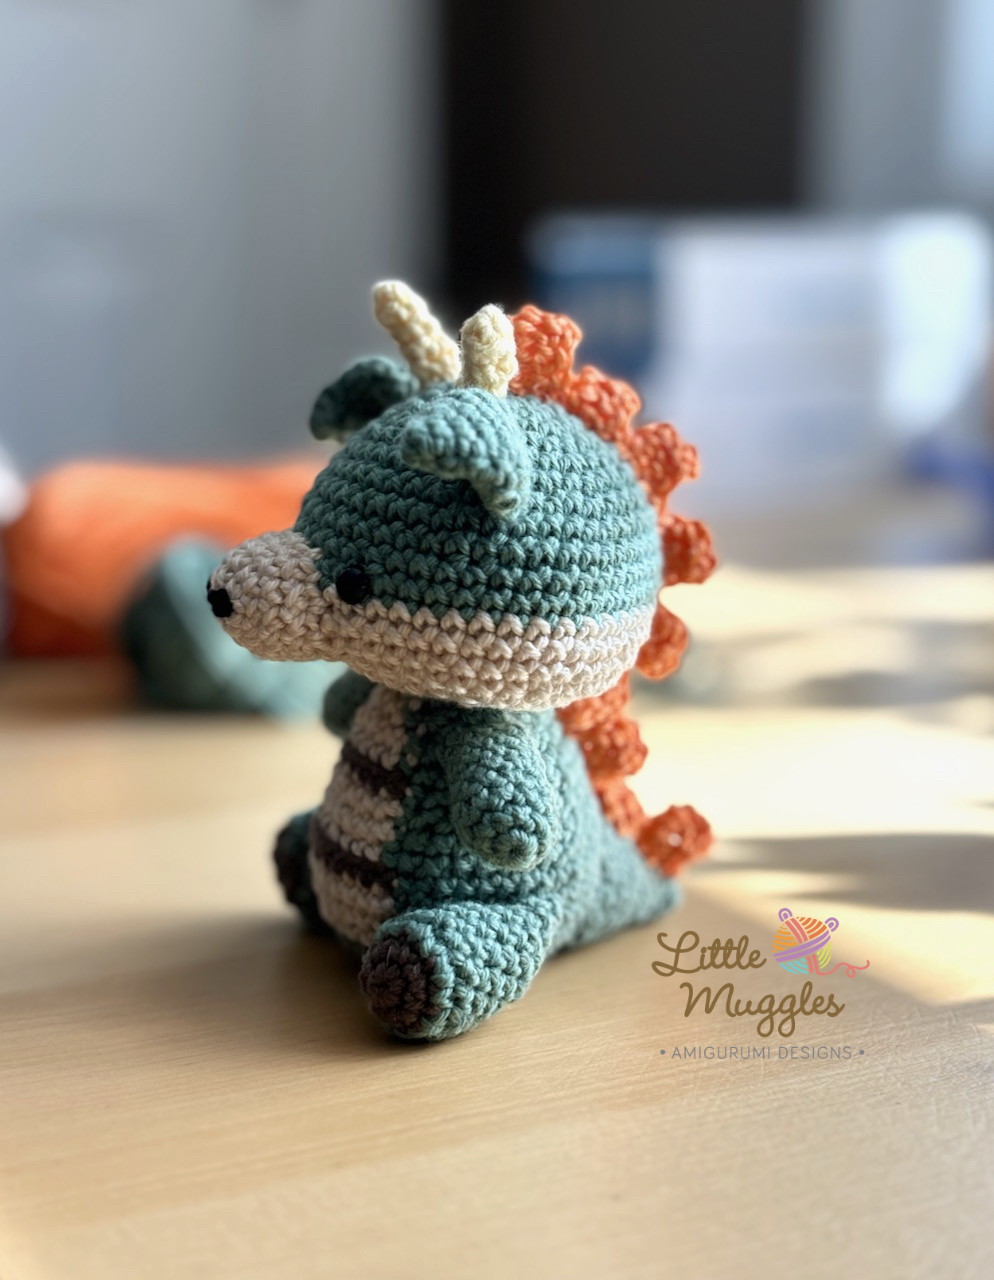
I consider this pattern to be of aBEGINNER/INTERMEDIATE level. Single crochet stitches are worked in spirals for all body parts. To make this dragon, you need to be familiar with working in Front Loops Only, Back Loops only, the invisible color change technique, double crochet stitches, and making French Knots. This doll is relatively small – it can fit in the palm of your hand. Because of this, some may find it difficult to work with such small, tight stitches. Because of the size of the pieces, this pattern might not be the best for true beginners.
MATERIALS
- 2.0mm crochet hook
- Light/DK yarn (In my examples I used 8/4 Hobbii Cotton yarn and Patons Grace) I used 5 colors:
- Main Body Color
- Cream (snout/belly patch)
- Brown (details on belly patch and feet)
- Yellow (horns)
- Orange (spikes)
- pair of 6mm eyes
- fiber-fill
- stuffing beads (optional)
- black embroidery thread or fine weight yarn (nostrils)
HEAD
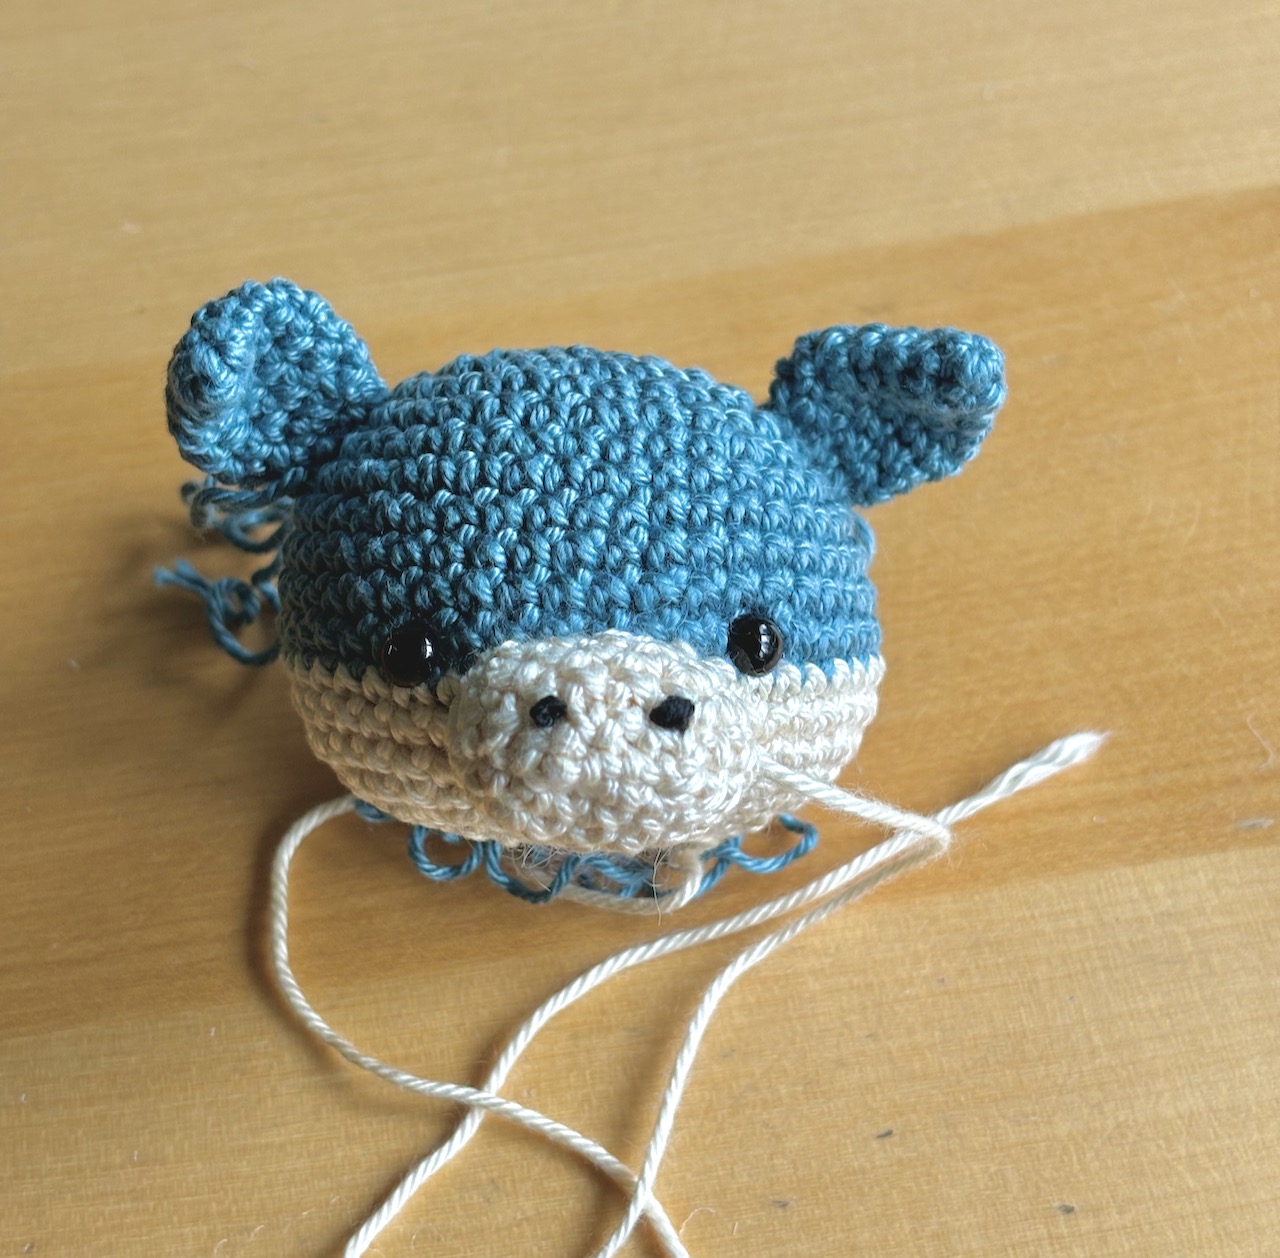
Start with your main color yarn
- Rnd 1: 6sc into magic ring
- Rnd 2: sc into each st [12]
- Rnd 3: (sc into next st, inc in next st) repeat 6 times [18]
- Rnd 4: (sc into next 2 st, inc in next st) repeat 6 times [24]
- Rnd 5: sc in all 24 st [24]
- Rnd 6: (sc in next 3 st, inc in next st) repeat 6 times [30]
- Rnd 7: (sc in next 4 st, inc in next st) repeat 6 times [36]
- Rnd 8: (sc in next 5 st, inc in next st) repeat 6 times [42]
- Rnd 9-12: sc in all 42 st [42]
- change to off white yarn
- Rnd 13-15: sc in all 42 st [42]
- Rnd 16: (sc in next 5 st, dec) repeat 6 times [36]
- Rnd 17: (sc in next 4 st, dec) repeat 6 times [30]
- Rnd 18: (sc in next 3 st, dec) repeat 6 times [24]
- Rnd 19: (sc in next 2 st, dec) repeat 6 times [18]
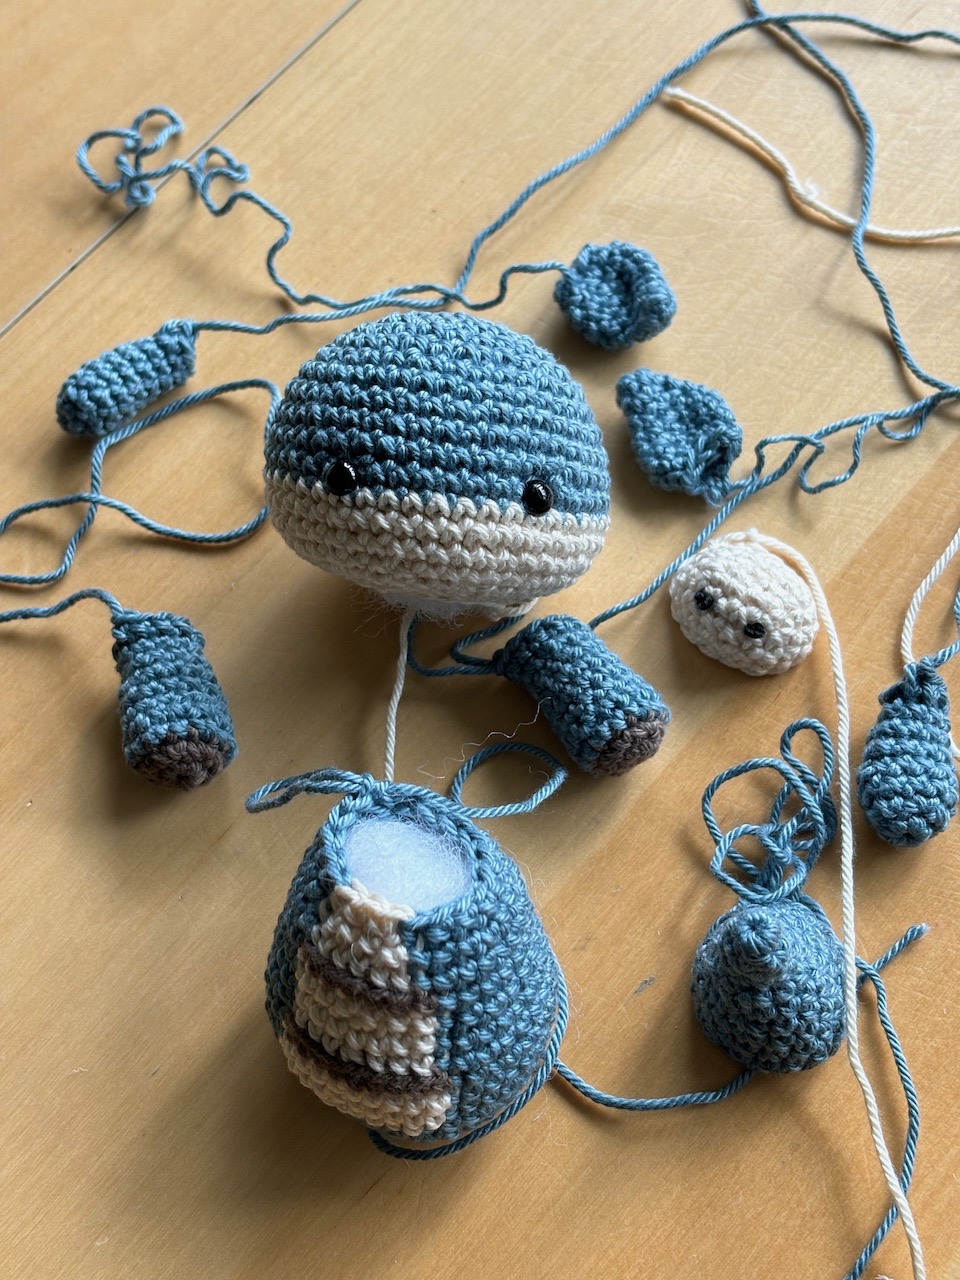
- Fasten off and stuff the head with fiber-fill.
The 6mm safety eyes are placed between Rounds 12 and 13, with an interspace of 7 stitches.
SNOUT
use cream yarn
- Chain 4
- starting in the 2nd chain from the hook, sc in next 2 st, inc in next. Continuing around the foundation chain, sc in next 2 st, inc in next st [8]
- Rnd 1: inc in next st, sc in next 2 st, inc in next 2 st, sc in next 2 st, inc in next st [12]
- Rnd 2: sc in next st, inc in next st, sc in next 3 st, inc in next st, sc in next st, inc in next st, sc in next 3 st, inc in next st [16]
- Rnd 3-4: sc in all 16 st [16]
- Fasten off and leave a yarn tail.
Using either fine black yarn or thick embroidery thread, make two french knots to serve as the dragon’s nostrils. Stuff the snout with fiberfill and sew onto the head.
EARS
(make two) Use main color yarn
- Rnd 1: 4sc into magic ring
- Rnd 2: (sc in next st, inc in next st) repeat twice [6]
- Rnd 3: (sc in next 2 st, inc in next st) repeat twice[8]
- Rnd 4: (sc in next 3 st, inc in next st) repeat twice [10]
- Rnd 5: (sc in next 4st, inc in next st) repeat twice [12]
- Rnd 6: sc in all 12 st [12]
- Rnd 7: (sc in next 4 st, dec) repeat twice [10]
- Rnd 8: (sc in next 3 st, dec) repeat twice [8]
- Fasten off and leave a tail. Sew the opening shut and sew each ear to the head.
HORN
(make two) Use yellow yarn
- Rnd 1: 4sc into magic ring
- Rnd 2-5: sc in all 4 st [4]
- Fasten off and leave a yarn tail for attaching to the head.
ARM
(make two) start with main color yarn
- Rnd 1: 5sc into magic ring
- Rnd 2: inc in each st [10]
- Rnd 3-5: sc in all 10 st [10]
- Rnd 6: dec, sc in next 8 st [9]
- Rnd 7: sc in all 9 st [9]
- Rnd 8: dec, sc in next 7 st [9]
- Fasten off and leave a yarn tail. Slightly stuff each arm with fiber fill and sew the opening shut before attaching to the body.
FOOT
(make two) Start with brown yarn
- Rnd 1: 6sc into magic ring
- Rnd 2: inc in each st [12]
- change to main color yarn
- Rnd 3: (sc in next st, inc in next st) repeat 6 times [18]
- Rnd 4: (sc in next st, dec) repeat 6 times [12]
- Rnd 5-7: sc in all 12 st [12]
- Rnd 8: (sc in next 4 st, dec) repeat twice [10]
- Rnd 9-10: sc in all 10st [10]
- Fasten off and leave a tail. Stuff each foot with fiber-fill and sew the opening shut before attaching to the body.
BODY
**Important**: All the stitches for the body should be worked in Front Loops Only unless otherwise indicated. This is important for the edges of the belly patch to line up properly.
Start with main color yarn. The yellow highlighted portions should be worked in cream and the blue highlighted portions are to be worked in brown yarn. ……….. = cream yarn ………. = brown yarn
FRONT LOOPS ONLY

- Rnd 1: 6sc into magic ring
- Rnd 2: inc in each st [12]
- Rnd 3: (sc in next st, inc in next st) repeat 6 times [18]
- Rnd 4: (sc in next 2 st, inc in next st) repeat 6 times [24]
- Rnd 5: (sc in next 3 st, inc in next st) repeat 6 times [30]
- Rnd 6: (sc in next 4st, inc in next st) repeat 6 times [36]
- Rnd 7: (sc in next 5 st, inc in next st) repeat 2 times, sc in next 2 st [sc in next 3 st, inc, sc in next 3 st] sc in next 2 st, inc in next st, (sc in next 5 st, inc in next st) repeat 2 times [42]
- Rnd 8-9: sc in next 15 st [sc in next 10 st] sc in next 17 st [42]
- Rnd 10: sc in next 15 st [sc in next 10 st] sc in next 17 st [42]
- Note: in the next round, the highlighted (cream color) portion is worked in Back Loops Only – BLO
- Rnd 11: (sc in next 5 st, dec) repeat 2 times, [ BLO sc in next 3st, dec, sc in next 4 st] sc in next st, dec, (sc in next 5 st, dec) repeat 2 times
- Rnd 12: sc in next 14 st [sc in next 8 st] sc in next 14 st [36]
- Rnd 13: (sc in next 4 st, dec) repeat 2 times, sc in next 2 st [sc in next 2st, dec, sc in next 4st] dec, (sc in next 4st, dec) repeat 2 times [30]
- Rnd 14: sc in next 12st [sc in next 7st] sc in next 11st [30]
- Rnd 15: sc in next 13st [BLO sc in next 6st] sc in next 11st [30]
- Rnd 16: (sc in next 3 st, dec) repeat 2 times, sc in next 3 st [dec, sc in next 3 st, dec](sc in next 3 st, dec) repeat 2 times [24]
- Rnd 17: (sc in next 2 st, dec) repeat 3 times [sc in next 2 st, dec] (sc in next 2 st, dec) repeat 2 times [18]
- Fasten off and leave a tail for sewing. In my example, I filled the body 2/3 of the way with polypropylene stuffing beads because I like the weight and stability it gives to the doll. Of course this is optional – feel free to use only fiber fill if you prefer.
TAIL
- Rnd 1: 6sc into magic ring
- Rnd 2: sc in each st [6]
- Rnd 3: (sc in next st, inc in next st) repeat 3 times [9]
- Rnd 4: (sc in next 2 st, inc in next st) repeat 3 times [12]
- Rnd 5: sc in all 12 st [12]
- Rnd 6: (sc in next 3 st, inc in next st) repeat 3 times [15]
- Rnd 7: sc in all 15 st [15]
- Rnd 8: (sc in next 4 st, inc in next st) repeat 3 times [18]
- Rnd 9: sc in all 18 st [18]
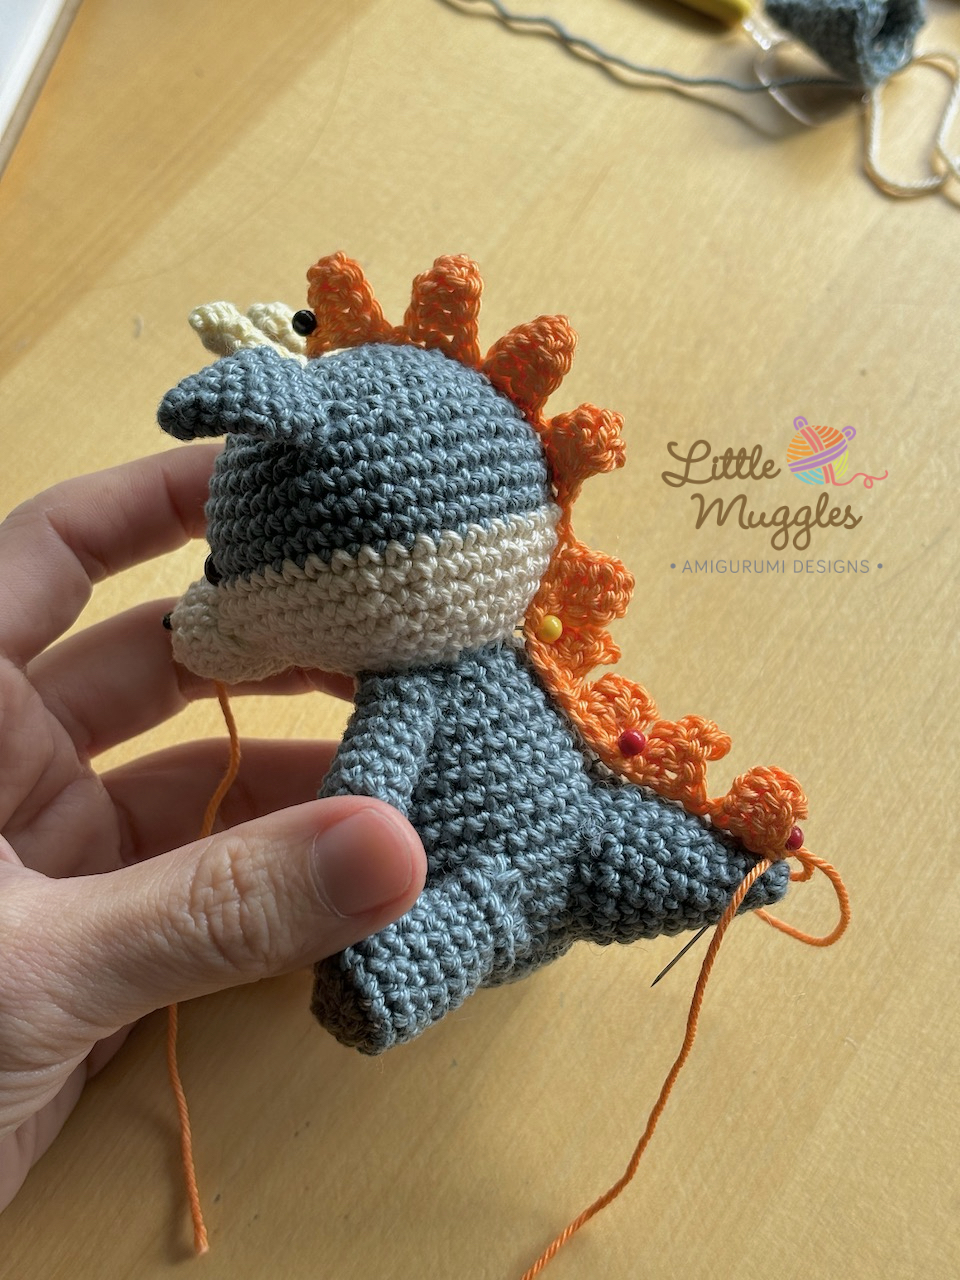
- Fasten off and leave a tail. Stuff the tail and sew onto the back of the dragon’s body.
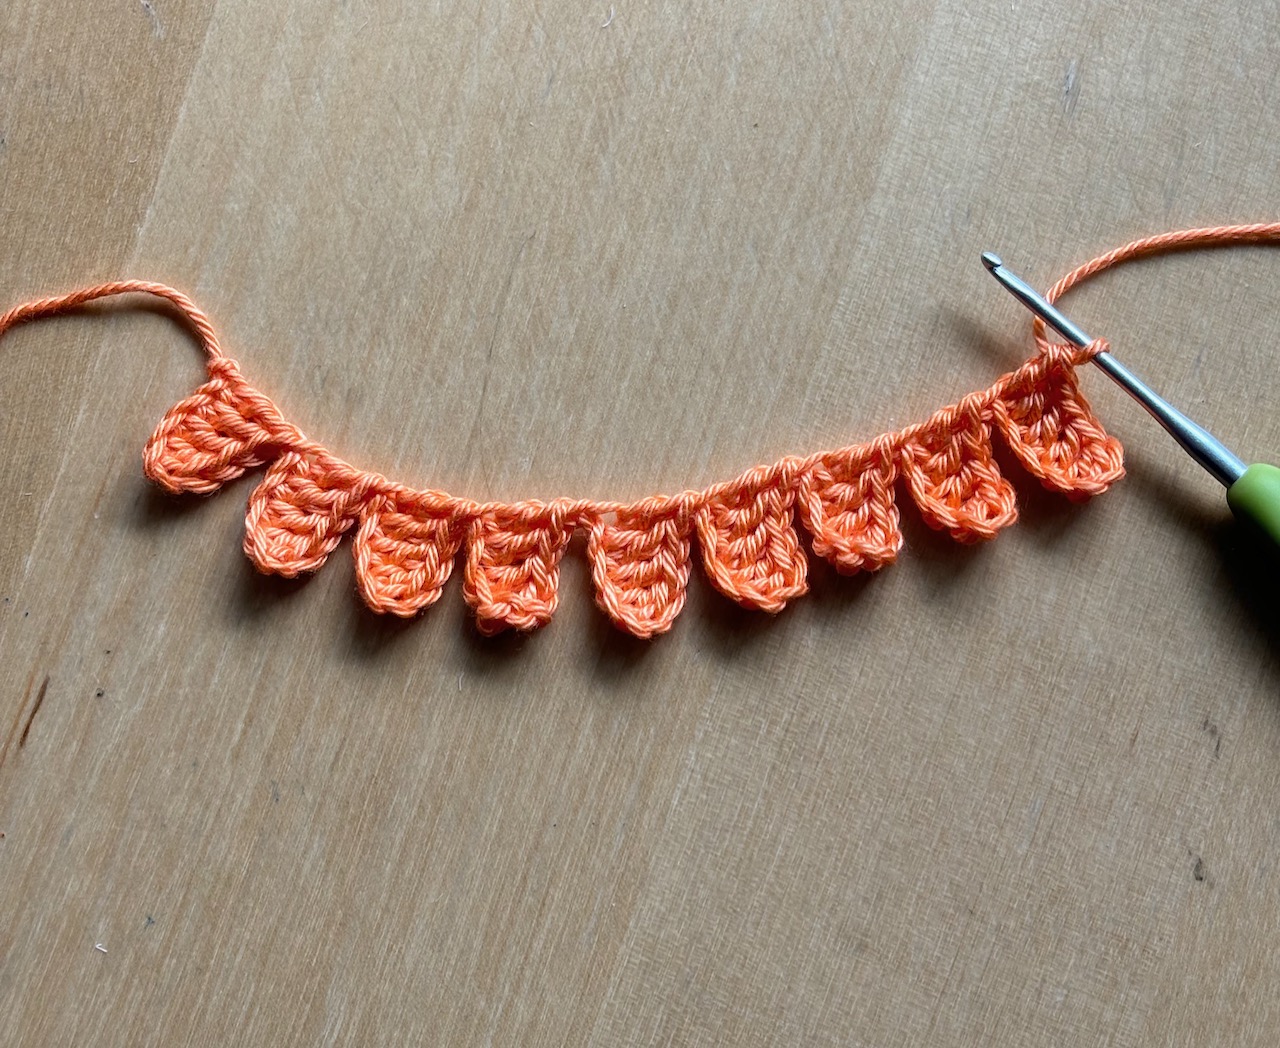
SPIKES
Use orange yarn. Leaving a 6 inch tail,
- Chain 6. starting in the 3rd chain from hook, dc in next 4st.
- Chain 6 again, starting in the 3rd chain from hook, dc in next 4st.
- Repeat these instructions for a total of 9 spikes.
- Fasten off and leave a tail. Use your yarn tails to sew this row of spikes onto the dragon’s back, beginning from the top of the head and going down to the tip of the tail.
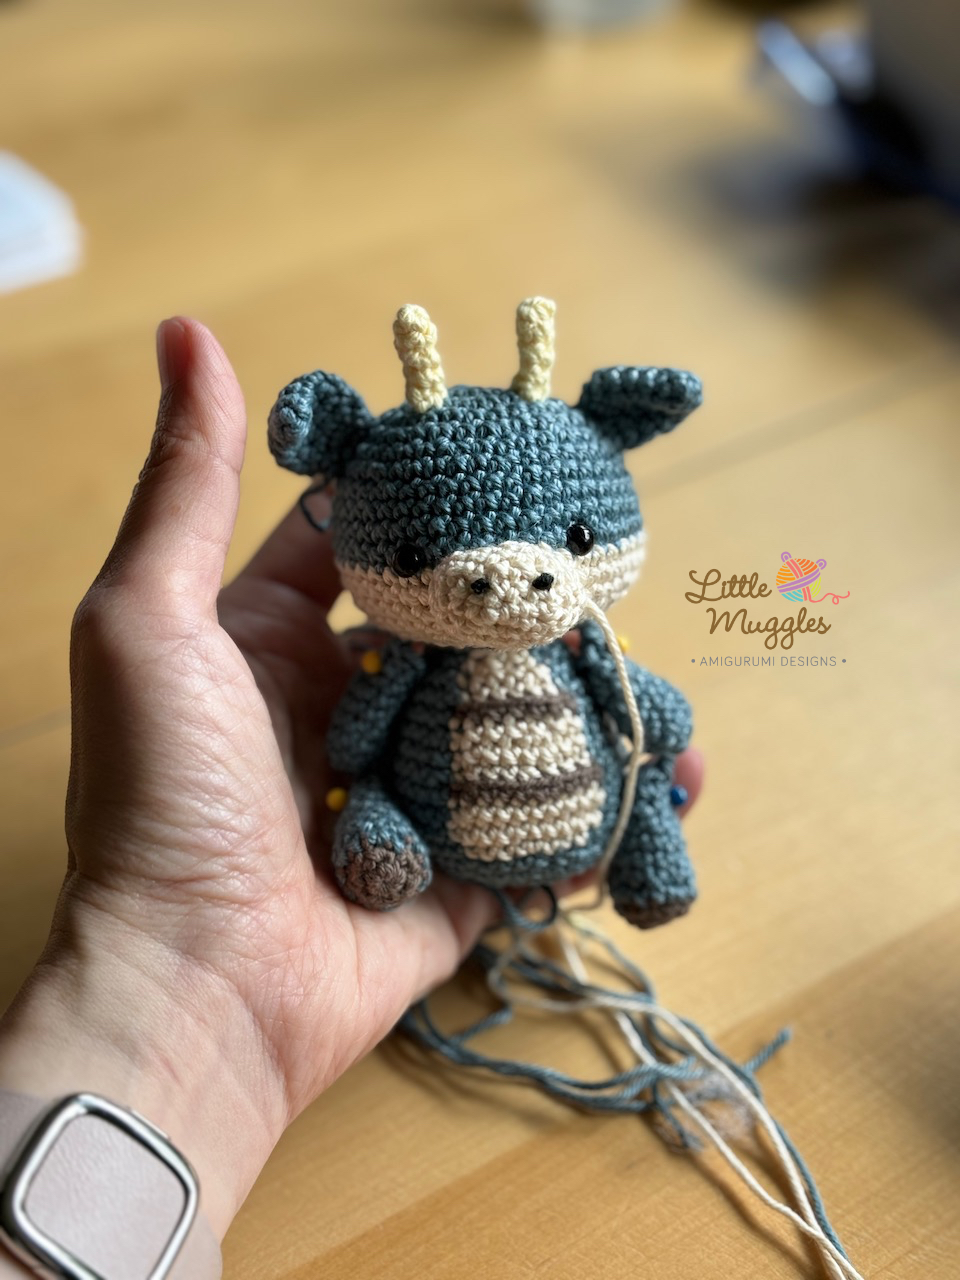
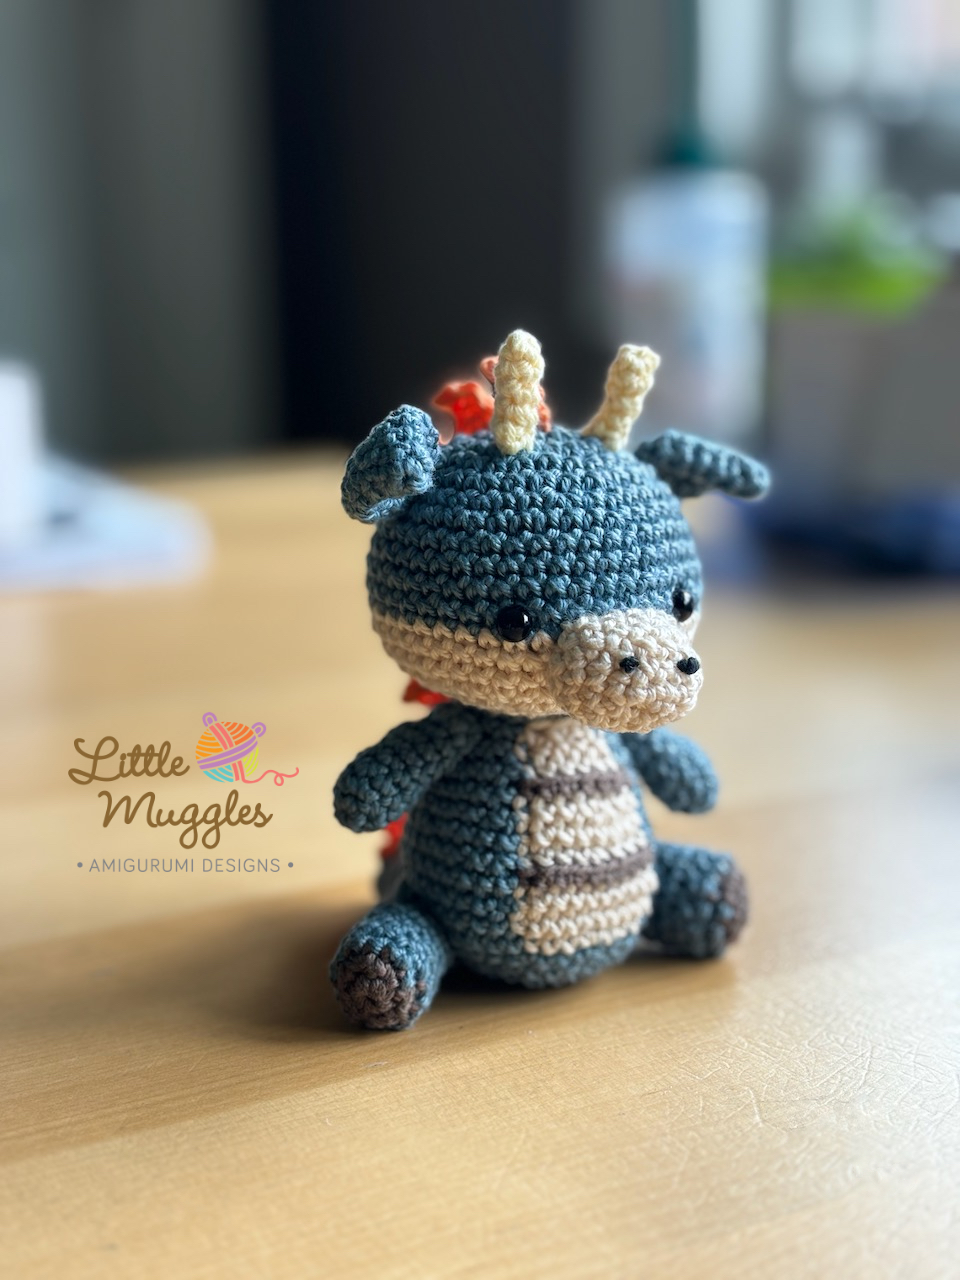
All done! I hope you are pleased with the results of your doll! I’m looking forward to seeing everybody’s personal touches to their dragons! Don’t forget to tag me @littlemuggles with your pics! Til next time! XOXO
As with all of the patterns I offer for free, I’d truly appreciate if nobody claim my pattern or my photos as their own and/or attempt to sell my instructions for profit. You may sell your own homemade dolls made from this pattern. (no mass production, please) I kindly ask that you credit the design to Little Muggles. Please be respectful to designers who spend many, many hours coming up with and sharing creations with the world! We love what we do and are happy to spread the love of crocheting but it’s terribly discouraging and disheartening when we discover pattern thieves.
©2024 Little Muggles