

Little Muggles may earn an affiliate commission on purchases made through links in this page.
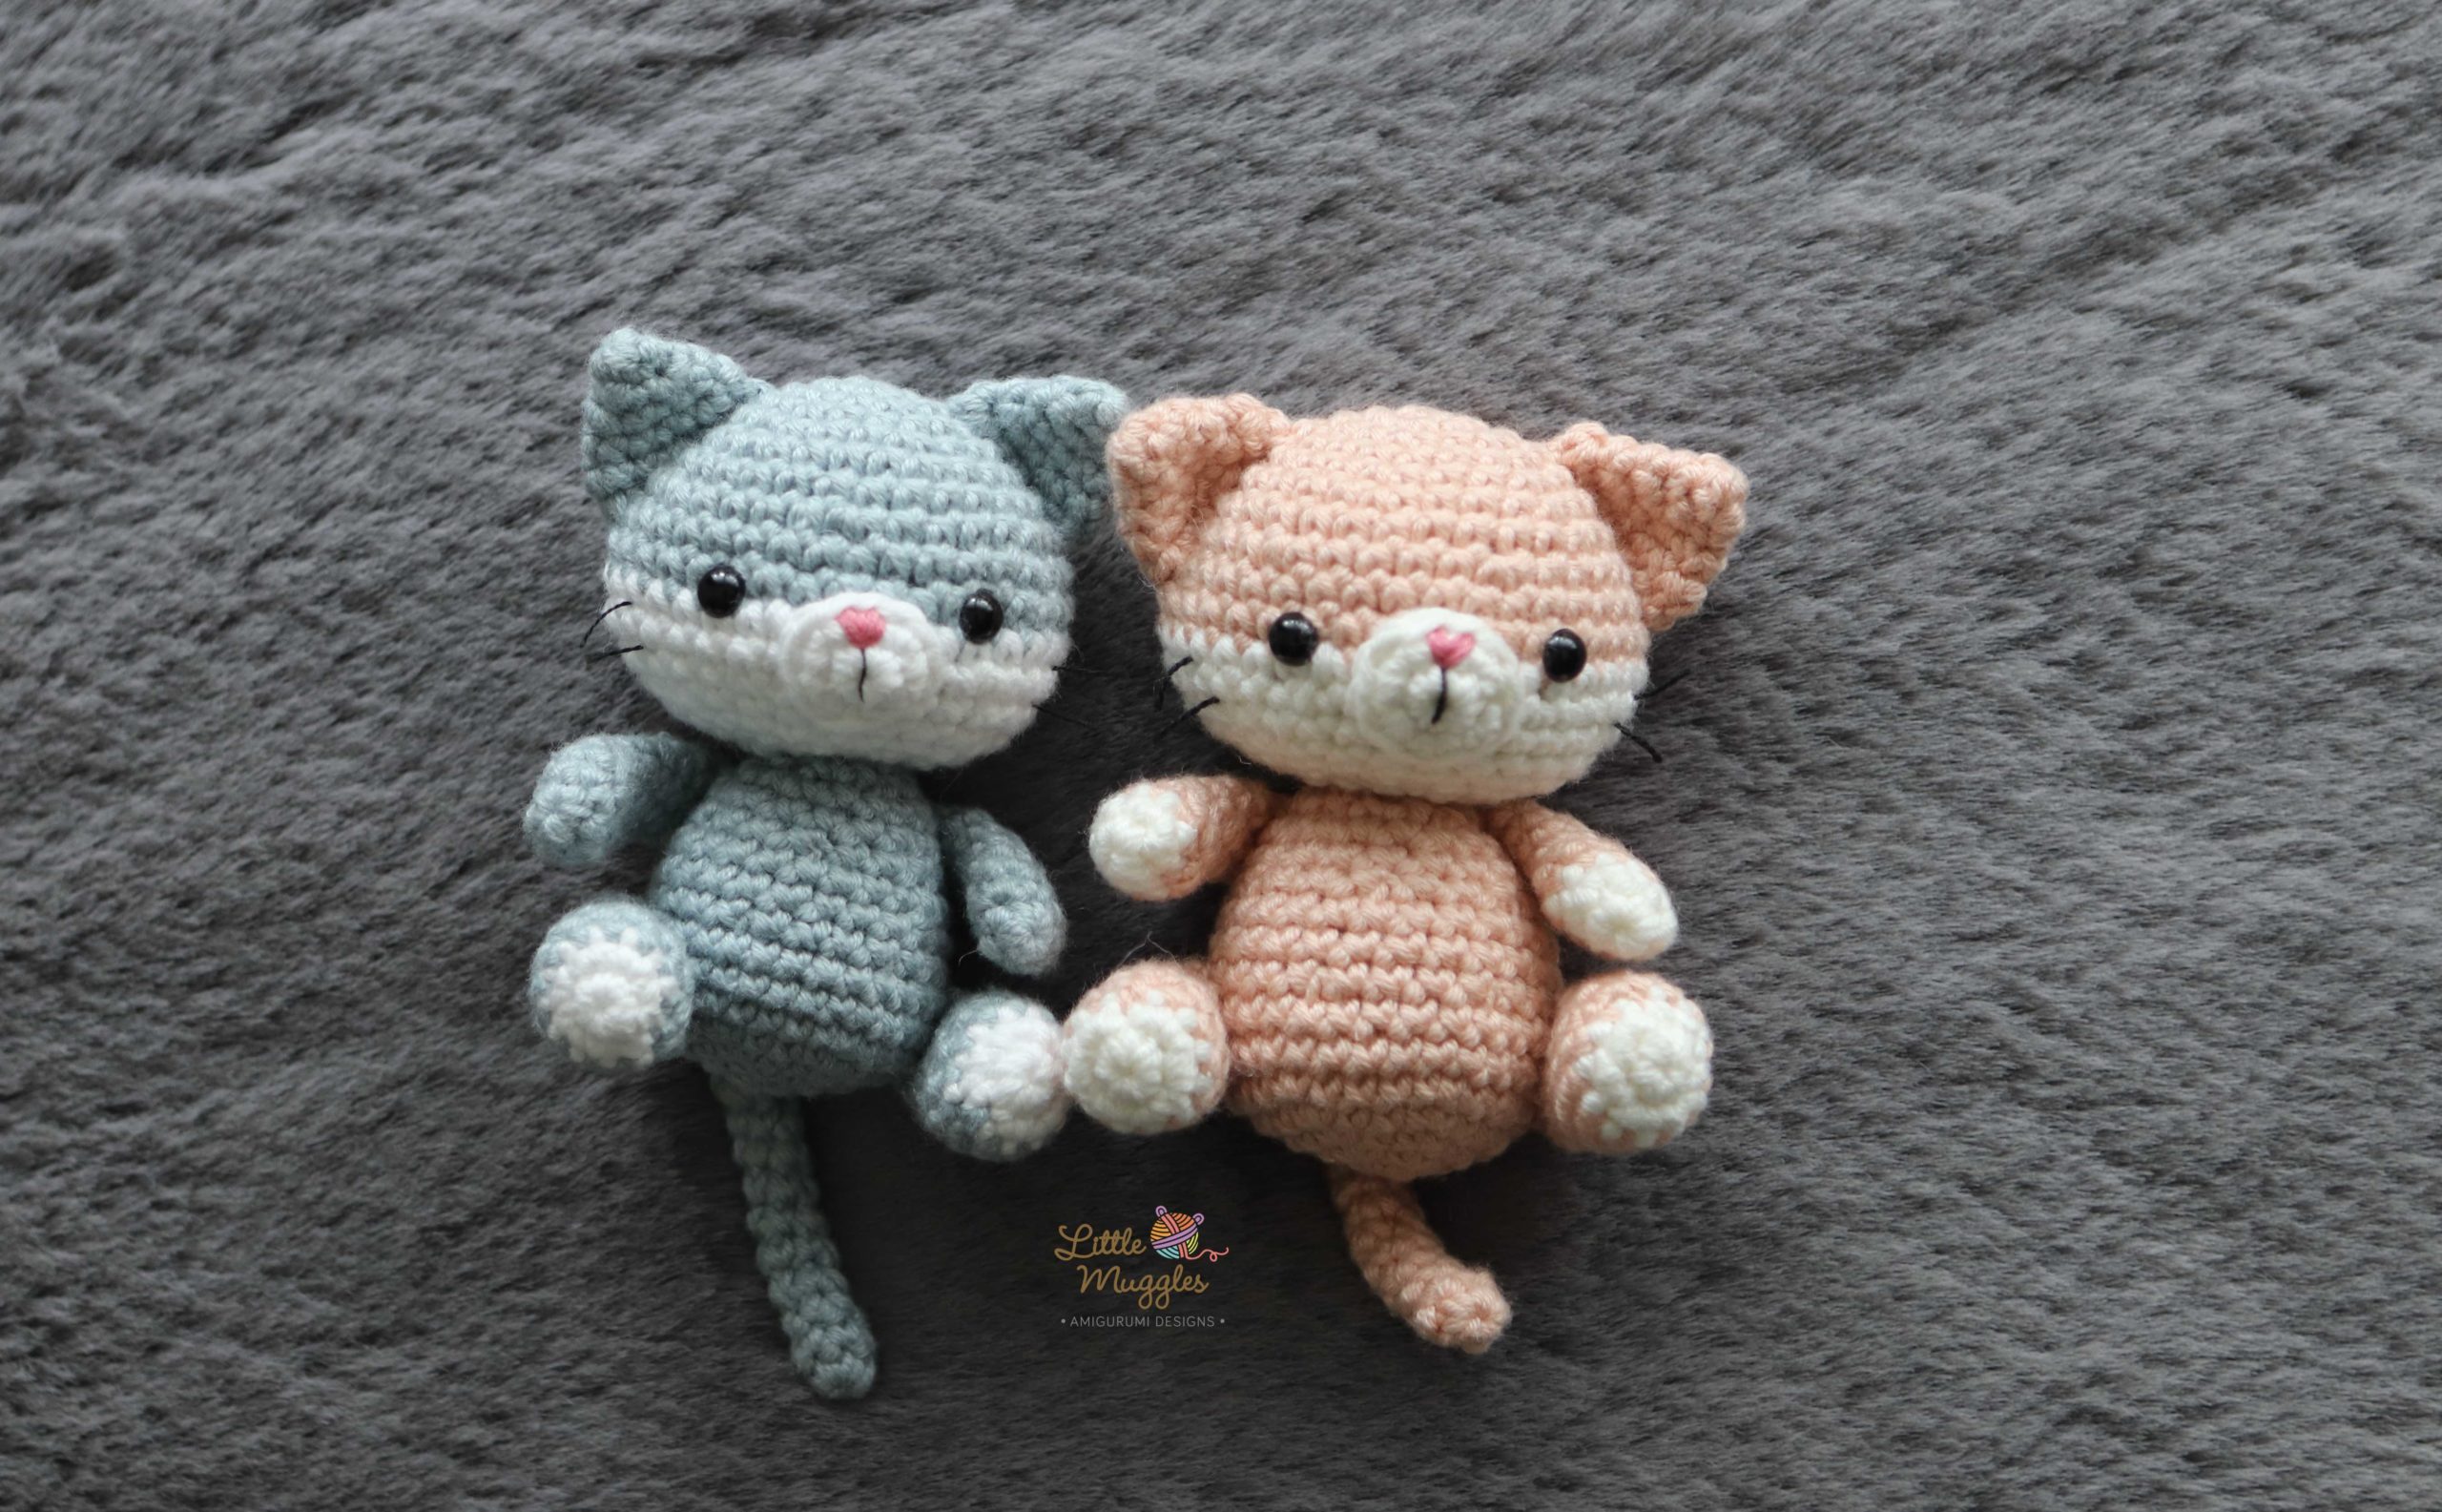
This little kitty pattern is worked in continuous rounds. It requires basic crochet knowledge and is suitable for beginners. The small size of the doll makes it a little more difficult to work up but the required skills are simple.
MATERIALS
- size 2.0 crochet hook
- 6mm black safety eyes
- fiber fill
- yarn needle
- sewing needle
- main color yarn (Category 2)
- white yarn
- embroidery thread (nose color)
- black thread (whiskers)
When made with the recommended yarn weight and hook size, this doll sits at approximately 3.5inches/9cm tall.
In my kitty examples, I used Premier Cotton Fair yarn (Category 2) Click HERE to explore and shop for this yarn!
You will not need more than one skein of any color to make this doll.
HEAD
start with main color yarn
- Rnd 1: make 6sc into magic ring
- Rnd 2: inc in each st [12]
- Rnd 3: (sc in next st, inc in next st) repeat 6 times [18]
- Rnd 4: sc in all 18 st [18]
- Rnd 5: (sc in next 2 st, inc in next st) repeat 6 times [24]
- Rnd 6: (sc in next 3 st, inc in next st) repeat 6 times [30]
- Rnd 7: sc in all 30 st [30]
- Rnd 8: sc in next 2 st, inc in next st (sc in next 4 st, inc in next st) repeat 5 times, sc in next 2 st [36]
- Rnd 9-10: sc in all 36 st
- change to white yarn
- Rnd 11: sl st, sc in next 35 st [36]
- Rnd 12: sc in all 36 st
- Rnd 13: sc in next 2 st, dec (sc in next 4 st, dec) repeat 5 times, sc in next 2 st [30]
- Rnd 14: (sc in next 3 st, dec) repeat 6 times [24]
- Rnd 15: sc in all 24 st [24]
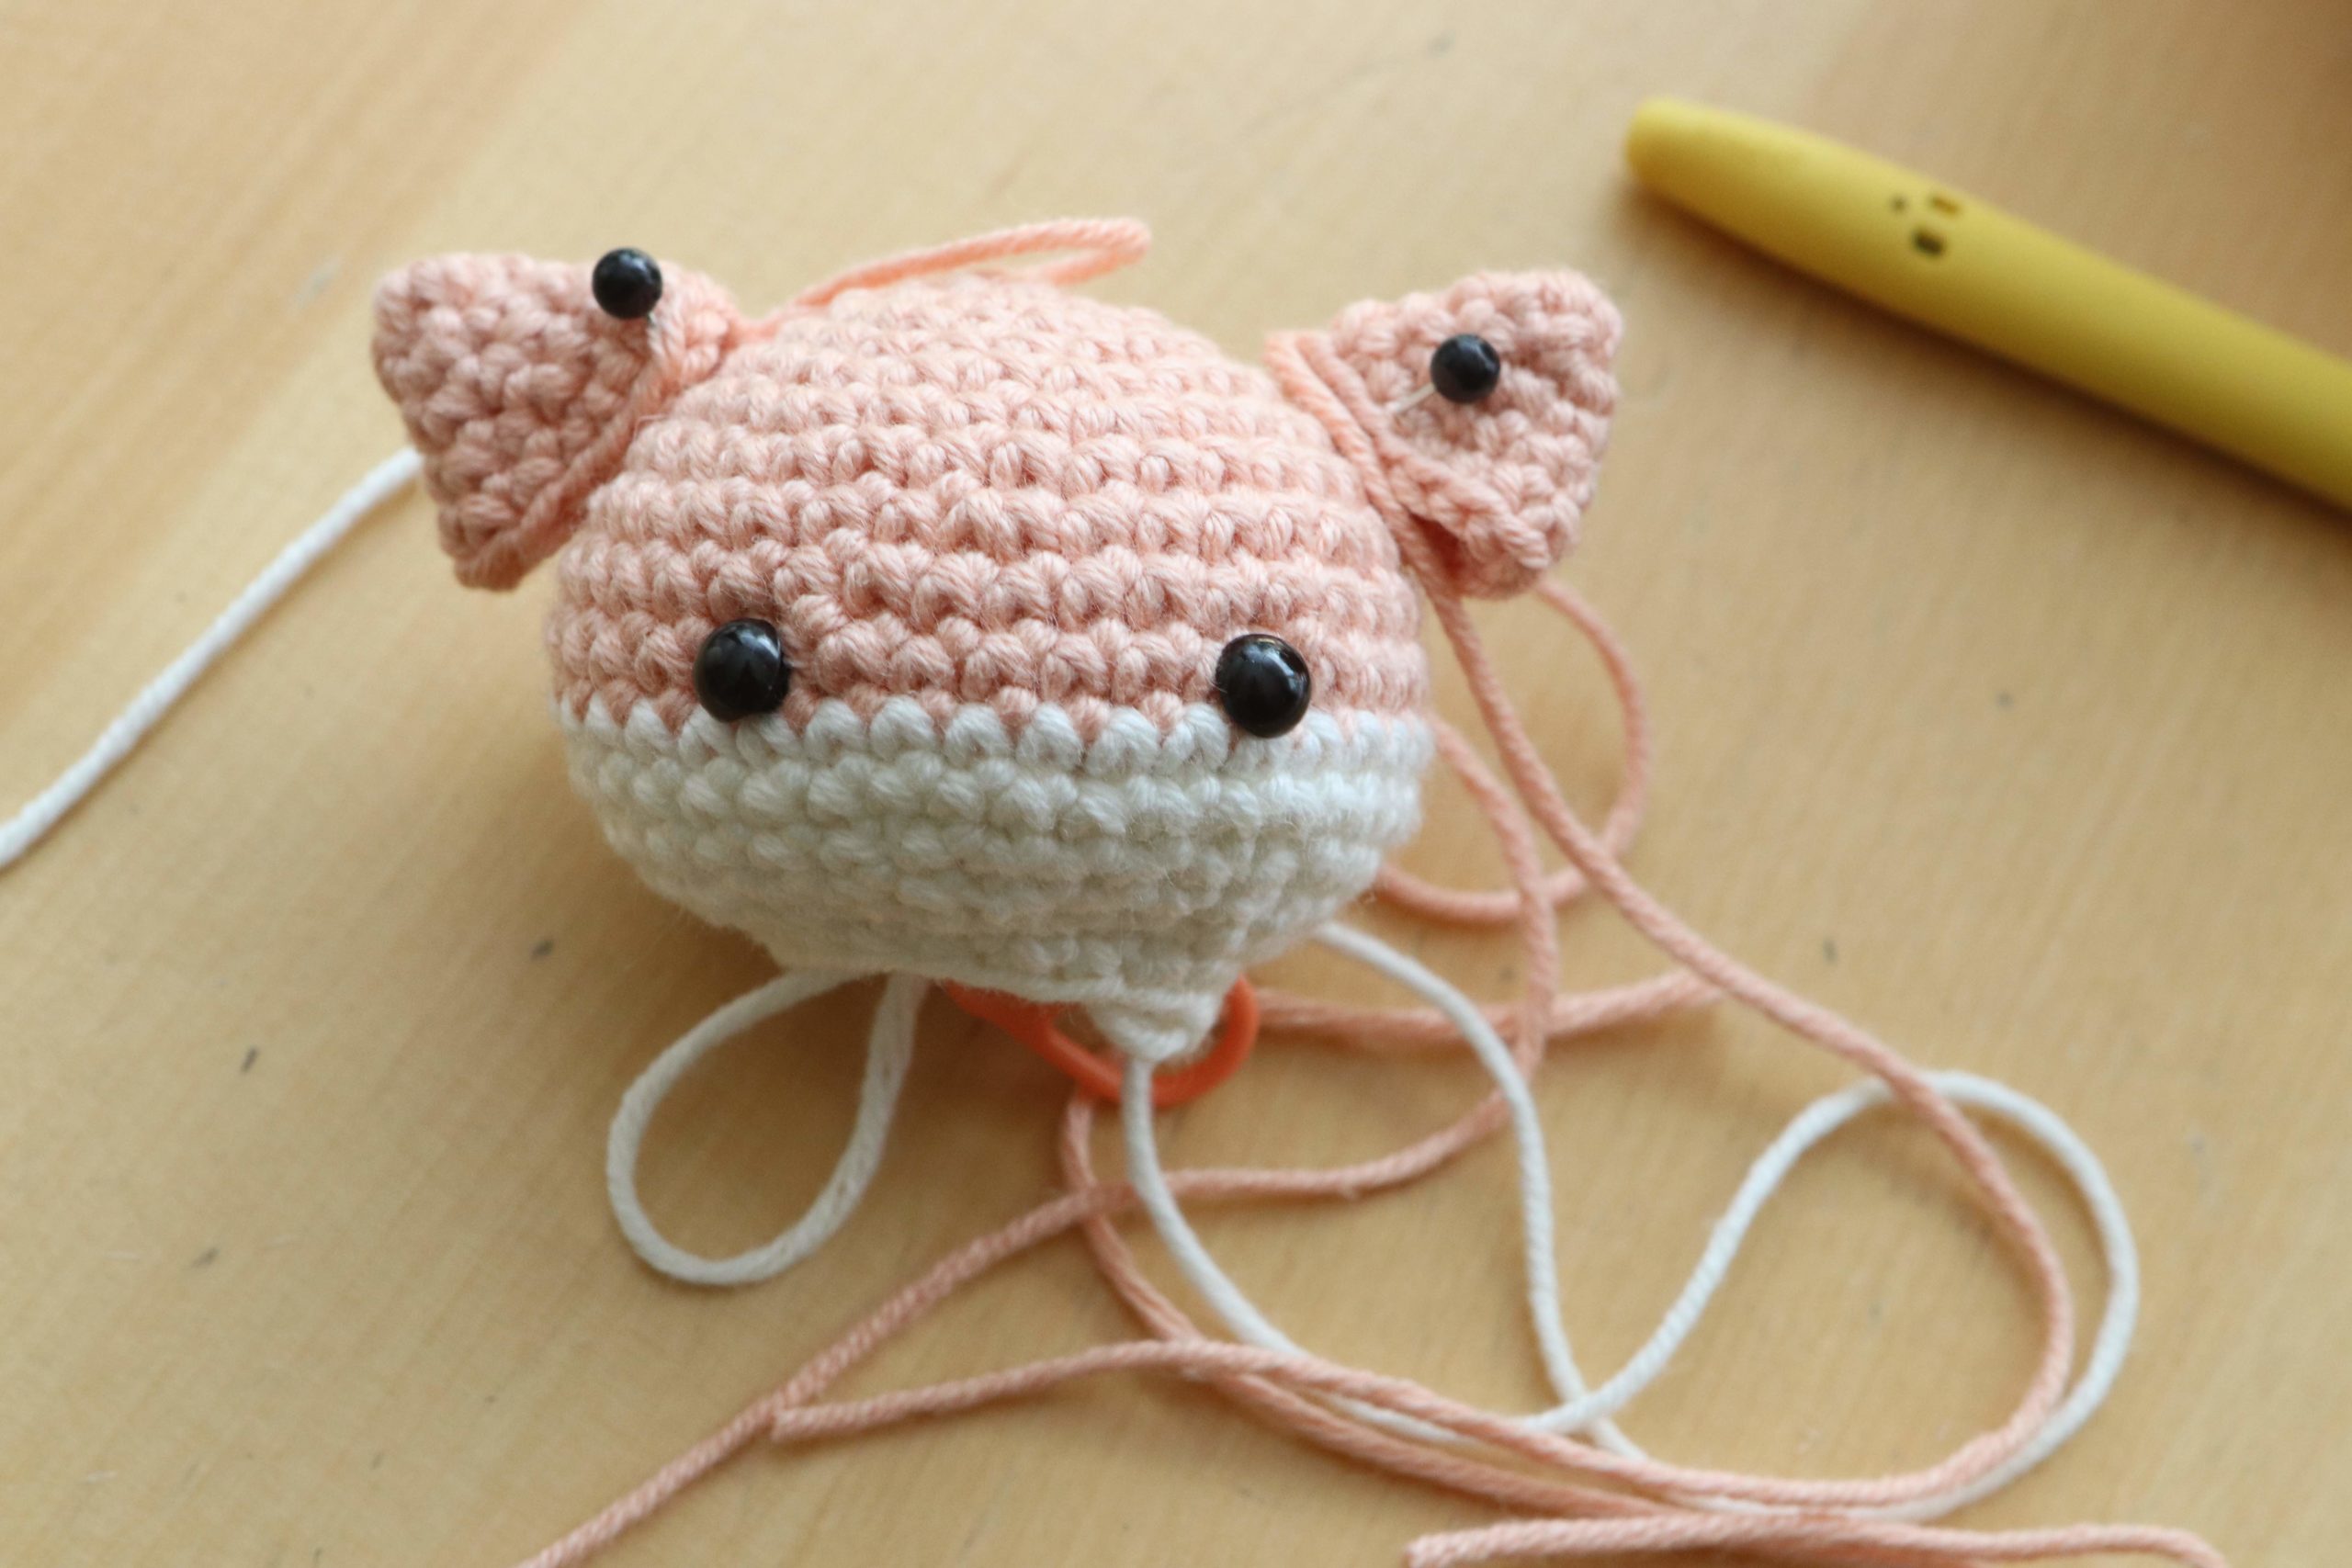
- Place the eyes, attach the snout, and sew whiskers before continuing
- Rnd 16: (sc in next 2 st, dec) repeat 6 times [18]
- Rnd 17: (sc in next st, dec) repeat 6 times [12]
- Fasten off
Stuff the head with fiber fill. In my example, the safety eyes are placed between Rnds 10 and 11, with an interspace of 6 stitches.
EAR
use main color yarn
- Rnd 1: make 4sc into magic ring
- Rnd 2: (sc in next st, inc in next st) repeat twice [6]
- Rnd 3: (sc in next st, inc in next st) repeat 3 times [9]
- Rnd 4: (sc in next 2 st, inc in next st) repeat 3 times [12]
- Rnd 5: (sc in next 3 st, inc in next st) repeat 3 times [15]
- Fasten off and leave a tail of about 10 inches long. Flatten the ear and sew the opening shut with the yarn end. The remainder of the yarn tail should be used to sew the ear onto the head.
SNOUT
use white yarn
- Rnd 1: make 6sc into magic ring
- Rnd 2: inc in each st [12]
- Fasten off with an invisible finish and leave a tail for sewing onto head.
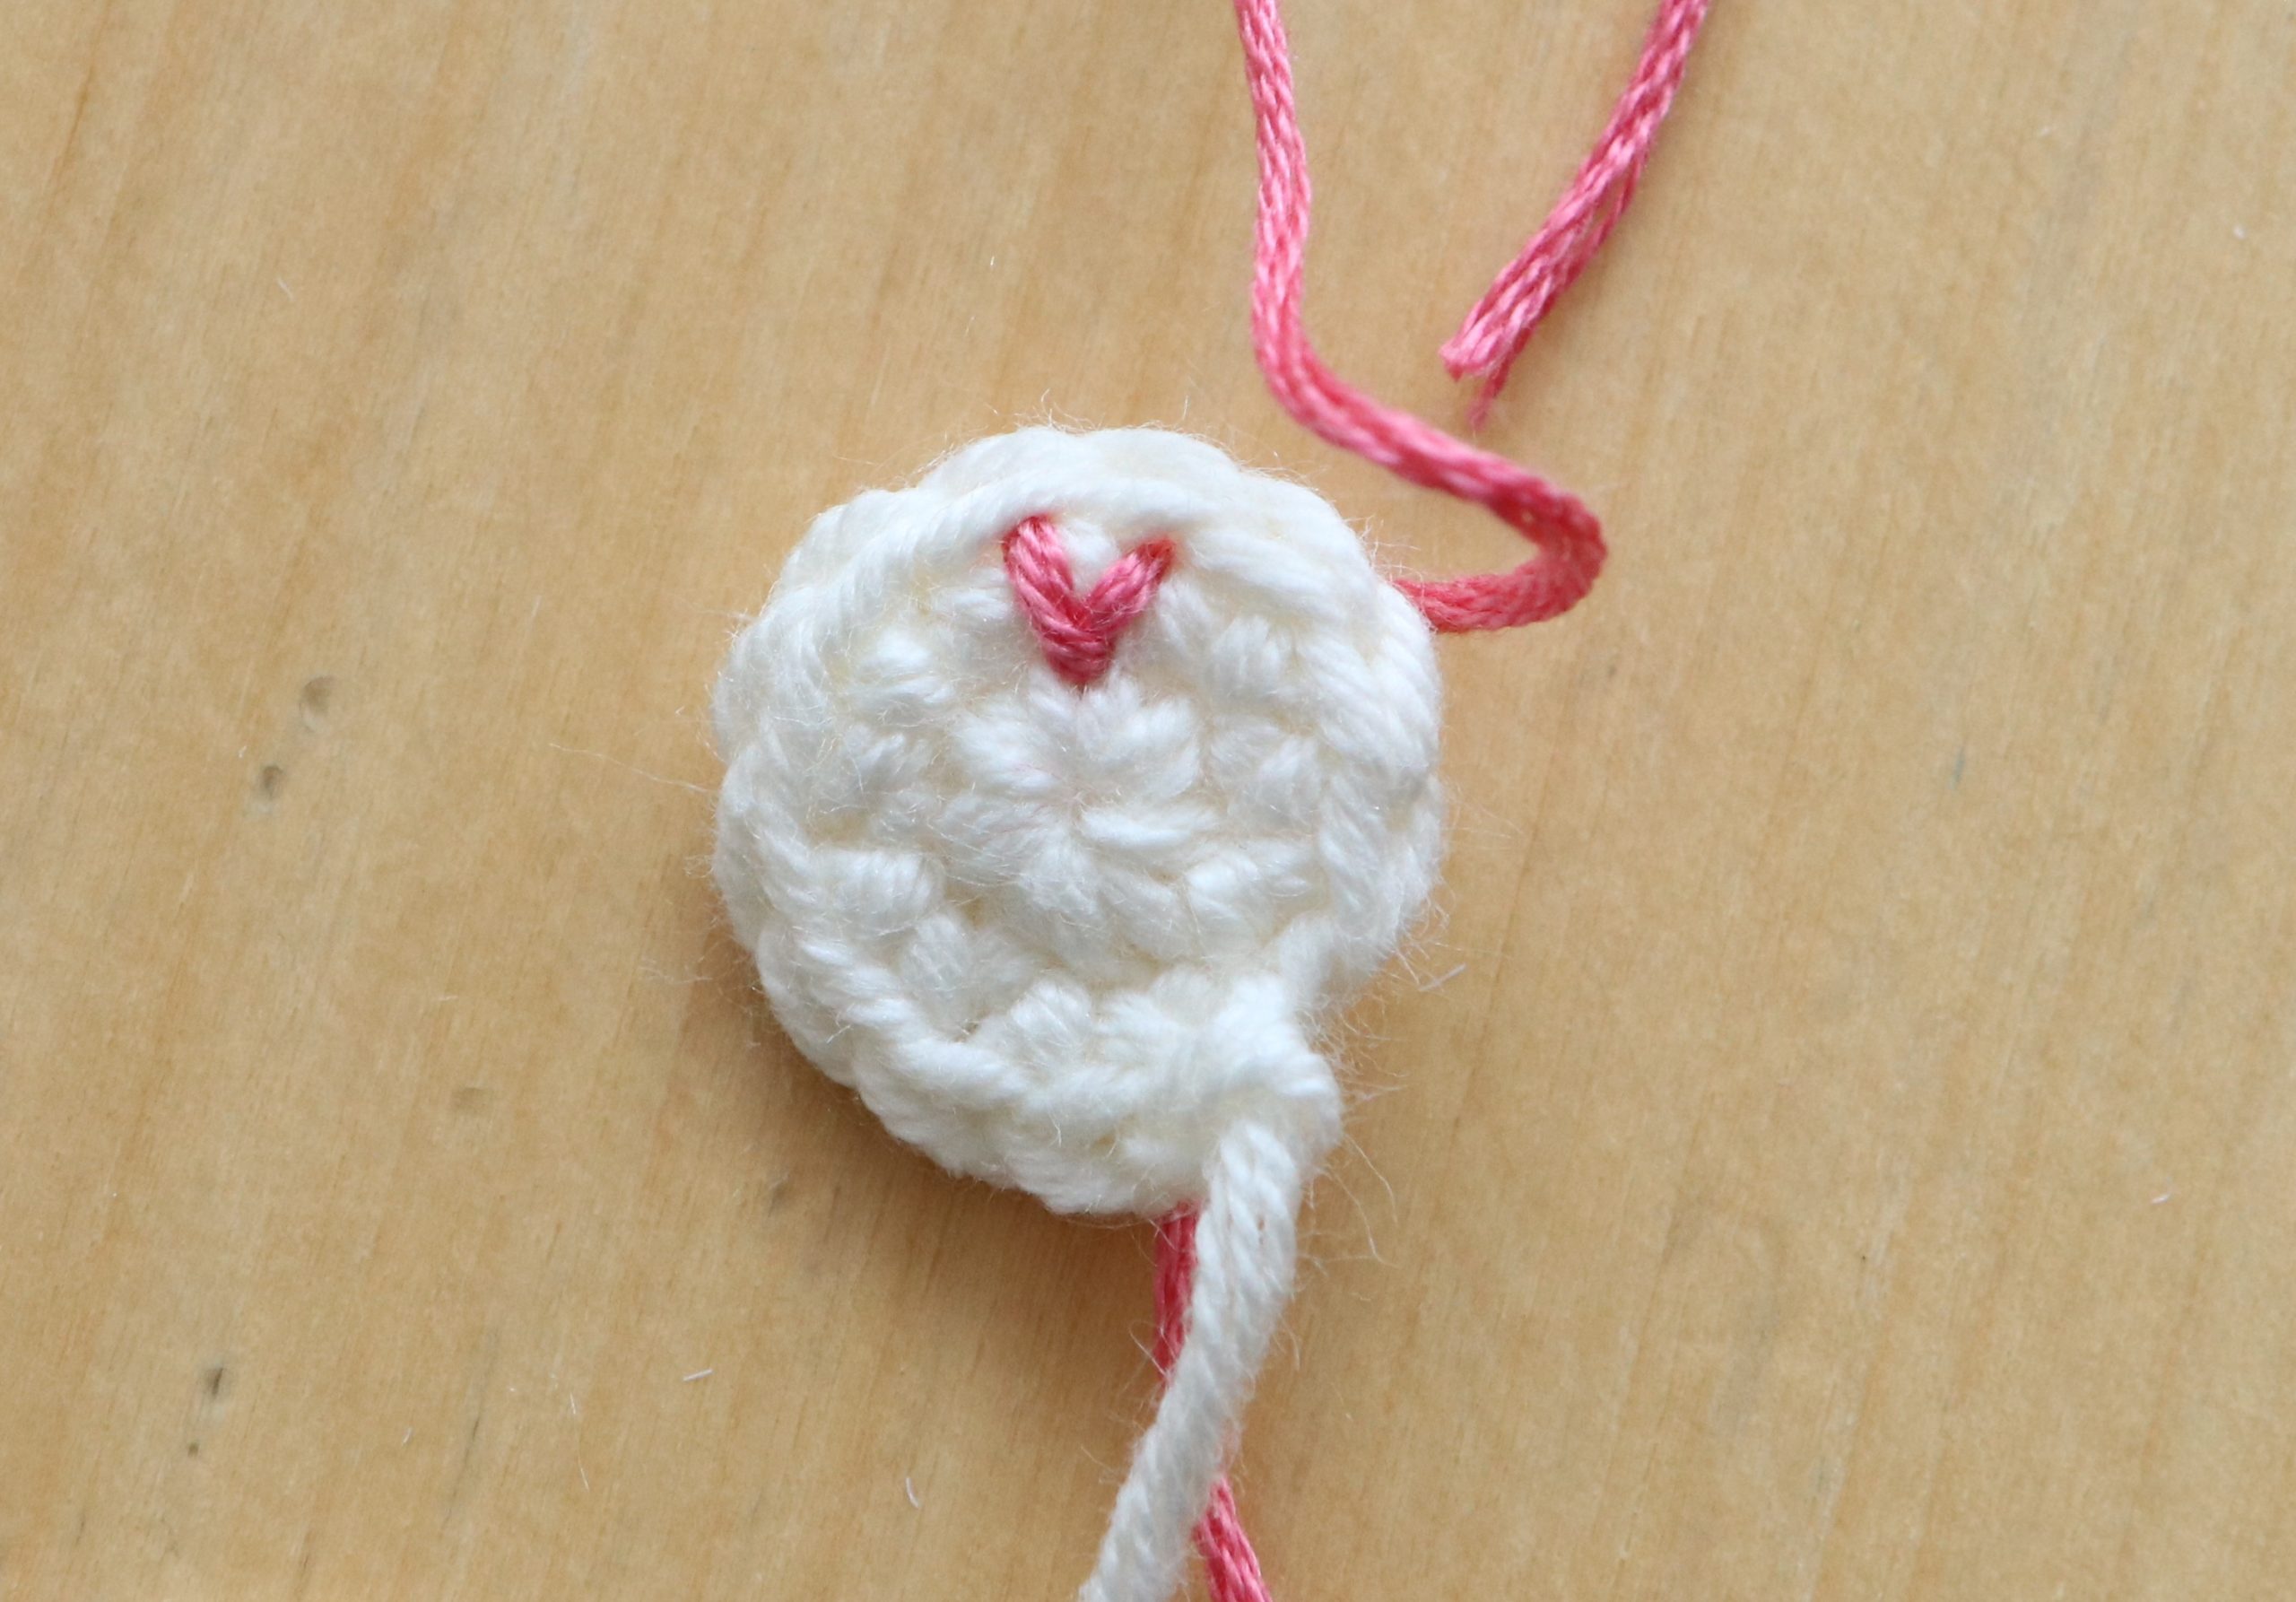

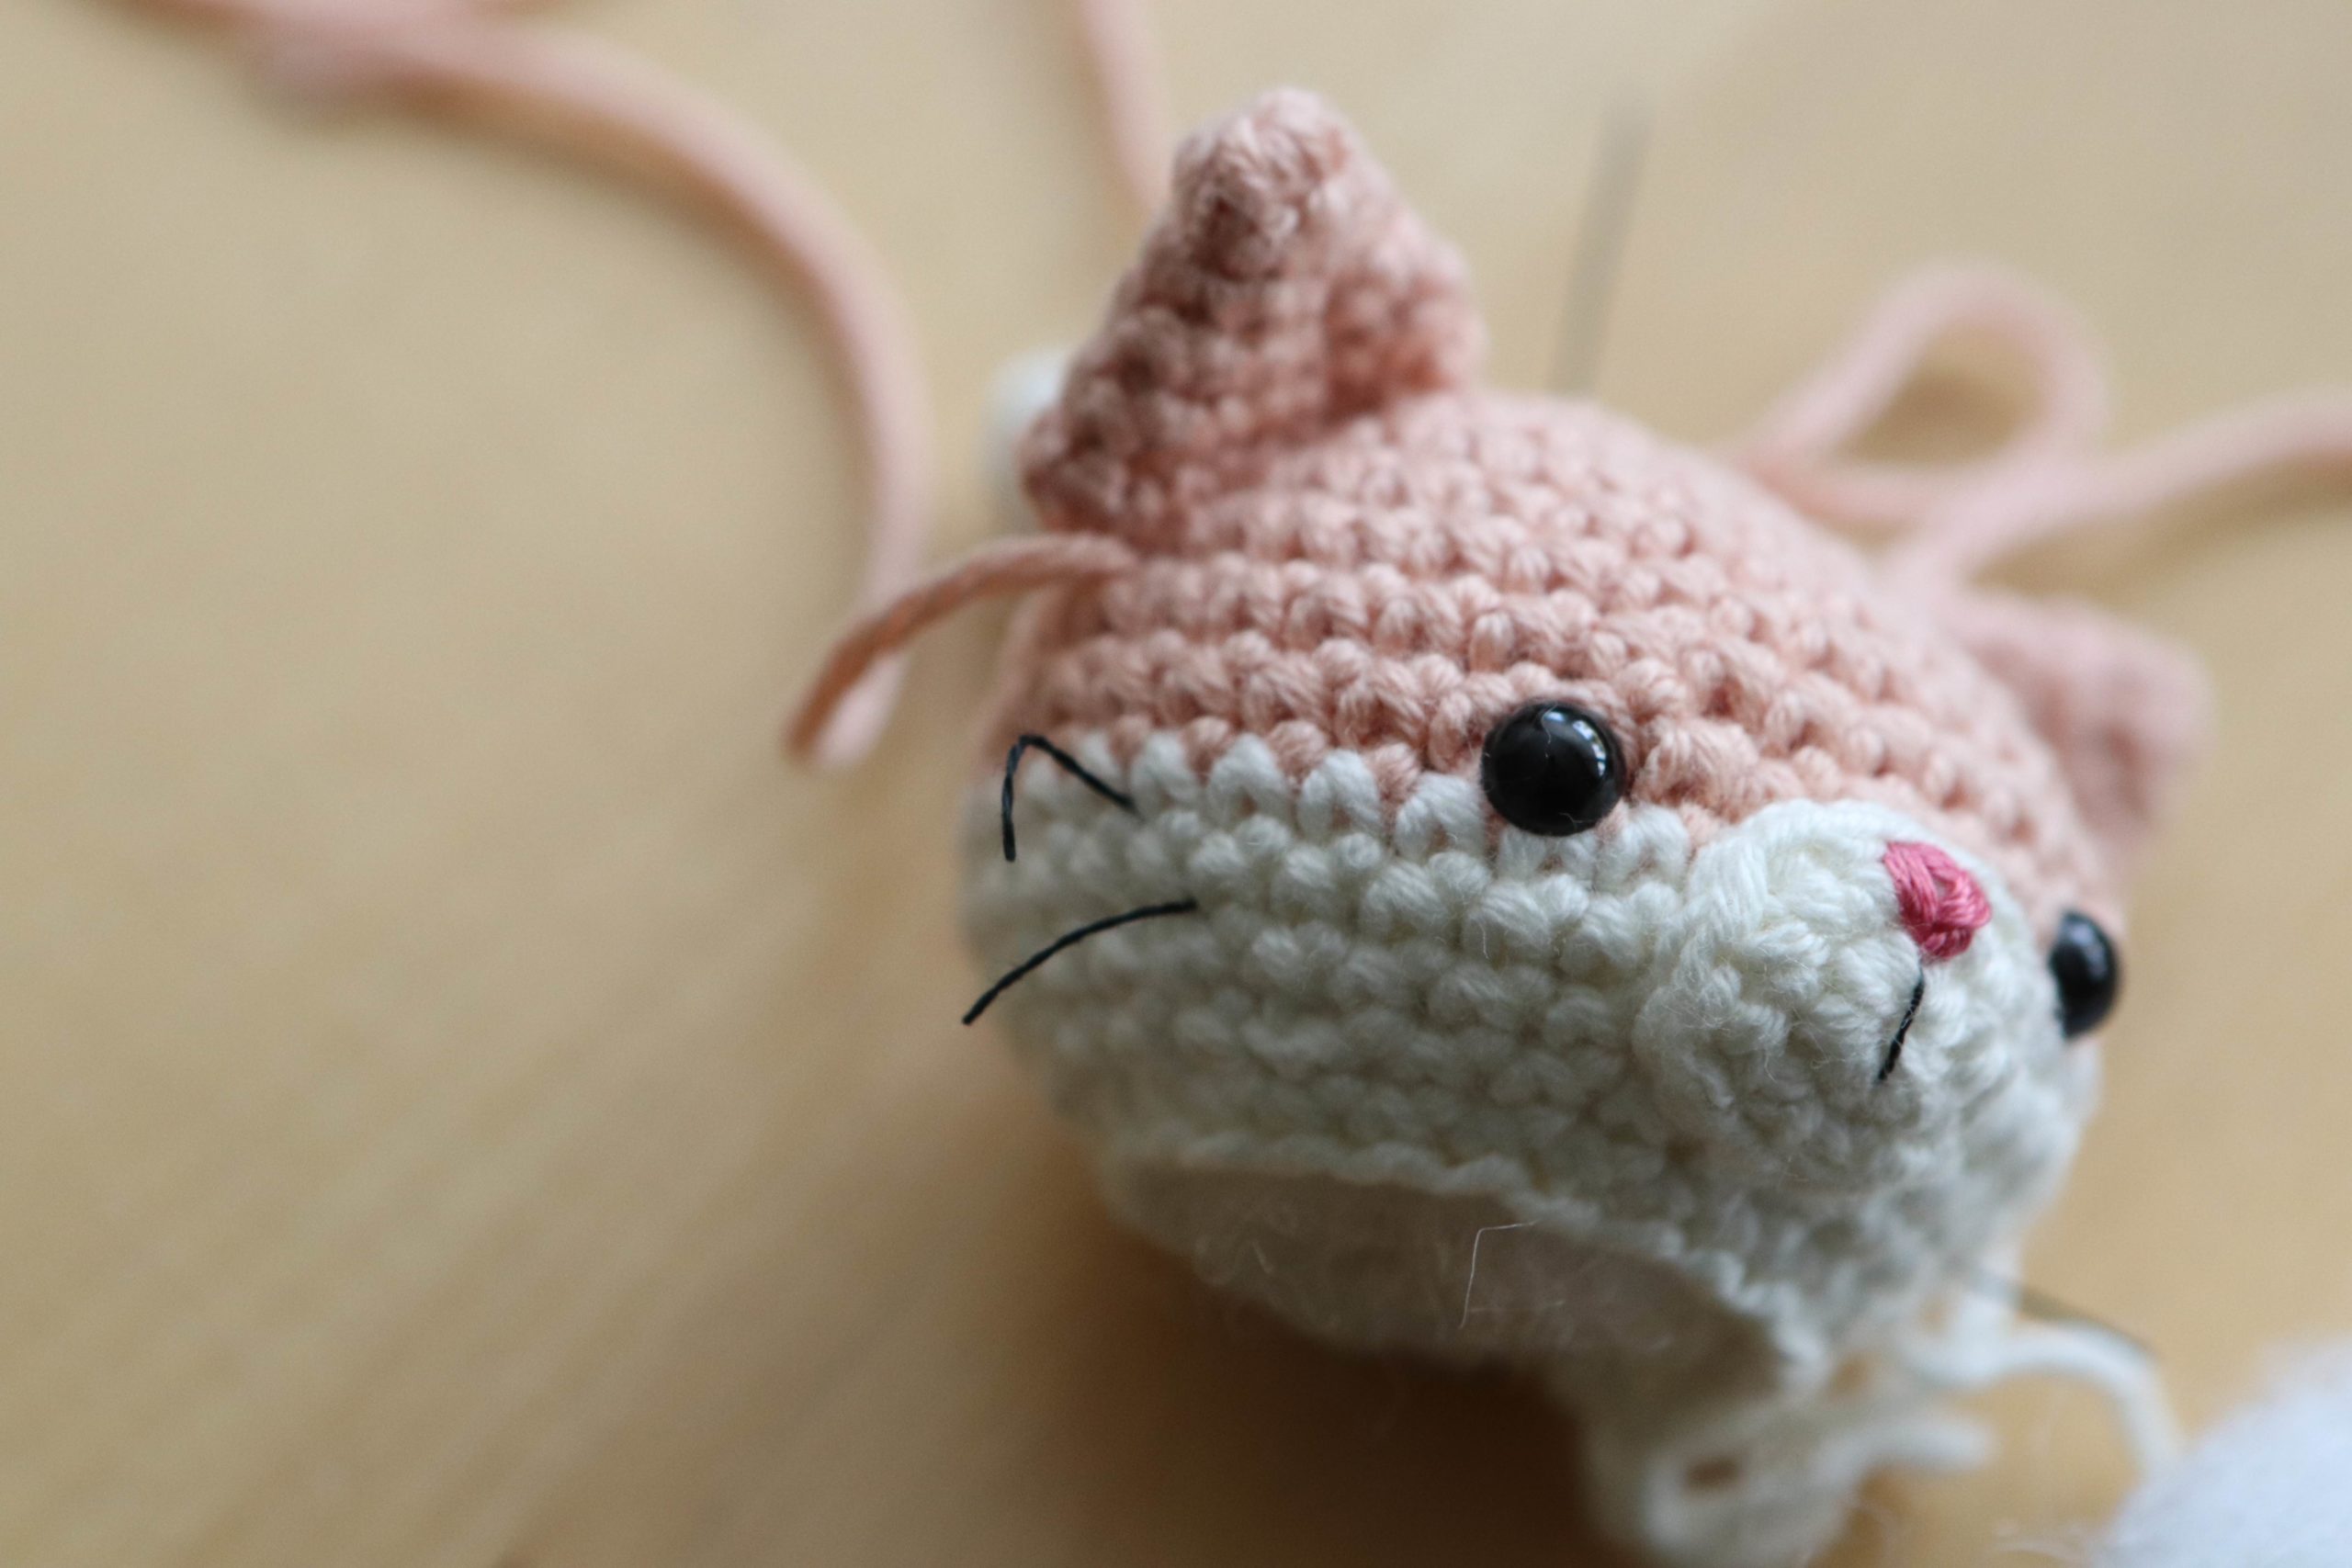
To make the nose, use your yarn needle and embroidery floss and sew a “V” onto the snout as pictured. In my example, I repeated these stitches 3 times each. Tie the ends behind the snout.
Take your sewing needle and black thread and sew a single line as pictured. Tie a neat knot at the back of the snout.
Sew the snout onto the head with the top edge of the nose halfway between the eyes.
WHISKERS
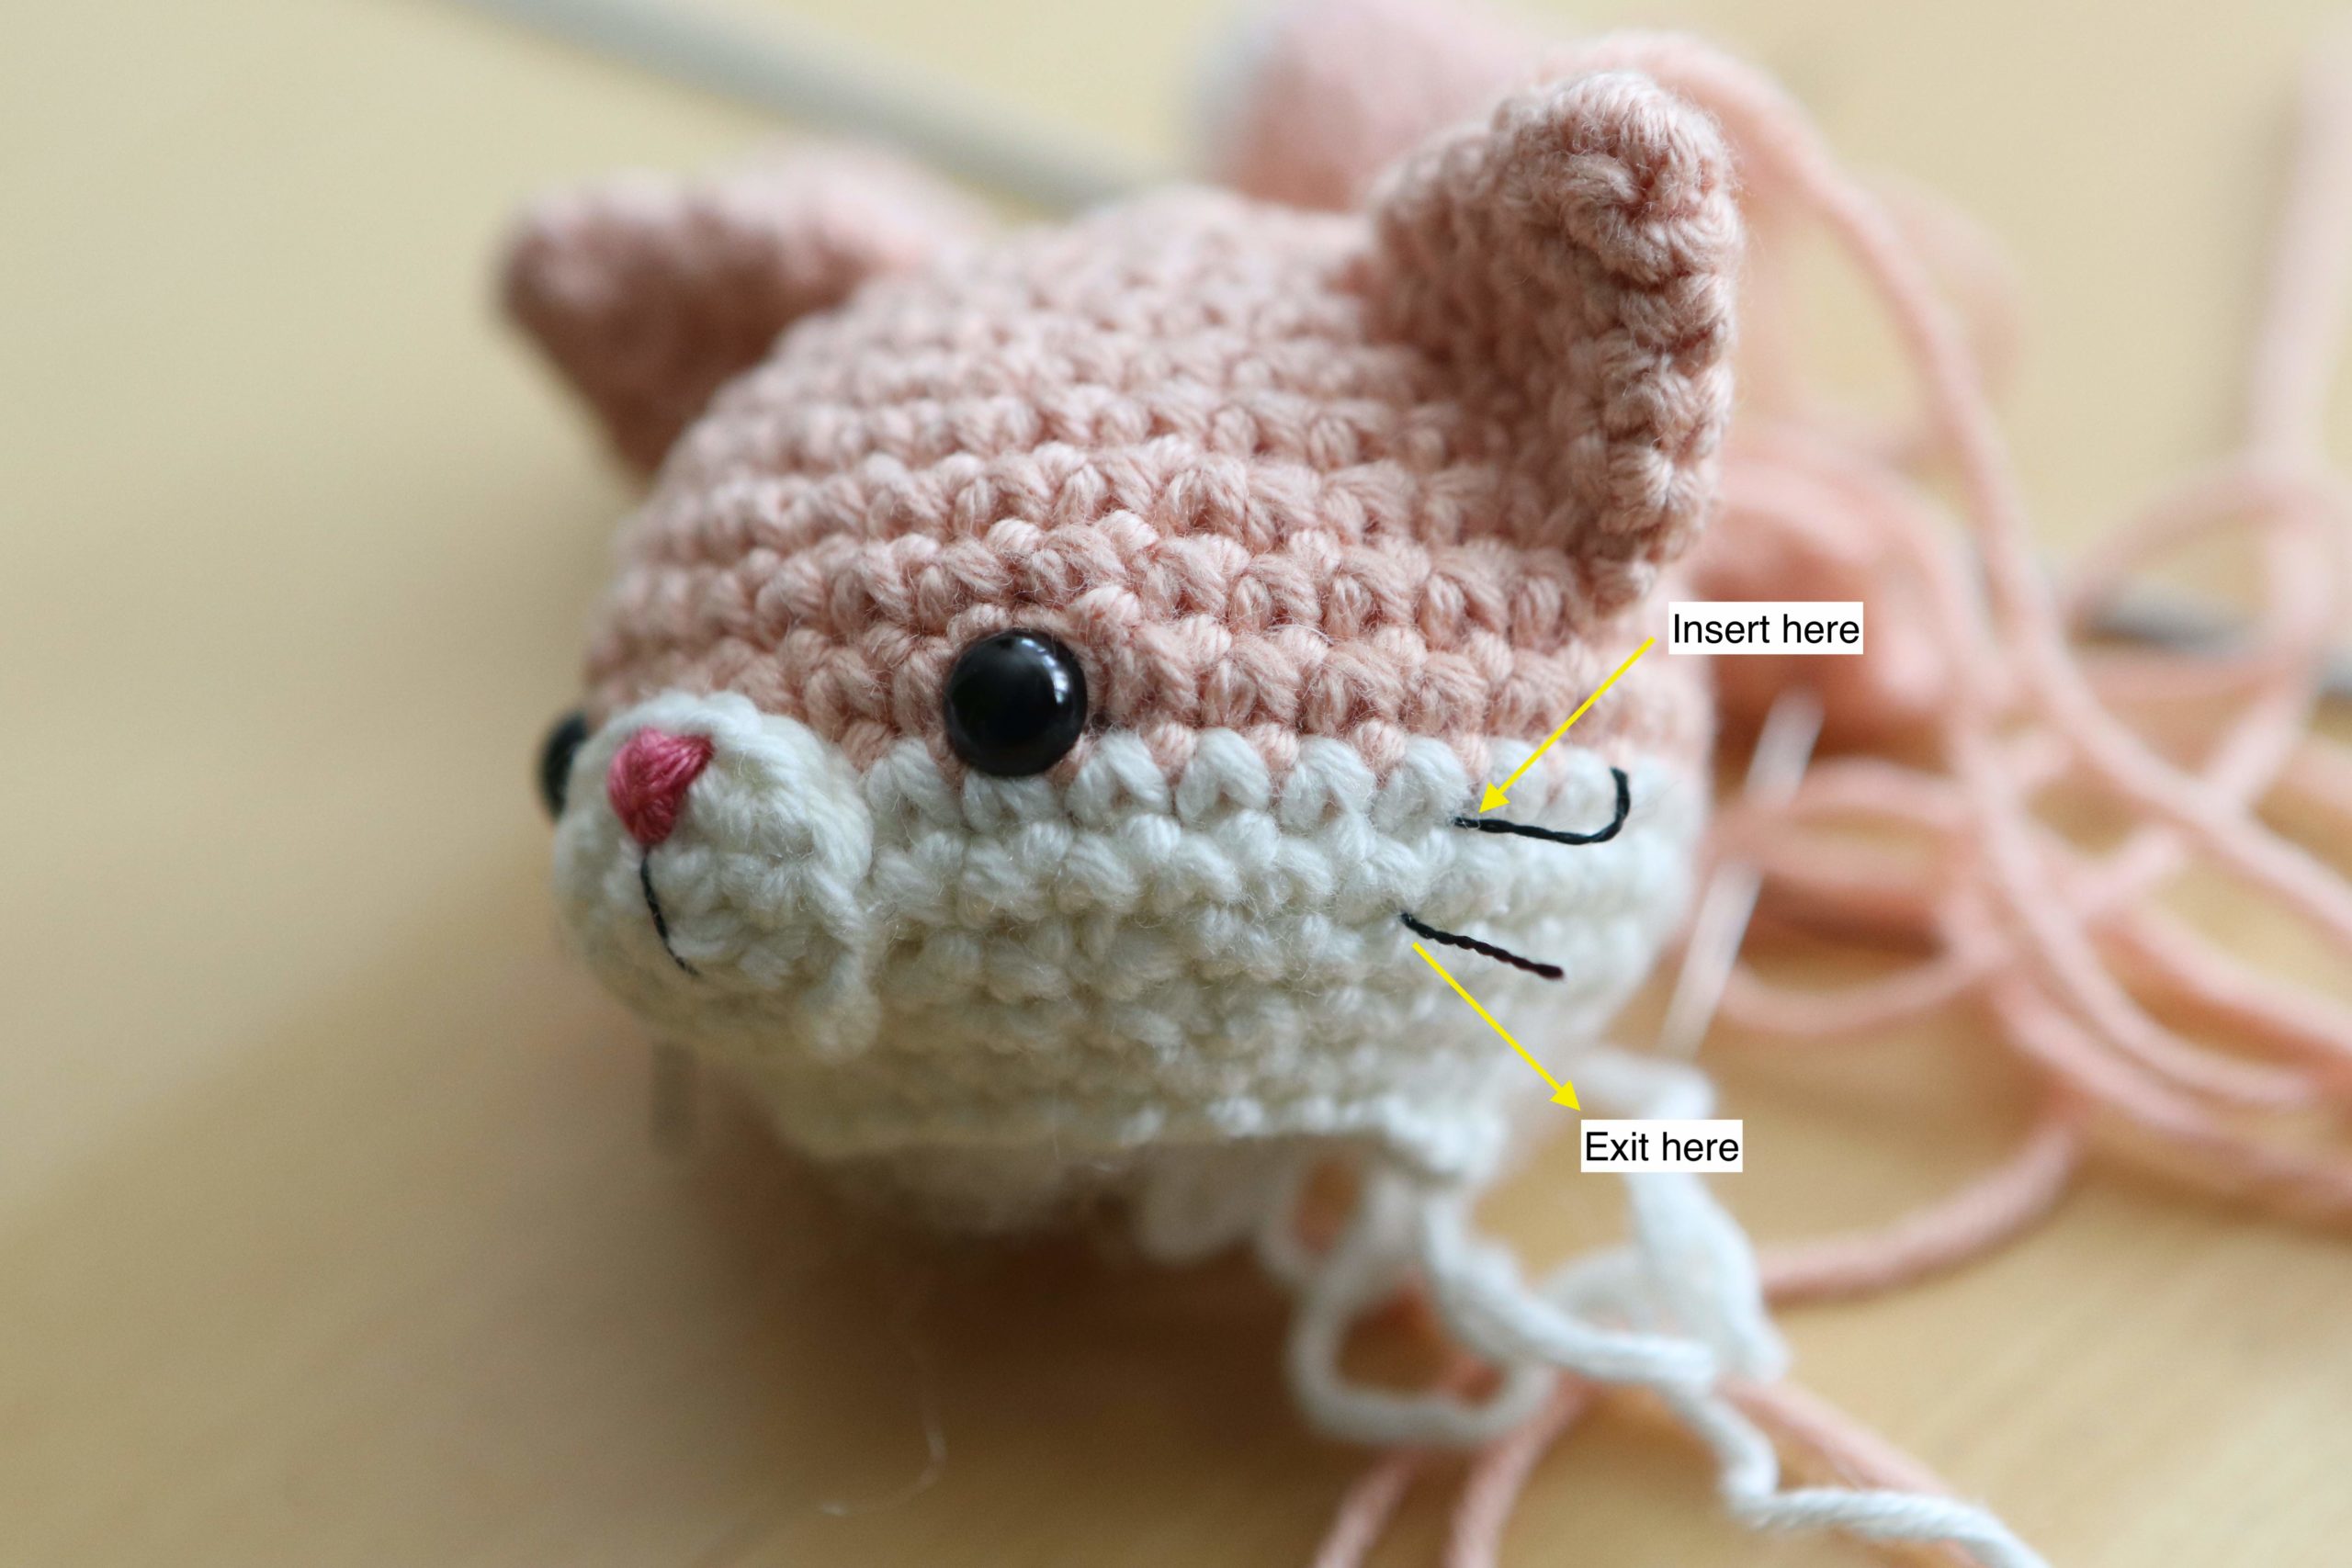
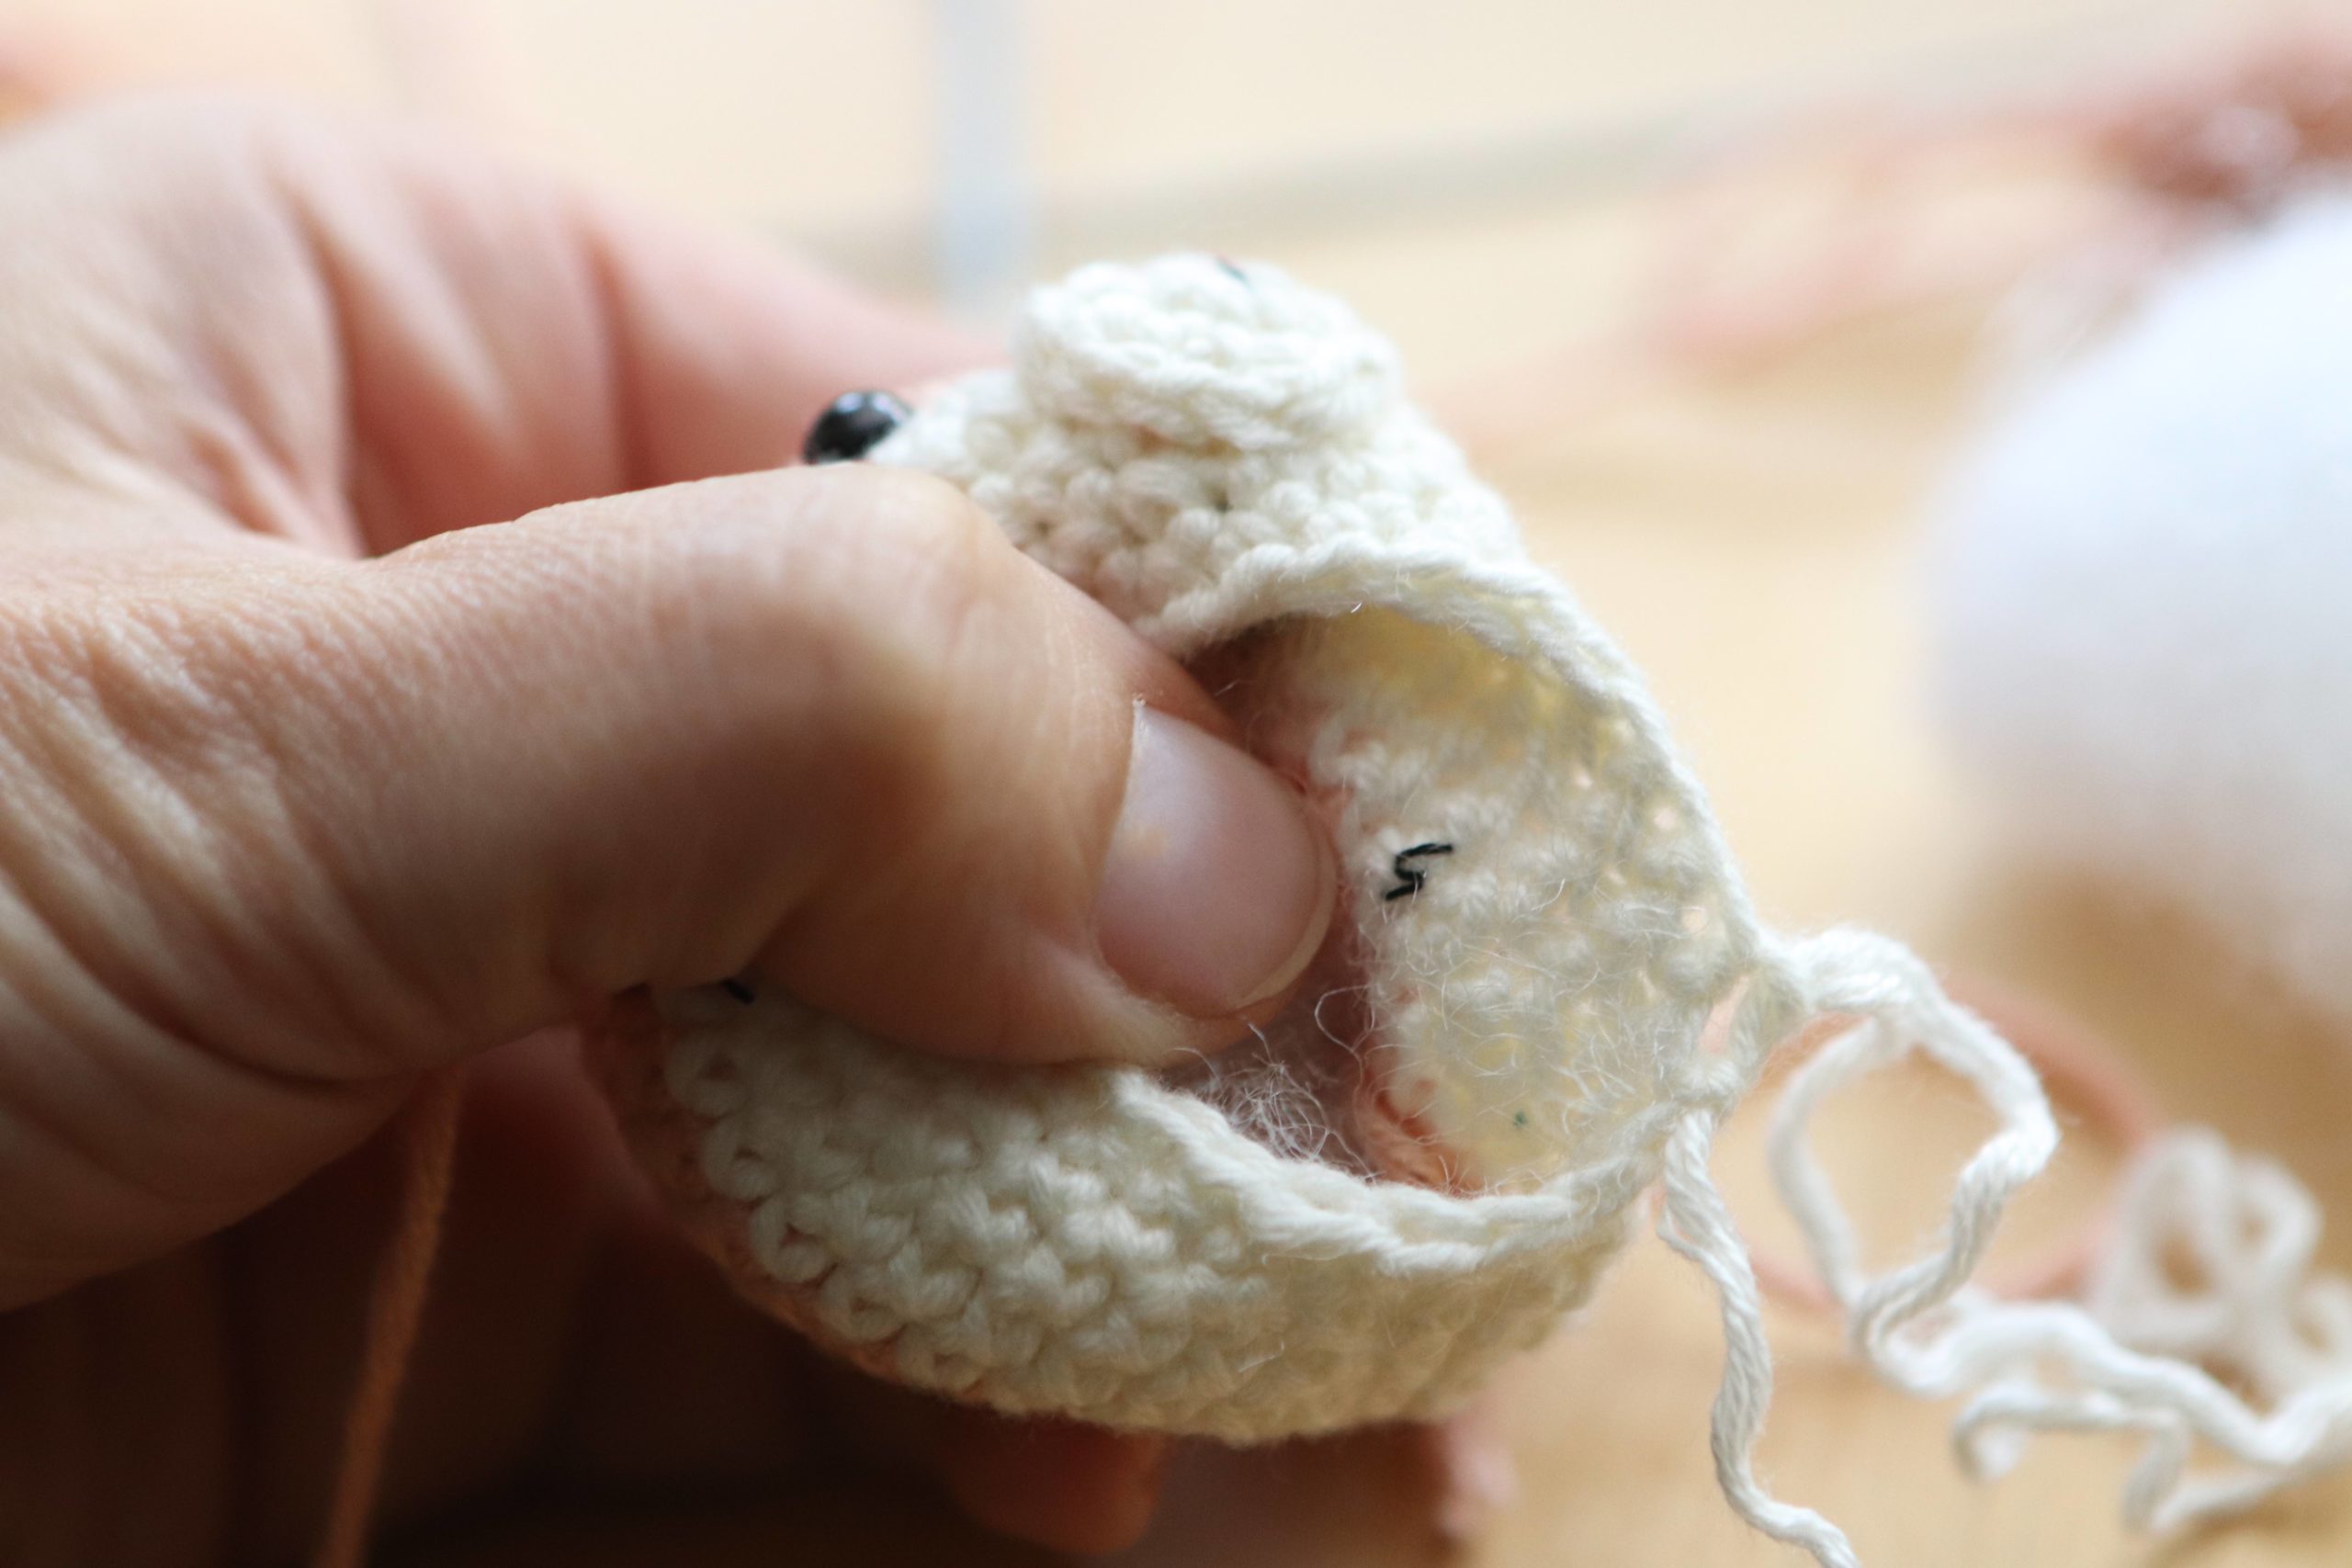
To sew the whiskers, thread your sewing needle with a piece of black thread about 7 inches long and start by inserting your thread into the opening that is four stitches away from the eye on one side. Leave about half of the thread sticking out. You will have to flip the head inside out a little bit next. Sew the the thread into any nearby stitch to attach/anchor the thread so that it can’t be pulled out. Make sure your stitch can’t be seen from the outside. Once done, insert the needle out of the opening as indicated in the photo. You should now have two whiskers sticking out of the face that is securely anchored from the inside. Trim the whiskers to your desired length. Repeat for the other side.
BODY
- Rnd 1: make 6sc into magic ring
- Rnd 2: inc in each st [12]
- Rnd 3: (sc in next st, inc in next st) repeat 6 times [18]
- Rnd 4: (sc in next 2 st, inc in next st) repeat 6 times [24]
- Rnd 5: (sc in next 3 st, inc in next st) repeat 6 times [30]
- Rnd 6-7: sc in all 30 st [30]
- Rnd 8: (sc in next 3 st, dec) repeat 6 times [24]
- Rnd 9-10: sc in all 24 st [24]
- Rnd 11: (sc in next 2 st, dec) repeat 6 times [18]
- Rnd 12-13: sc in all 18 st [18]
- Stuff the body with fiber fill
- Rnd 14: (sc in next st, dec) repeat 6 times [12]
- Fasten off and leave a tail for sewing to head.
ARM
make two
Start with white yarn if you’d like your doll to have white paws
- Rnd 1: make 6sc into magic ring
- Rnd 2: (sc in next st, inc in next st) repeat 3 times [9]
- Change to main color yarn
- Rnd 3: sl st, sc in next 8 st [9]
- Rnd 4: dec, sc in next 7 st [8]
- Rnd 5: sc in all 8 st [8]
- Rnd 6: dec, sc in next 6 st [7]
- Rnd 7: sc in all 7 st [7]
- Rnd 8: dec, sc in next 5 st [6]
- Fasten off and leave a tail for sewing to body. Do not stuff the arm. Sew the opening shut before attaching to the body.
FOOT
make two
Start with white yarn
- Rnd 1: make 6sc into magic ring
- Rnd 2: inc in each st [12]
- Change to main color yarn
- Rnd 3-4: sc in all 12 st [12]
- Rnd 5: dec, sc in next 10 st [11]
- Stuff with a bit of fiber fill
- Rnd 6: sc in all 11 st [11]
- Rnd 7: dec, sc in next 9 st [10]
- Rnd 8: dec, sc in next 8 st [9]
- Rnd 9: sc in all 9 st [9]
- Fasten off and leave a tail for sewing to body. Sew the opening shut before attaching to the body.
TAIL
- Rnd 1: make 5sc into magic ring
- Rnd 2-11: sc in all 5 st [5]
- No stuffing is needed
- Bind off and leave a tail for sewing onto body
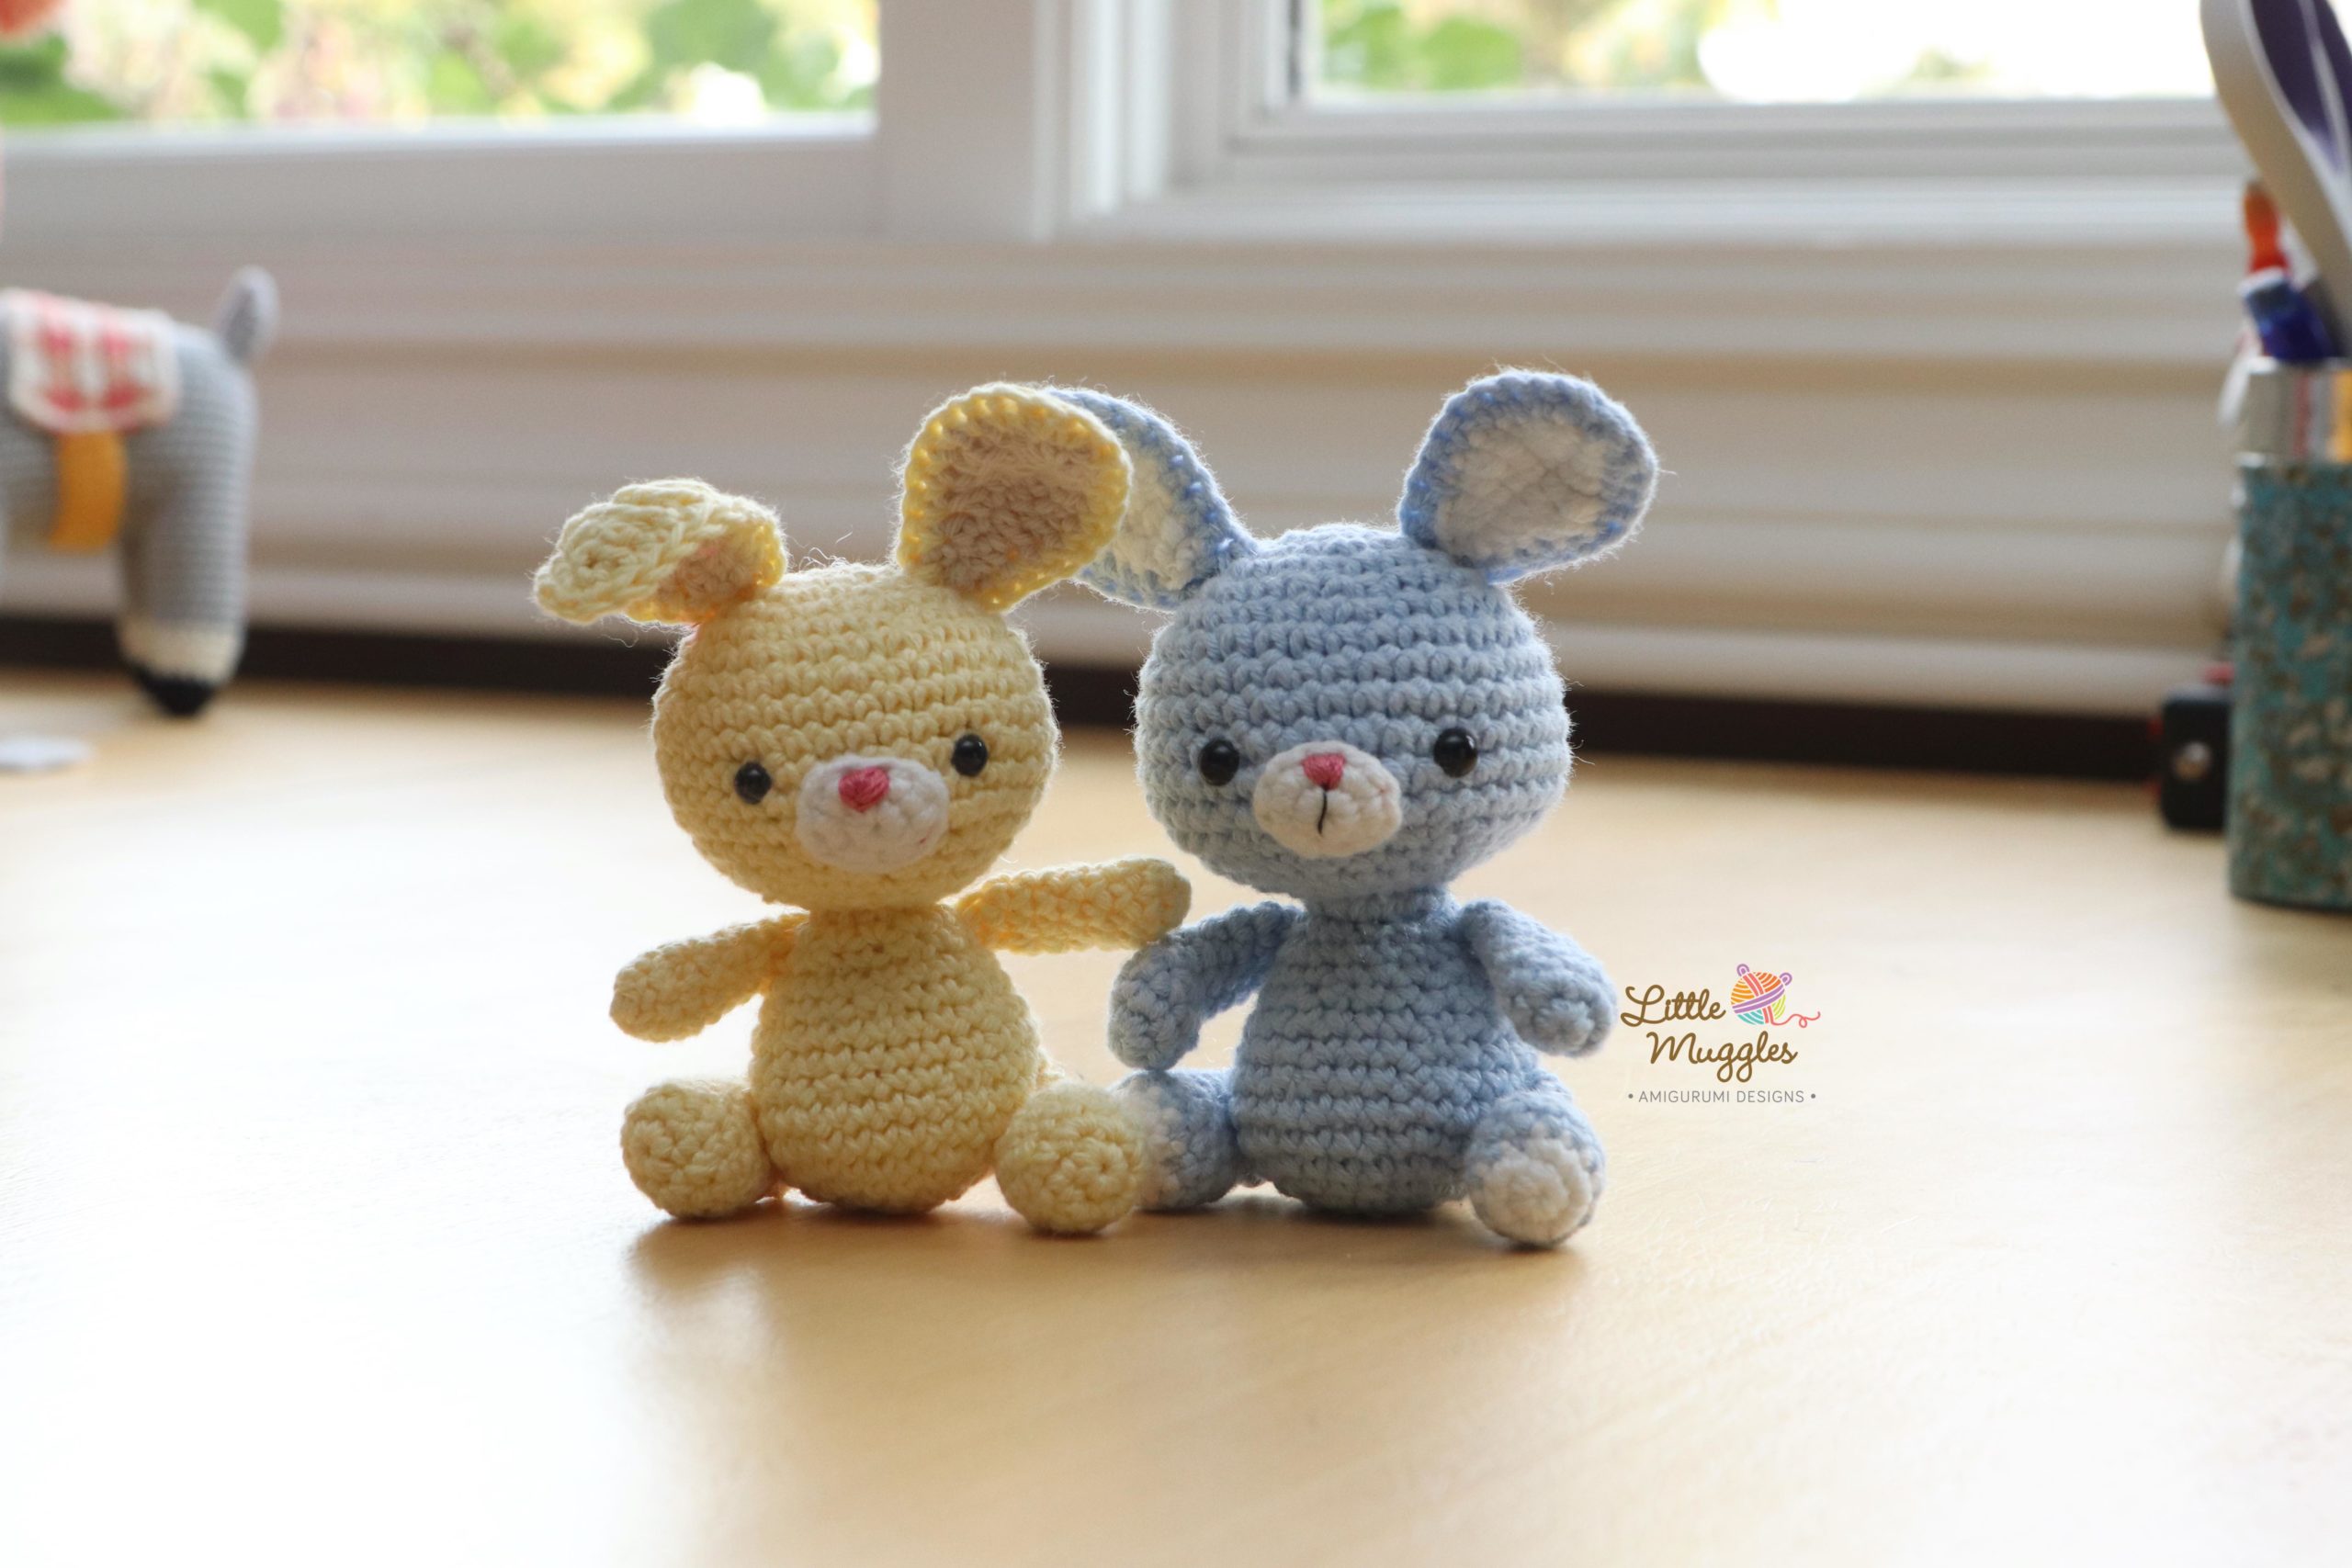
You can modify this pattern to create other animals as well. Here you can see I have used it to make these cute little bunnies. You can customize your dolls in any way you like. For example, you can choose to make the head in all one color or you might do away with the white paws… These would make for cute little ornaments or keychains… There are many possibilities! This is a great foundation pattern for many different animals.
For those interested in these bunnies, the ears are made by crocheting two identical pieces in different colors:
- Chain 10. Starting in 2nd chain from hook, make sc, hdc, dc, tc in next 3 st, dc, hdc, inc. Continue around the other side of the foundation chain and repeat the instructions.
- Place the two pieces with the wrong sides facing each other and using the main color, sc around the edge to attach the pieces together.
Please share your creations by tagging me on Instagram! #littlemuggles
Happy Crocheting!! XOXO