
Welcome!! You are in the right place if you’re here for the newest FREE Little Muggles pattern!
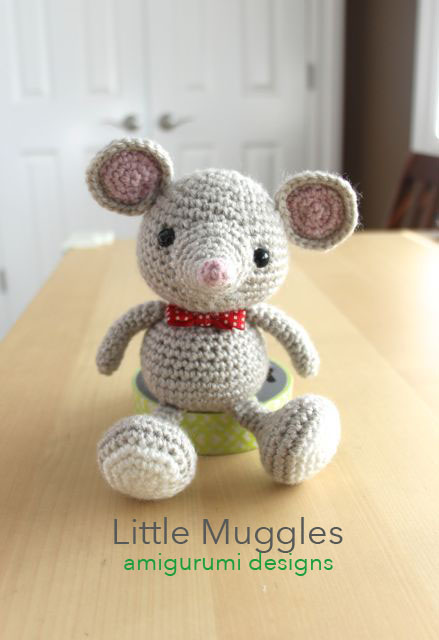
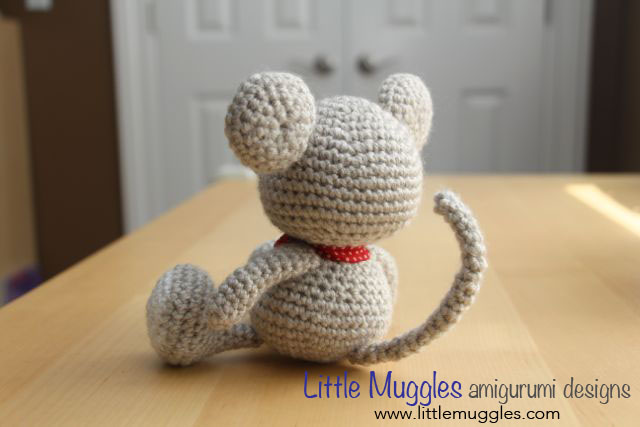
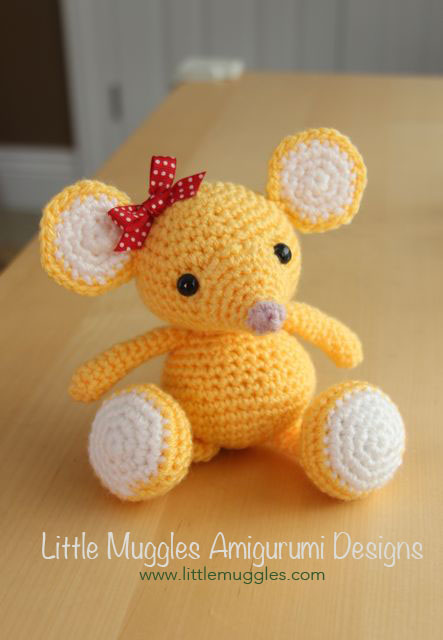
I present to you “Buttons”, the little baby mouse! This doll is fairly simple to make as it uses simple crochet stitches and techniques. The main difficulty that I can see is being able to manipulate the yarn and crochet hook, as the circumference of the body parts are quite small at times! Be patient and you should be just fine! When this doll is made with the indicated yarn and hook size, it sits at approximately 5 inches/12.7cm high. His body can be filled with either fiber fill or polyester pellets, as with my previous baby owl pattern.
Basic skills needed:
magic ring, single crochet, increase, decrease, color change
MATERIALS
Size USD3/3.25mm Crochet hook
Worsted weight acrylic yarn (Lion Brand Vanna’s Choice)
– Linen (pale gray)
– White
Worsted weight acrylic/wool blend yarn (Lion Brand Wool-Ease)
– Blush Heather (pink)
9mm safety eyes
Polyester Fiberfill
Yarn/Tapestry needle
ABBREVIATIONS
st – stitch
sc – single crochet
inc – increase
dec – decrease
The bracketed numbers at the end of the rounds (Rnd) represent the number of stitches you should have at the end of that particular round.
HEAD
use gray yarn
Rnd 1: Start 6sc into magic ring [6]
Rnd 2: inc 6 times [12]
Rnd 3: sc in all 12 st [12]
Rnd 4: (sc, inc in next st) repeat 6 times (18)
Rnd 5: (sc in next 2 st, inc in next st) repeat 6 times [24]
Rnd 6: (sc in next 3 st, inc in next st) repeat 6 times [30]
Rnd 7: sc in next 4 st, inc in next st) repeat 6 times [36]
Rnd 8: (sc in next 5 st, inc in next st) repeat 6 times [42]
Rnd 9-13: sc in all 42 st [42]
Rnd 14: (sc in next 5 st, dec) repeat 6 times [36]
Rnd 15: (sc in next 4 st, dec) repeat 6 times [30)
Rnd 16: (sc in next 3 st, dec) repeat 6 times [24]
Rnd 17: (sc in next 2 st, dec) repeat 6 times [18]
Rnd 18: (sc, dec) repeat 6 times [12]
Fasten off and leave a tail
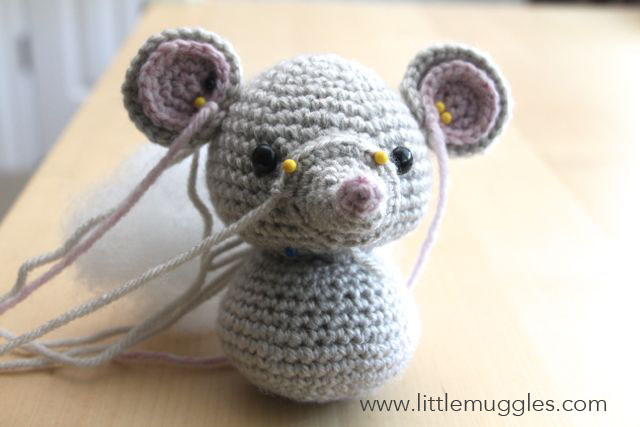
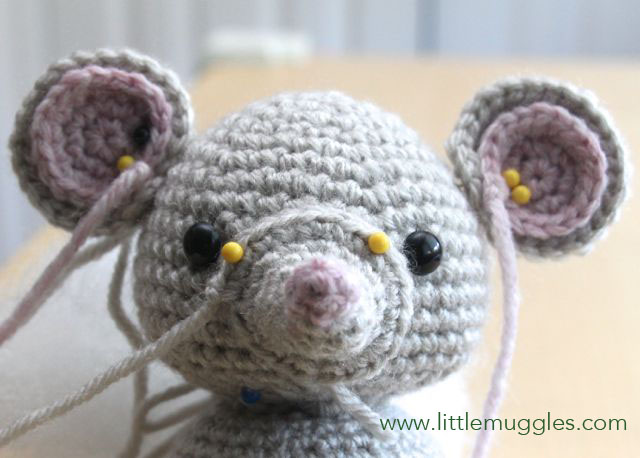
Stuff the head generously with fiber fill. Place the 9mm safety eyes between rows 9 and 10, with 8 stitches between them.
EAR
OUTER PORTION
use gray yarn
Rnd 1: Start 6sc into magic ring [6]
Rnd 2: inc 6 times [12]
Rnd 3: (sc, inc in next st) repeat 6 times [18]
Rnd 4: (sc in next 2 st, inc in next st) repeat 6 times [24]
Fasten off and leave a tail
INNER PORTION
use pink yarn
Rnd 1: make 6sc into magic ring
Rnd 2: inc 6 times [12]
Rnd 3: (sc, inc in next st) repeat 6 times [18]
Fasten off and leave a tail
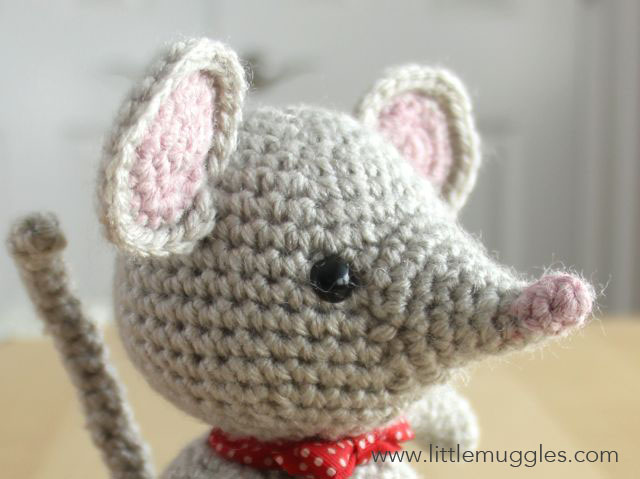
**The Lion Brand WoolEase yarn that I use for this pink portion is an acrylic(80%)/wool(20%) blend and just like the Vanna’s Choice yarn, is classified as Category 4 worsted weight. However, the WoolEase yarn is a bit finer and things come out a bit smaller when compared with the same thing made with the Vanna’s Choice. In my yellow version of the mouse, both the outer and inner ear portions are made with Vanna’s Choice and you might notice a cosmetic difference in the ears.
Center and sew the inner pink portion onto the gray ear using the gray yarn tail. In my example, I have the “wrong side” of the pink portion facing the “right side” of the gray circle. You can do it any way you like, just take note to do the same thing on both ears! The reason I did it this way is because I liked how the gray circle seems to have a natural rim that cups the pink portion nicely.
SNOUT
start with pink yarn
Rnd 1: Start 4sc into magic ring
Rnd 2: inc 4 times [8]
Rnd 3: dec 4 times [4]
change to gray yarn
Rnd 4: inc 4 times [8]
Rnd 5: 5sc, inc in next 2 st, sc in last st [10]
Rnd 6: 2sc, dec, 2sc, inc, 2sc, inc [11]
Rnd 7: (sc, inc) 5 times, sc [16]
Rnd 8: sc in all 16 st [16]
Rnd 9: (2sc, inc) repeat 5 times, sc [21]
Fasten off and leave a tail
Center the snout between the eyes. The top rim of the snout should be at about where the level of row 7 and 8 meet. Sew the snout on carefully and neatly. Try to do it so it looks seamless!
BODY
Rnd 1: Start 6sc into magic ring [6]
Rnd 2: inc 6 times [12]
Rnd 3: (sc, inc in next st) repeat 6 times [18]
Rnd 4: (sc in next 2 st, inc in next st) repeat 6 times [24]
Rnd 5: (sc in next 3 st, inc in next st) repeat 6 times [30]
Rnd 6: (sc in next 4 st, inc in next st) repeat 6 times [36]
Rnd 7: (sc in next 5 st, inc in next st) repeat 6 times [42]
Rnd 8-9: sc in all 42 st [42]
Rnd 10: (sc in next 5 st, dec) repeat 6 times [36]
Rnd 11: (sc in next 4 st, dec) repeat 6 times [30]
Rnd 12-13: sc in all 30 st [30]
Rnd 14: (sc in next 3 st, dec) repeat 6 times [24]
Rnd 15: (sc in next 2 st, dec) repeat 6 times [18]
Rnd 16: (sc, dec) repeat 6 times [12]
Fasten off
Stuff the body generously before attaching the head!
ARM
use gray yarn
Rnd 1: Start 4sc into magic ring
Rnd 2: inc 4 times [8]
Rnd 3-7: sc in all 8 st [8]
Rnd 8: dec, 6sc [7]
Rnd 9-13: sc in all 7 st [7]
Fasten off and leave a tail
There is no need to stuff the arm. Sew the opening shut and attach the arms symmetrically to either side of the body.
FOOT
start with white yarn
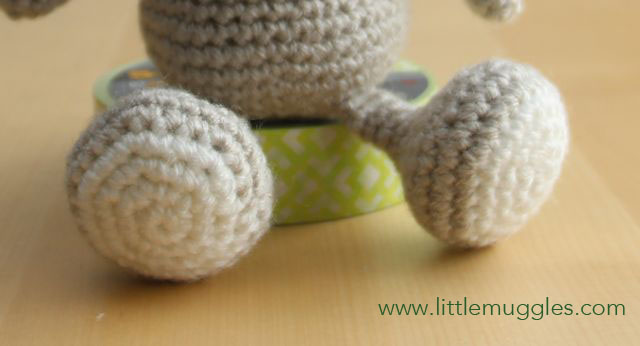
Rnd 1: Start 6sc into magic ring [6]
Rnd 2: inc 6 times [12]
Rnd 3: (sc, inc in next st) repeat 6 times [18]
Rnd 4: (sc in next 2 st, inc in next st) repeat 6 times [24]
change to gray yarn
Rnd 5: (sc in next 3 st, inc in next st) repeat 6 times [30]
Rnd 6: sc in all 30 st [30]
Rnd 7: (sc in next 3 st, dec) repeat 6 times [24]
Rnd 8: (2sc, dec) repeat 6 times [18]
Rnd 9: 2sc, (dec, sc) repeat instructions within parentheses 3 times, 7sc [15]
Rnd 10: sc, (dec, sc) repeat 3 times, 5sc [12]
Stuff the foot before continuing…
Rnd 11: (sc, dec) repeat 4 times,[8]
Rnd 12: 2sc, dec, 4sc [7]
Rnd 13-14: sc in all 7 st [7]
Fasten off and leave a tail
Sew the opening shut and attach symmetrically to the bottom of the body.
TAIL
use gray yarn
Rnd 1: start 4sc into magic ring
Rnd 2-21: sc in all 4 st [4]
There is no need (and no room!) to stuff the tail. Center the tail at the bottom of the body on the backside. Your mouse should be able to sit in a stable position once the tail is attached. Make sure the positioning of the tail does not interfere with its balance.
ASSEMBLY
- Attach the ears symmetrically to the top of the head.
- Sew the snout in place. You will need to stuff the snout with fiber fill before you complete the attachment. The pink nose should be slightly upturned if positioned correctly.
- Attach the backings of the safety eyes
- Sew the head to the body. This should be seamless as there are the same number of stitches on both openings to make the attachment as easy as possible.
- Attach the arms
- Attach the legs
- Attach the tail
- Tie a ribbon around the neck (optional)
Congratulations!! You are finished with your Little Muggles mouse!!
Please contact me if you have any questions regarding the instructions. I hope that you’ve enjoyed the process and of course, please feel free to share your photos! Email me at littlemuggles@yahoo.com or you can post them on my Facebook page for all to admire!
COPYRIGHT 2014 – LittleMuggles
This pattern is for personal use only. Please do not sell, distribute, or rewrite this pattern in any way. Mass production/factory production of dolls made from this pattern is not allowed. Please do not claim my patterns or amigurumi designs as your own. Please do not sell your finished dolls made from this pattern without my written consent.
Hi, I have tried to contact you through facebook but the message is coming up as unread. I currently have a yarn stall in a market and I also sell handmade items. I have a facebook page Handmade by Philippa and would like your permission to sell the items I make from your patterns. I am not blessed with the ability to create items from my imagination and always make sure people who purchase from me know who their creator is. I am currently in the process of securing a property so that I can open a wool shop in my village which is big enough for me to run workshops too. I also hope to be able to spread the word and get people buying from etsy as it has never failed me when I am looking for a certain pattern. Thank you for being so good at creating these wonderful things and I look forward to hearing from you soon. Regards Philippa.
Hi Philippa! I’m sorry you haven’t been able to reach me! I haven’t gotten any message through FB. IF you’d like, please contact me at littlemuggles@yahoo.com! I’d be happy to answer any questions you have!
Thank you!
I love your patterns, I am working on the whole collection. I just finished Sheldon and Timmy, now I am working on Sakura. I can not wait to make a few Buttons… thank you for being so creative.
Precioso!! Felicitaciones y muchas gracias por el regalo. Excelente explicación.
Espero algún día poder crear mis propios patrones. Mientas tanto me deleito con los suyos.
Saludos desde Buenos Aires.
Gaby ♡
THANK YOU
love your critter’s, thanks!
Thanks , i really like de little owl , kan’t wait to do this one.
I thank you in advance for this pattern. My dad had a nickname……..and it was “Mousie”. Crazy I guess but everyone in our small town knew him by this name!! After he passed several years ago, my sister and I have been gifting little mice to one another in his memory. I can’t wait to crochet this little mousie and give it to someone who holds his memory as close as we do. I now have 5 grandchildren and want to preserve his memory to them. He was a wonderful man who served his country, loved his family and taught me so much. Thank you that this is a ‘free’ pattern…….Happy Easter:)
Thank you! Can’t wait to try it
This little mouse is just so darn cute! Thank you for the free pattern.
Love your patterns soooooo cute!! Thank you for sharing!!!!
Love your patterns!!!! Thank you for sharing!!:)))
From Spain:
THANK YO SOOOOO MUCH!!!!
I try tonight.
♡♡♡
A fabulous little mouse. Love it! Thanks so much for sharing.
Ta souris est très belle, merci pour le partage !
AWWW this is the CUTEST mouse I’ve ever seen, thank you for sharing, I can’t wait to make it. I LOVE all of your Amigurumis, they’re SO ADORABLE!!
Thank you so much! Look forward to making this little mouse! =^..^=
A precious mouse, thank you so much for sharing it! I’m going to make him real soon.
Thank you
I love this mouse…just made one and am using the basic head and body to create other little animals…….thanks so much…..
Mil gracias ya lo he terminado….
I am a new hooker and am having trouble making the tail. It seems when there is only a few stitches in the round I keep missing. Any tips on getting this done right
Do you use a stitch marker? That’s a must for me to keep track of my rounds/stitches. Other than using that, the only advice I have is to make sure you’ve got good lighting and to make your stitches carefully. Don’t make the stitches too tight either…that could make it harder to tell which stitch is where. Good luck!
May I have permission to sell completed items of little muggles?
Please email me at littlemuggles@yahoo.com
Thank you!
So nice!! , thank you
Hartelijk dank! Zo leuk ! Thank you!
What did you use to sew it together? I am new to arigurumi and crochet in general but wanted to make this for my daughter. Don’t judge me! Lol
Hi there! No judging here! 🙂 I usually sew using the yarn tails that I leave behind when I’m done making a body part. I use a yarn/tapestry needle and it works out nicely. Good luck!
How fabulously adorable! I was looking for a cute mouse pattern and my heart settled for yours. Thank you for the generous share. This little fellow will travel with us around the world! Many blessings.
Gracias por compartir el patrón con nosotras. Eres muy amable, recibe un abrazo. Isabel
thanks so much for sharing this lovely pattern! best regards from Holland
Very cute! Thank you.
Merci pour le partage
Elle est adorable 🙂
Hola, gracias por los patrones gratis, muy generosa, el ratoncito precioso!!! Puedo hacerlo para vender??? Estoy comenzando un emprendimiento con muñecos tejidos, soy una abuela de 63 años y 16 nietecitos, y necesito unos besitos por eso hago visitas para vender. Gracias y esperó respuesta. Vivi.
Please email me at littlemuggles.com and I am happy to discuss this with you! Thank you!
It looks so sweet
Absolutely love this pattern but I wondered if you could maybe help me out? Every time I crochet the head, it has a little point on top 🙁 I’ve tried it a few times now & I don’t know where I’m going wrong, I’m sure I’m reading the pattern properly & I have the right amount of stitches but I just can’t lose the “point” xx
Hi Cherise! How does it look after you stuff it? If you are following the pattern properly, everything should be ok. The shape of the head before and after stuffing are very different! If it still isn’t working, please send me a photo and I’ll see what I can do to help you out! You can email it to littlemuggles@yahoo.com!
Hi again 🙂
Thank you for getting back to me, everything looks great now, you were right, he just needed stuffing!
Thanks again for such a lovely pattern! xx
Thank you so much. I will a few.
I love all of your patterns!! Thank you so much for freely sharing your little mouse pattern. It’s positively adorable!!
You are very welcome!!
Love the little ones. Can’t wait to make. Thank you so much for sharing. I have to have pattern to follow. I’ve never had the talent of being able to make something just by looking at finished product. Again, thank you so much for sharing.
You are very very welcome!
TU so much for adorable patterns and your talent. Planning on making an assortment and giving them away to children in Martin Hospital in Stuart,Fl. at Christmas. I am a senior volunteer at hospital.
You’re very welcome! I’m so happy to learn what happens to the dolls you make from my patterns! Thank YOU for your efforts and for putting smiles on little one’s faces! What a truly kind and special person you are to do what you do! 🙂
J’aimerais bien trouver ce modèle en français pouvez-vous me renseigner d’avance merci pour votre réponse
Hello! I’m sorry, there are no french versions of my patterns available! My shops only offer English patterns. Thank you for your interest!
This is so cute. Love it in the yellow the most. Going to make one for me. Thanks for sharing so everyone can have our own Buttons.
Estoy comenzando a realizar amugurumi, me encanta voy a tratar de hacer este precioso ratón, es parte de mi terapia ya que padezco de fibromialgia y debo hacer algo para poder reforzar mi memoria y alejarlo el dolor de mi. Gracias
Merci beaucoup pour ce partage. Joyeuses fetes de fin d annee
que preciosura!!!
I to am awestruck by the baby mouse .I have crocheted for over 50 years but never did the animals.
My older sis did free hand just pick up a bit of yarn and a hook out came a bear or monkey .but I am not so creative.but love this one I almost made it in 1day but don’t do much else at my age. Thank you
Vielen Dank für das Muster der süssen Maus. Werde es gelegentlich msl ausprobieren.
GRACIAS POR EL RATONSITO, STA HERMOSO
Congratulations! I love your patterns! Thank’s!
so cute,thanks.
so cute,thanks.I gave you my email address,what do I do now.
HI there! My free patterns can be found in the “free patterns” tab on the website. No need to give me your email address! Have fun with them!
So stinking CUTE!!! I’m definitely not gifted with amigurumi but may HAVE to make this one!
I love your mouse. I crocheted the grey one and it turned out beautiful, however, with arthritis in both my hands, it was a little complicated at the some of the smaller rounds, but I got through it. Thank you for your pattern. I was having difficulty finding a mouse I liked until I saw yours.